Tri-D — Design. Do. Deliver.
Glossary of Terms
Software (ПО) |
Software, computer program. |
Tri-D |
Design. Do. Deliver. |
Client-side component |
A software component accessible via a browser, designed to provide users with an interface for interacting with the software's functionality. |
Browser |
Google Chrome, Yandex Browser, Microsoft Edge (formerly Internet Explorer), Opera, Mozilla Firefox. |
Course |
The basic element of educational content in Tri-D. Represents structured material on a specific knowledge object, including a set of slides (minimum one) with user progress tracking mechanisms and availability/assignment settings. |
Slide |
The minimal required element of a course. May include text, images, video, quiz questions, and other supported content formats in any sequence, at the author's discretion. Course authors in Tri-D can create and edit content within a course on a slide-by-slide basis. |
Course Workshop |
A set of tools for creating, editing, assigning, and managing courses in Tri-D. |
Organization |
A separate user interface for organization users (employees), where common access policy settings apply to courses within their organization and to courses from external organizations. The space, content, and employees of one organization are separated from other organizations in Tri-D. |
Purpose of This Document
This document is designed to help users develop basic skills for working with the Tri-D — Design. Do. Deliver. software.
The document describes the user workflow with the software:
- Opening the Tri-D application via a browser and authorizing in the application;
- Working with the software interface.
General Description of Software Functional Characteristics
Tri-D software is a learning and course creation tool that enables the following tasks:
- Creating educational courses manually or with the help of neural networks;
- Importing previously created courses in SCORM 1.2 format;
- Playing both created and imported courses;
- Collecting statistics on course completion and preparing visual analytics and reports for methodologists and learners;
- Managing system users: adding, editing, deleting, assigning roles, grouping into teams.
User Skill Level
Users should have basic skills in working with any browser — either on a mobile device or on a personal computer.
Software and Hardware Requirements
For proper software operation, the user's browser must support modern web standards (HTML5, CSS3, JavaScript).
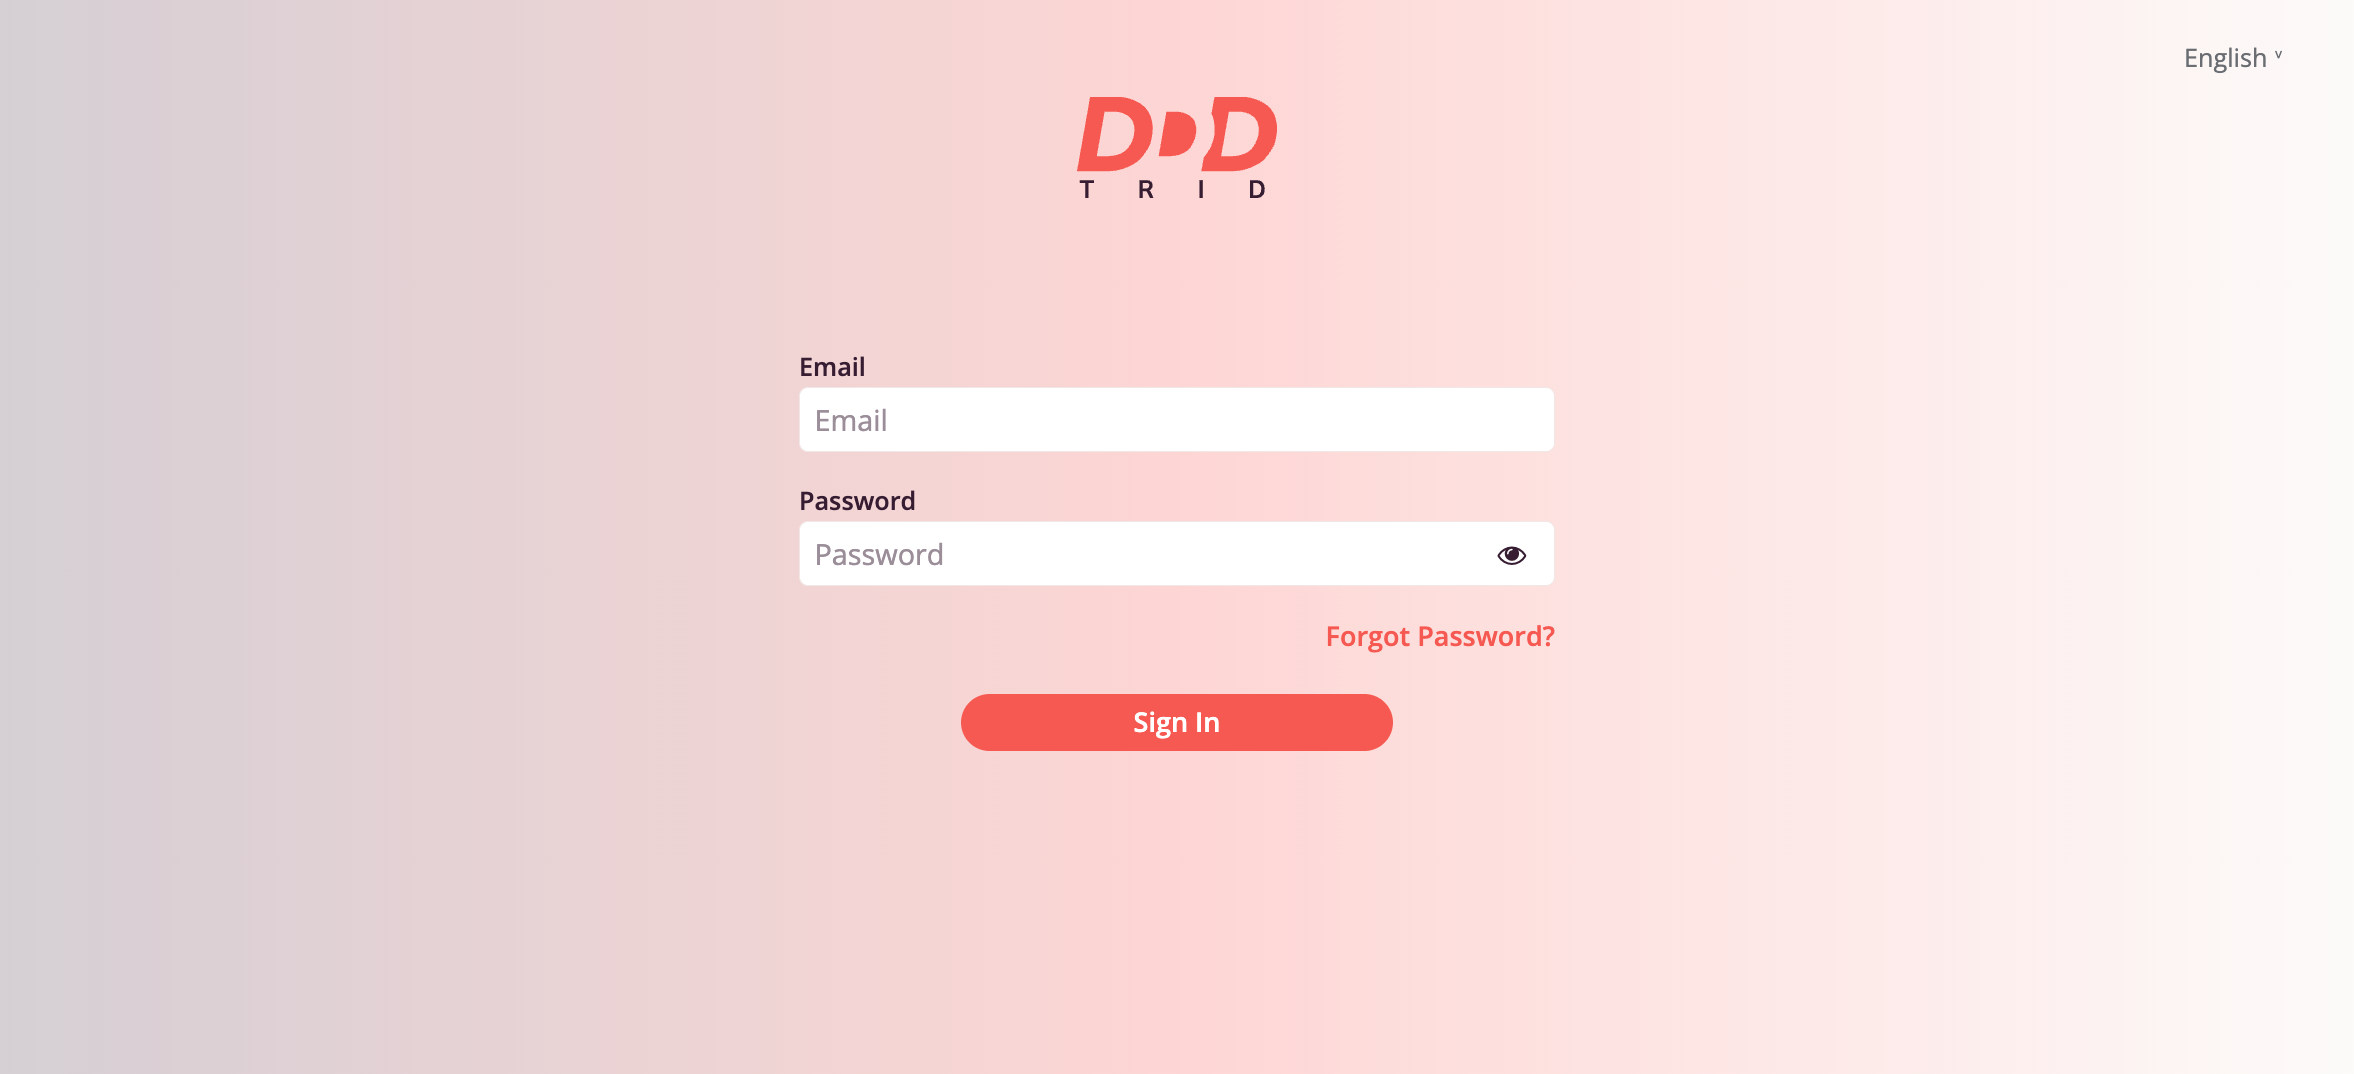
Instructions for Gaining Access to the Software
The software is distributed as an internet service; no special installation actions are required on the user's side. To use the software, launch a browser and open the page: https://tri-d.app/
Software Operating Instructions
Registration in the Tri-D System
To register in the Tri-D System, the user must receive a registration email from the Organization Administrator to their email address. The email is sent automatically when a new user is added to the system.
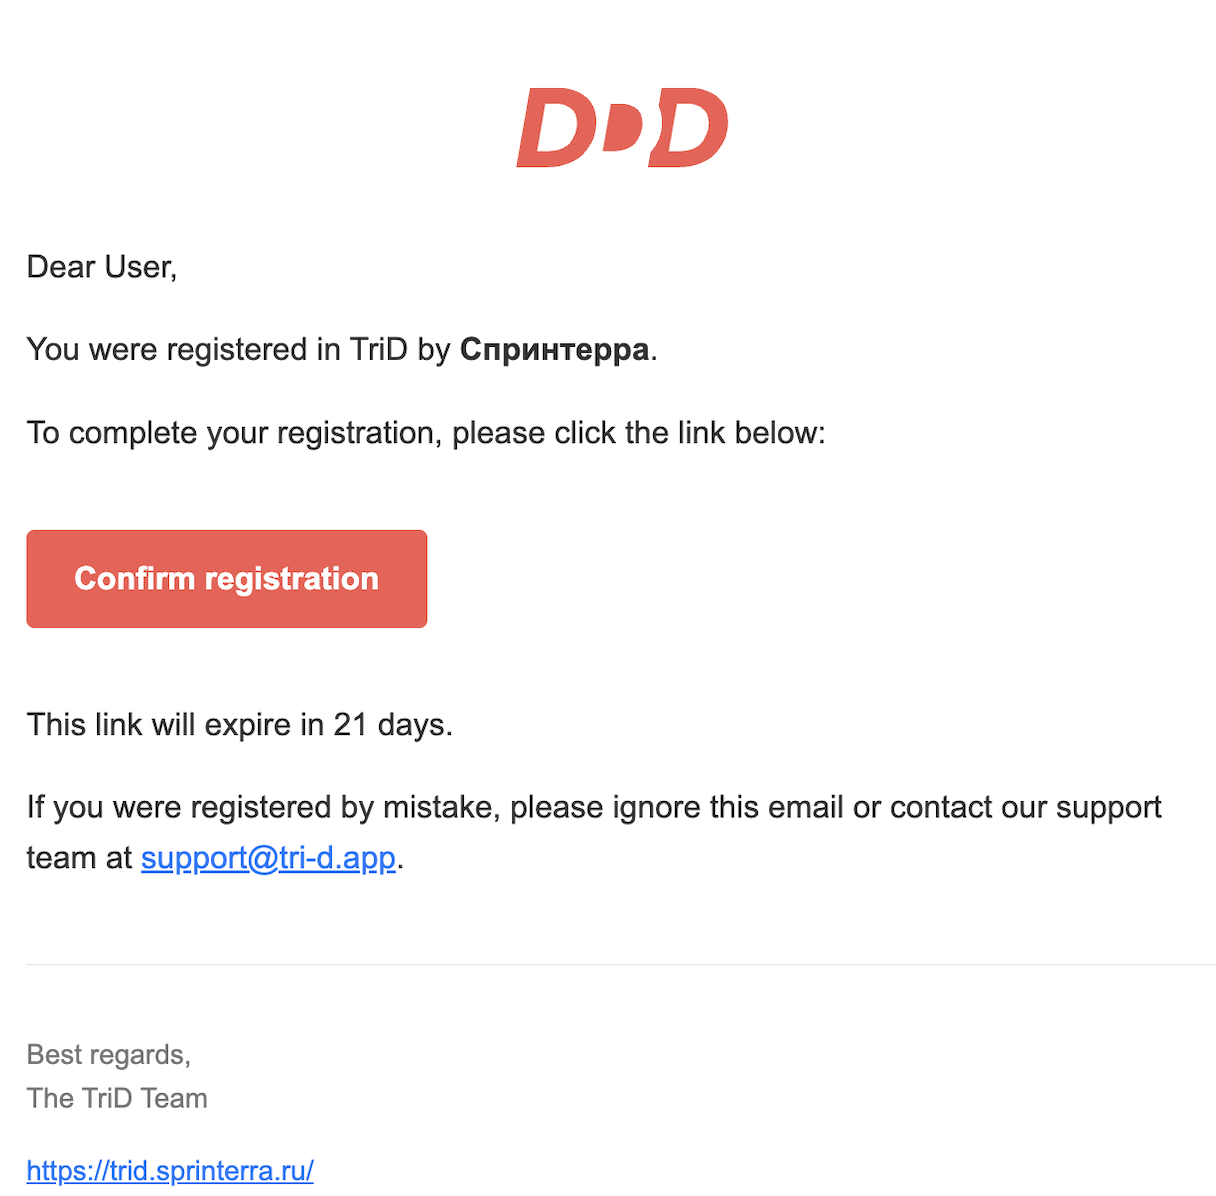
After confirming registration, the user will be prompted to set a password for system login.
User Roles in the Tri-D System
The available functionality in the Tri-D system depends on the user's role. Currently, there are 4 roles:
- Organization Administrator
- Manager
- Course Author
- Employee
Permissions for Predefined Roles
Organization Administrator
- Can create a new organization
- Can edit organization properties
- Can manage employees, groups, and roles within the organization
- Can create, publish, and unpublish their courses
- Has access to the Course Catalog and can take available courses
- Has access to their own learning results and results for employees, courses, and the organization
- Can edit, publish, and unpublish any course in the organization.
Manager
- Can manage employees, groups, and roles within the organization
- Can create, publish, and unpublish their courses
- Has access to the Course Catalog and can take available courses
- Has access to their own learning results and results for employees and courses
Course Author
- Can create, publish, and unpublish their courses
- Has access to the Course Catalog and can take available courses
- Has access to their own learning results and results for courses
Employee
- Has access to the Course Catalog and can take available courses
- Has access to their own learning results
*Further sections of the document describe system functionality and its availability depending on the role in more detail.*
Tri-D System User Interface
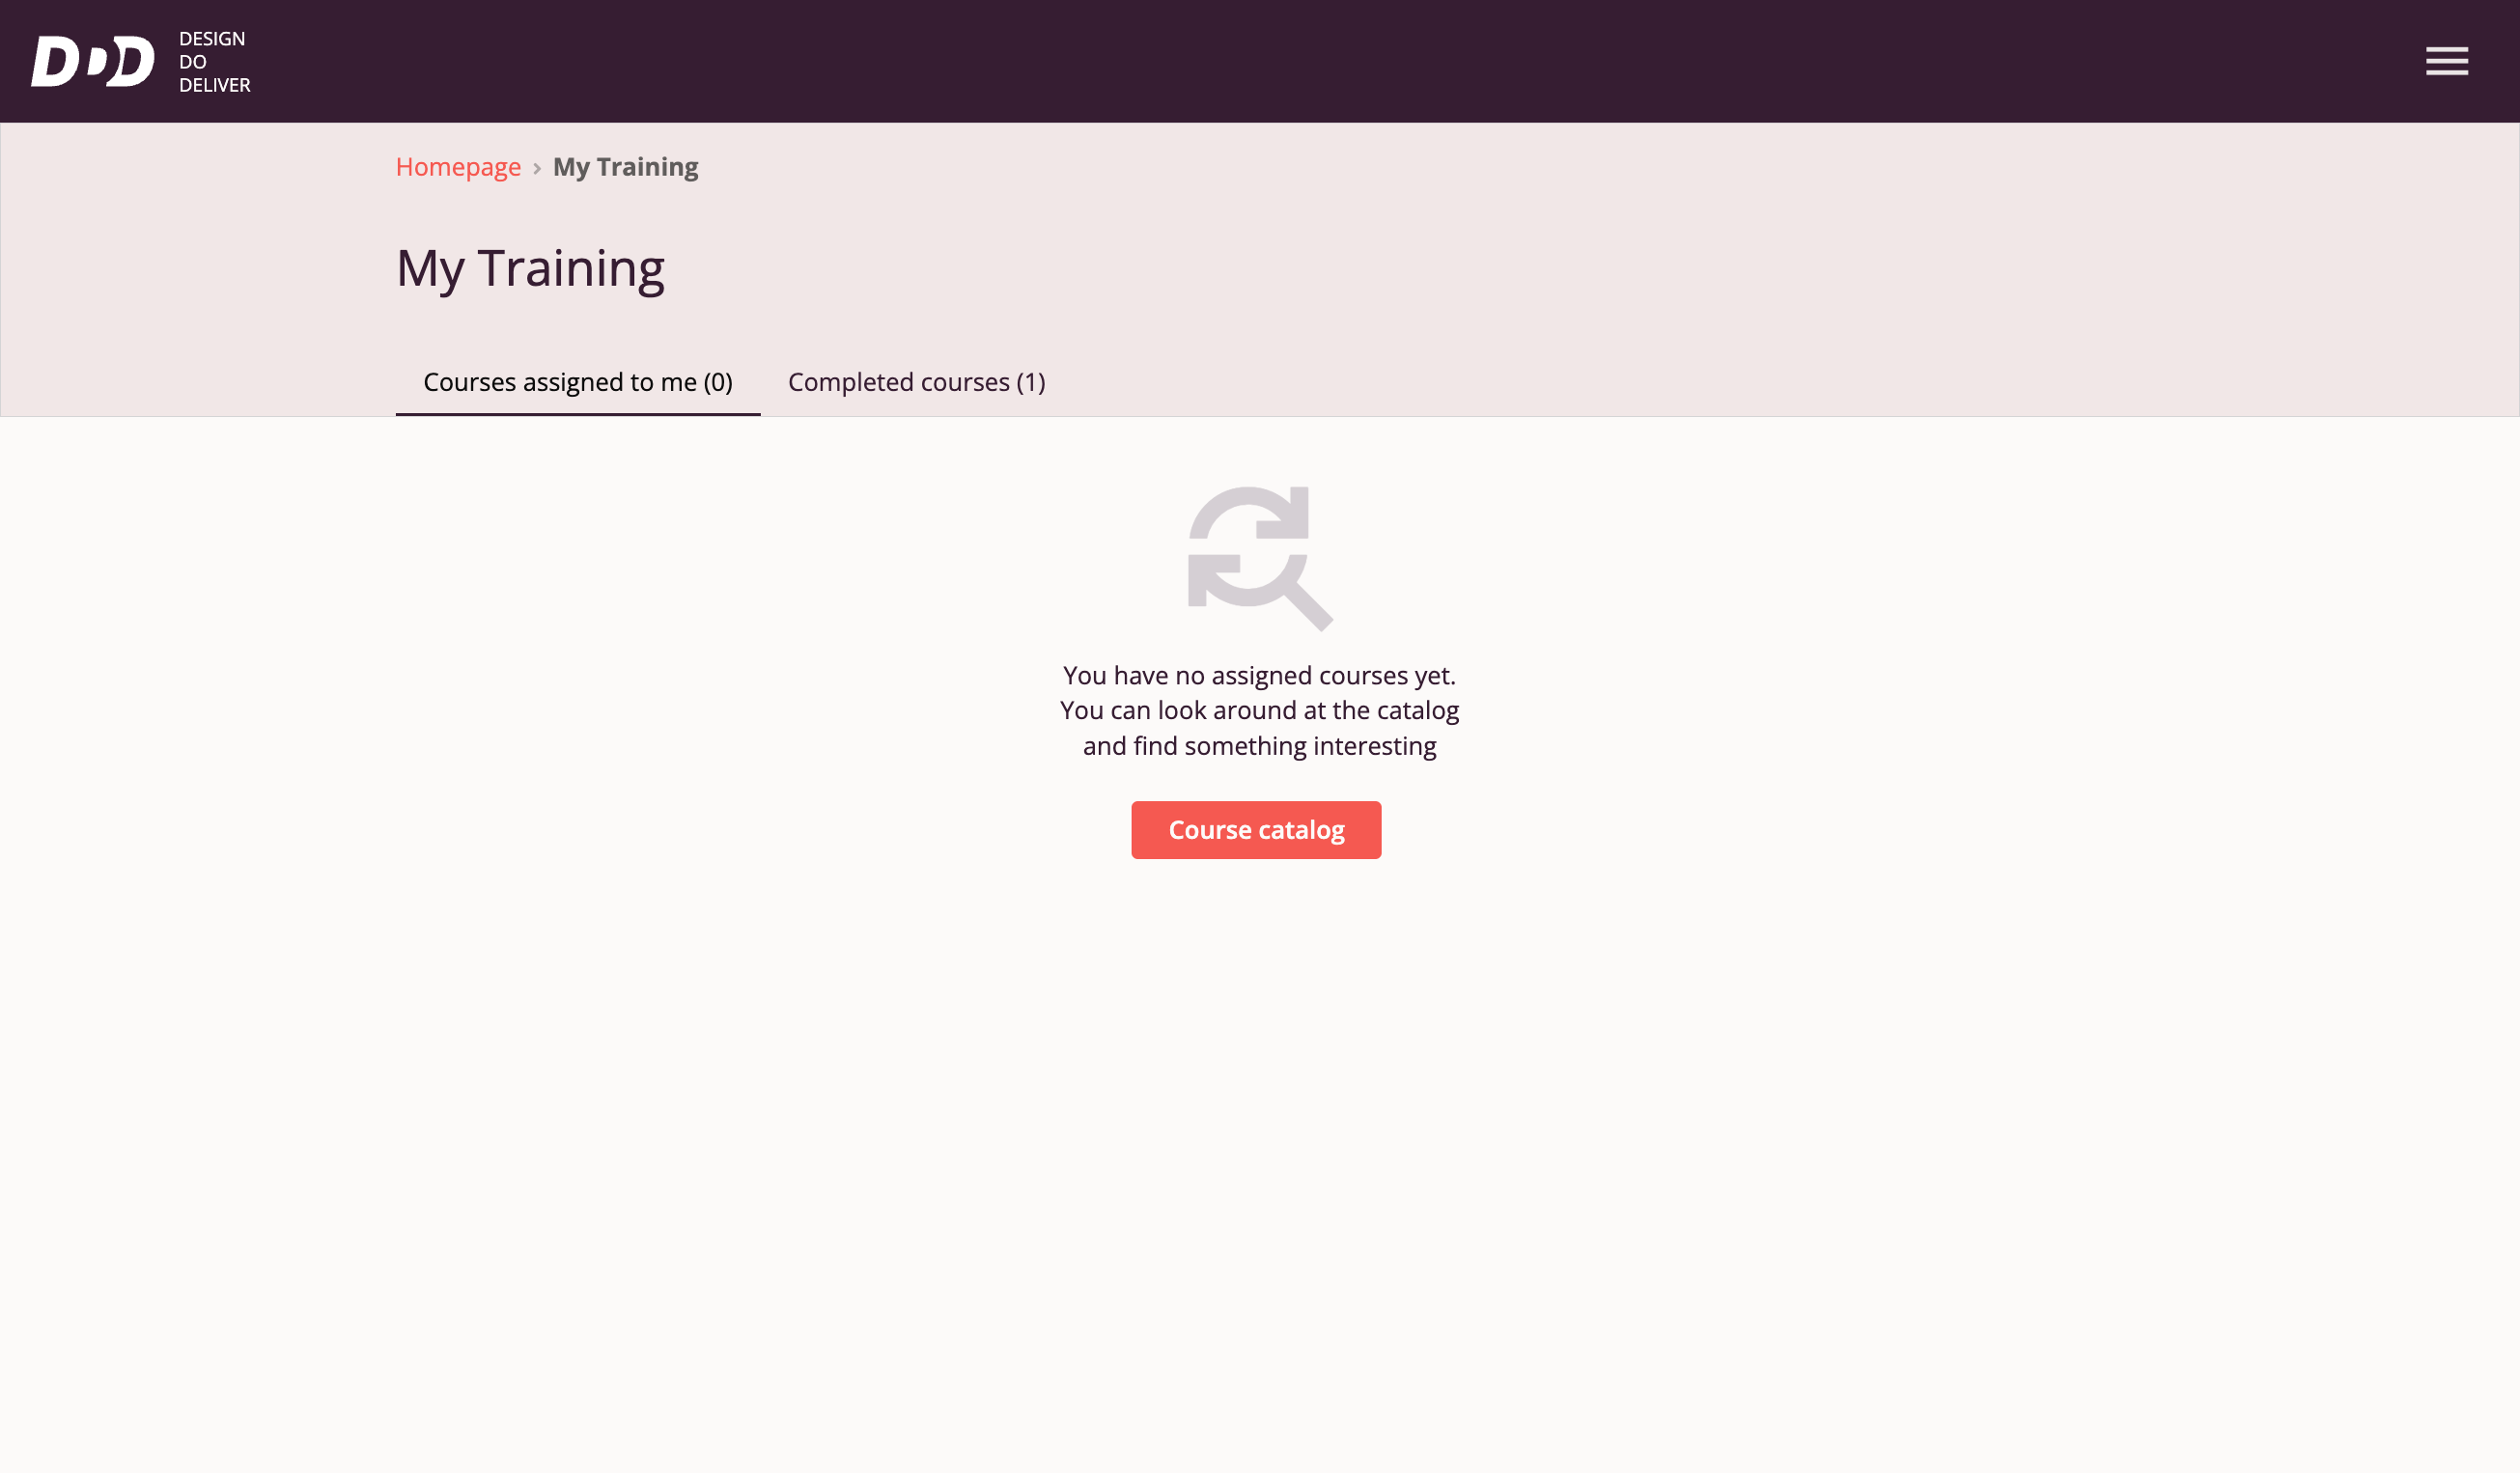
Tri-D System Home Page
Upon logging into the Tri-D system, the user is shown the home page by default, displaying courses assigned to them. This page is identical for all roles.
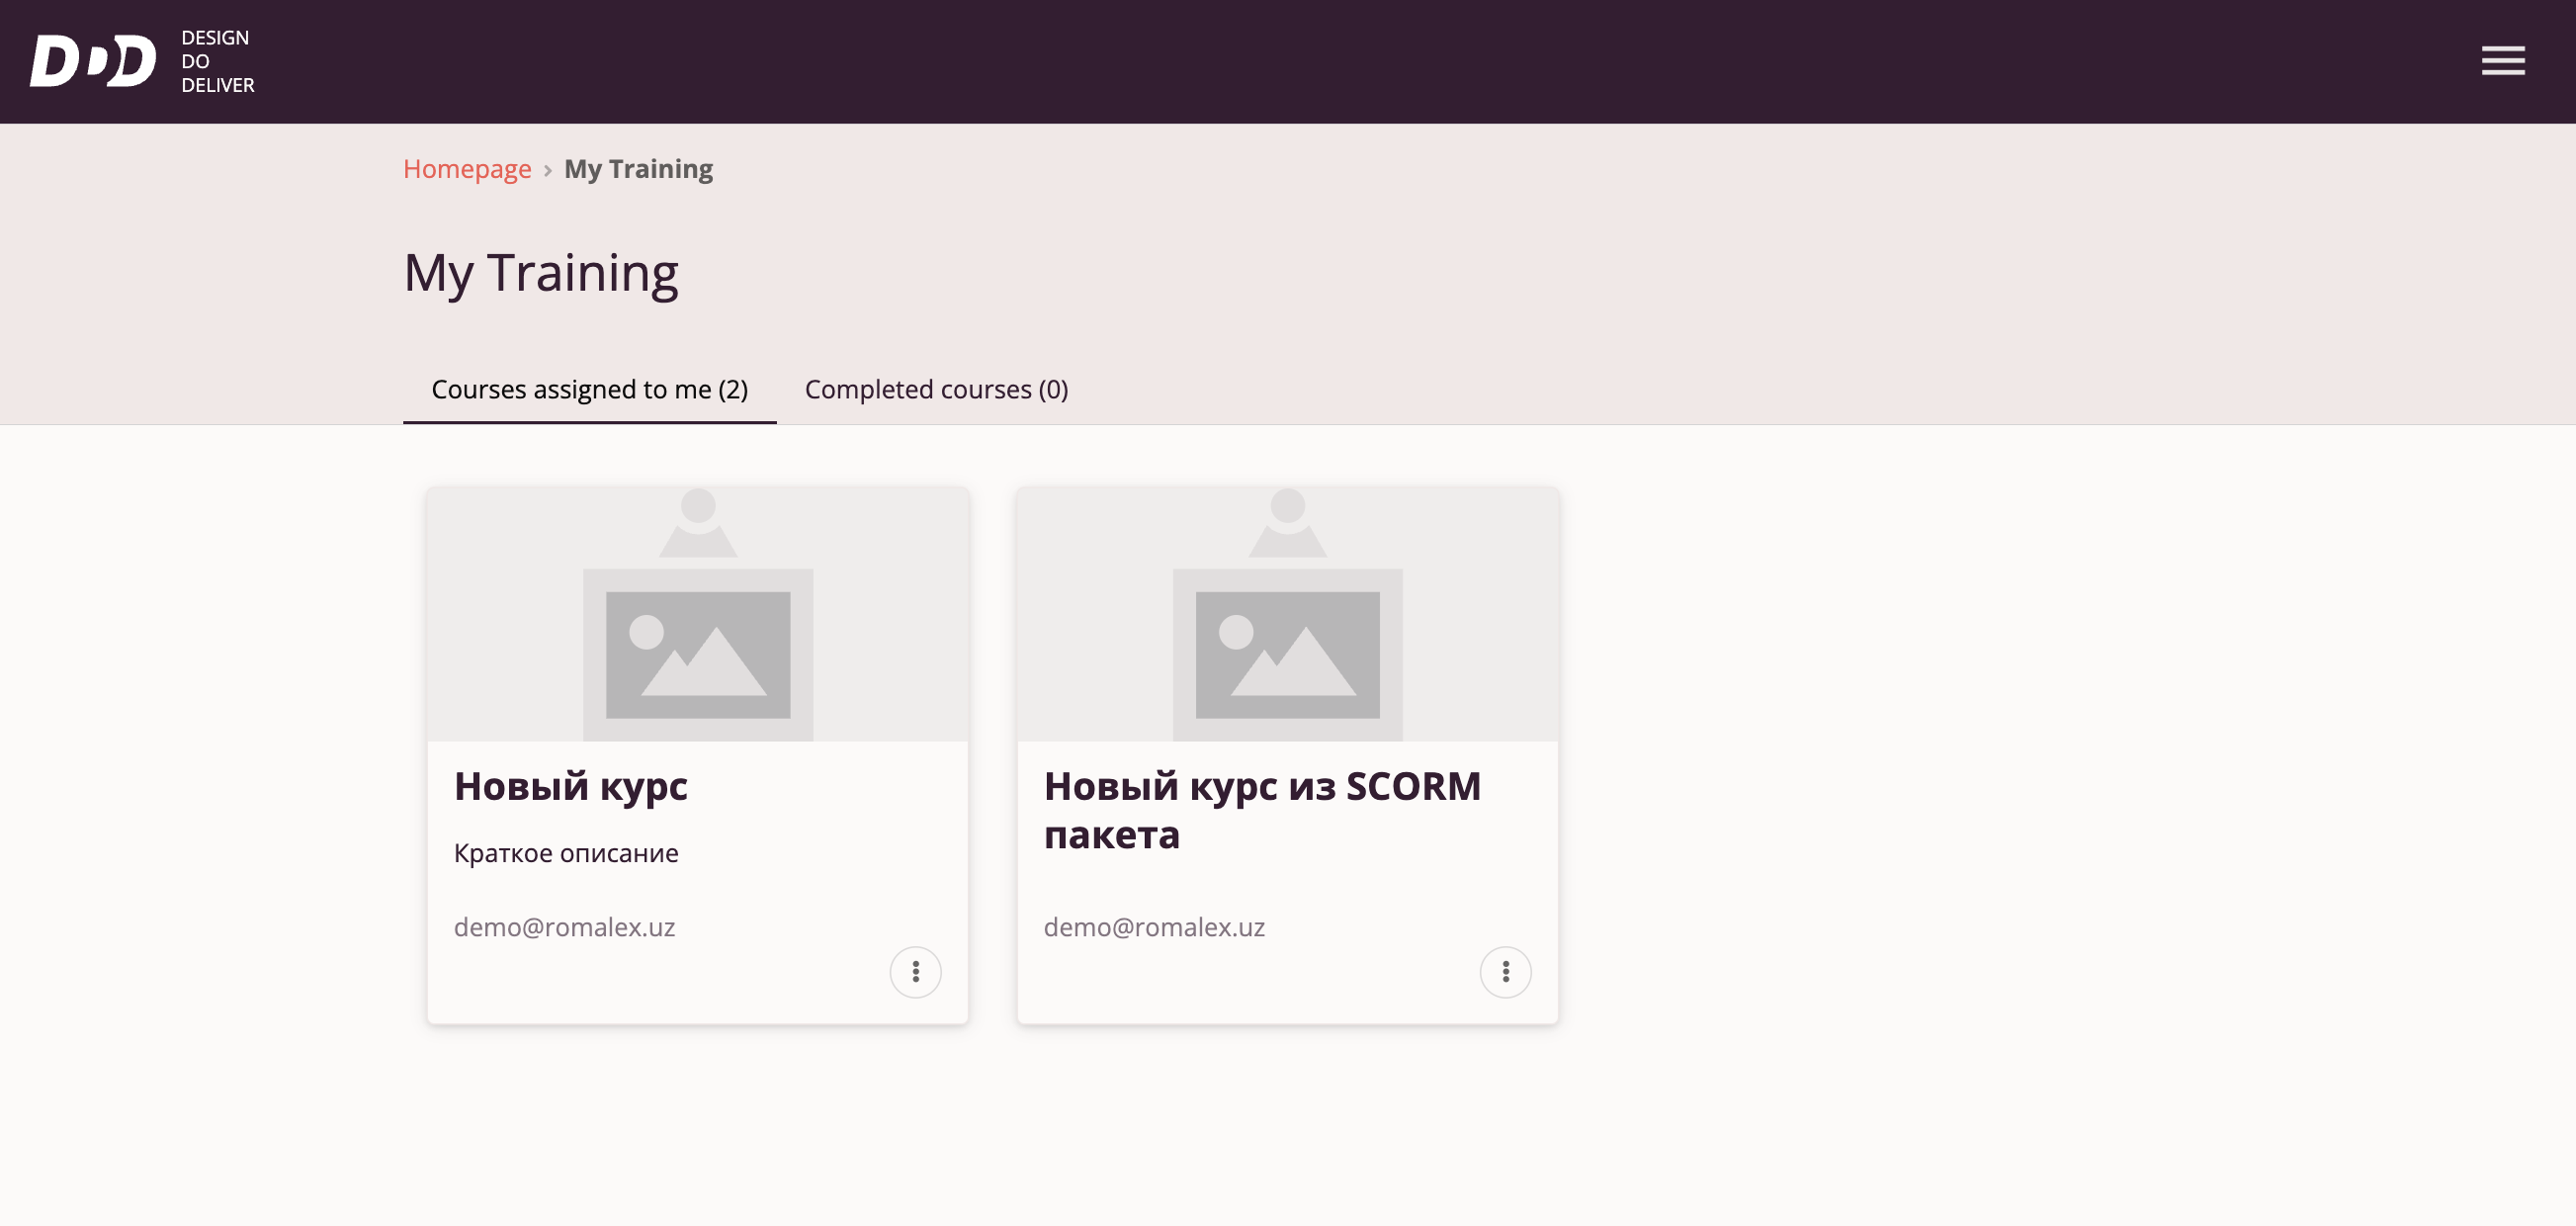
The user can start a desired course by clicking on it.
If no courses are assigned, the user is prompted to go to the Course Catalog to select a course of interest.
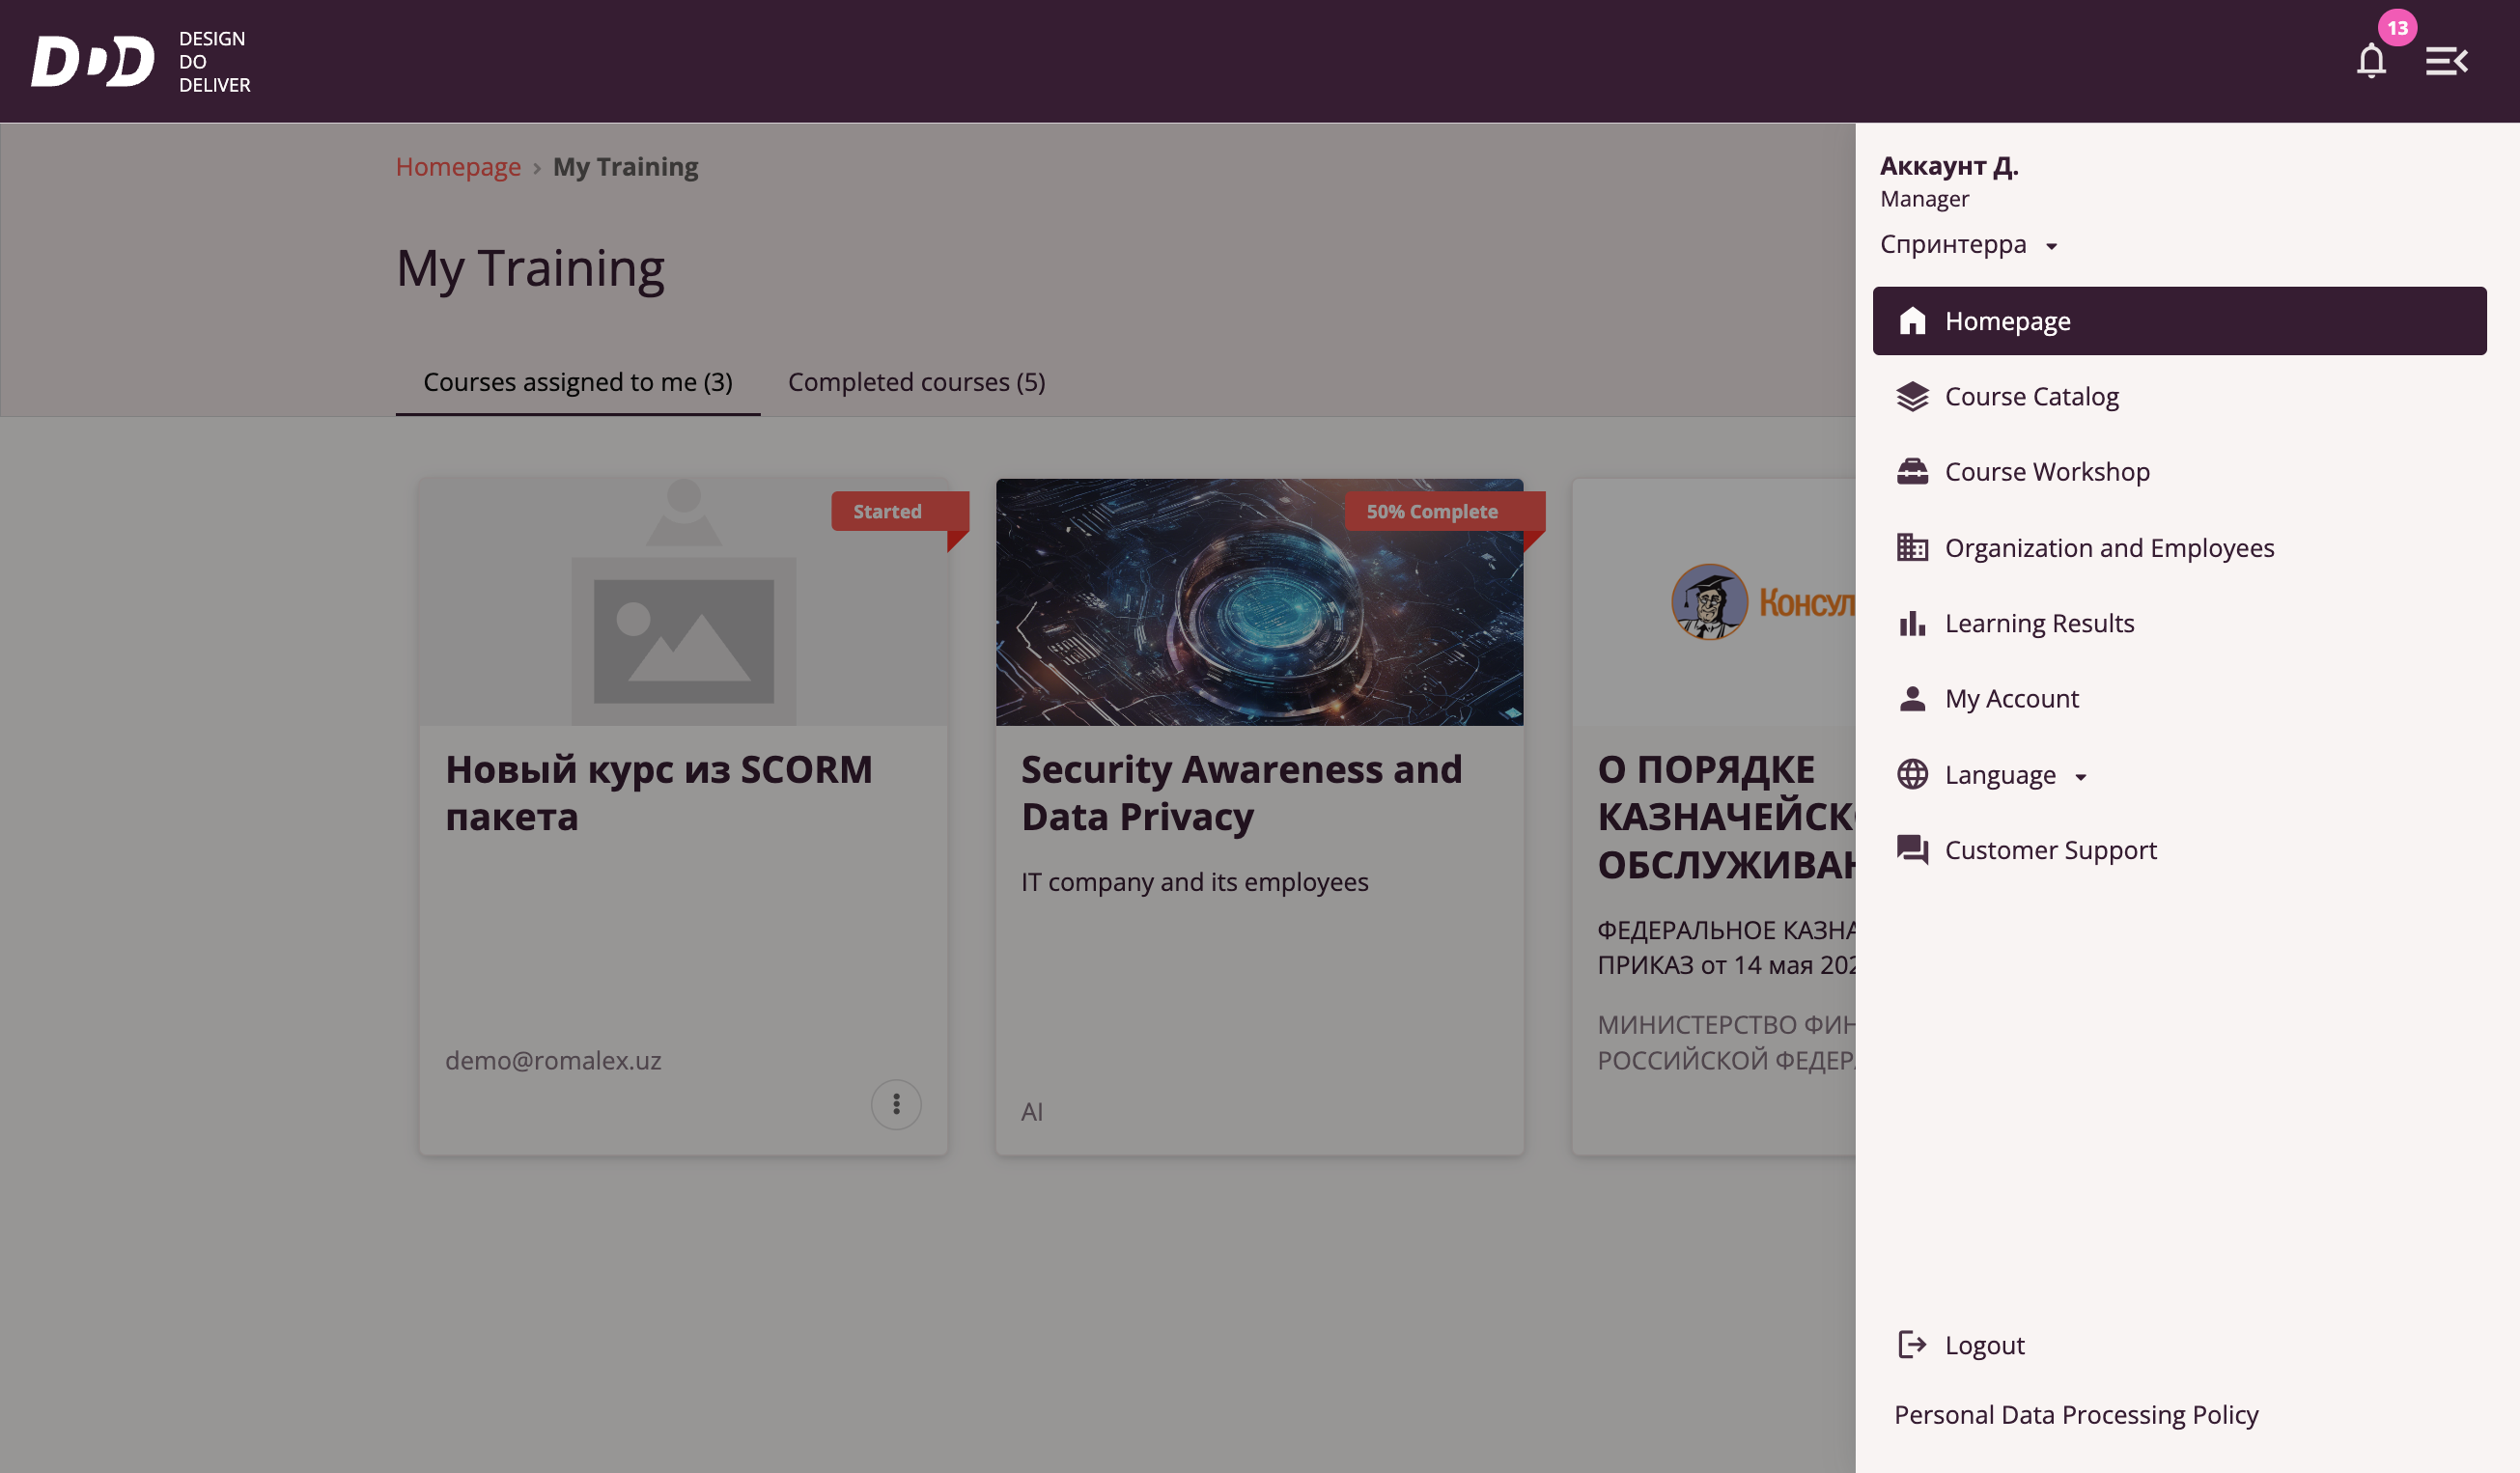
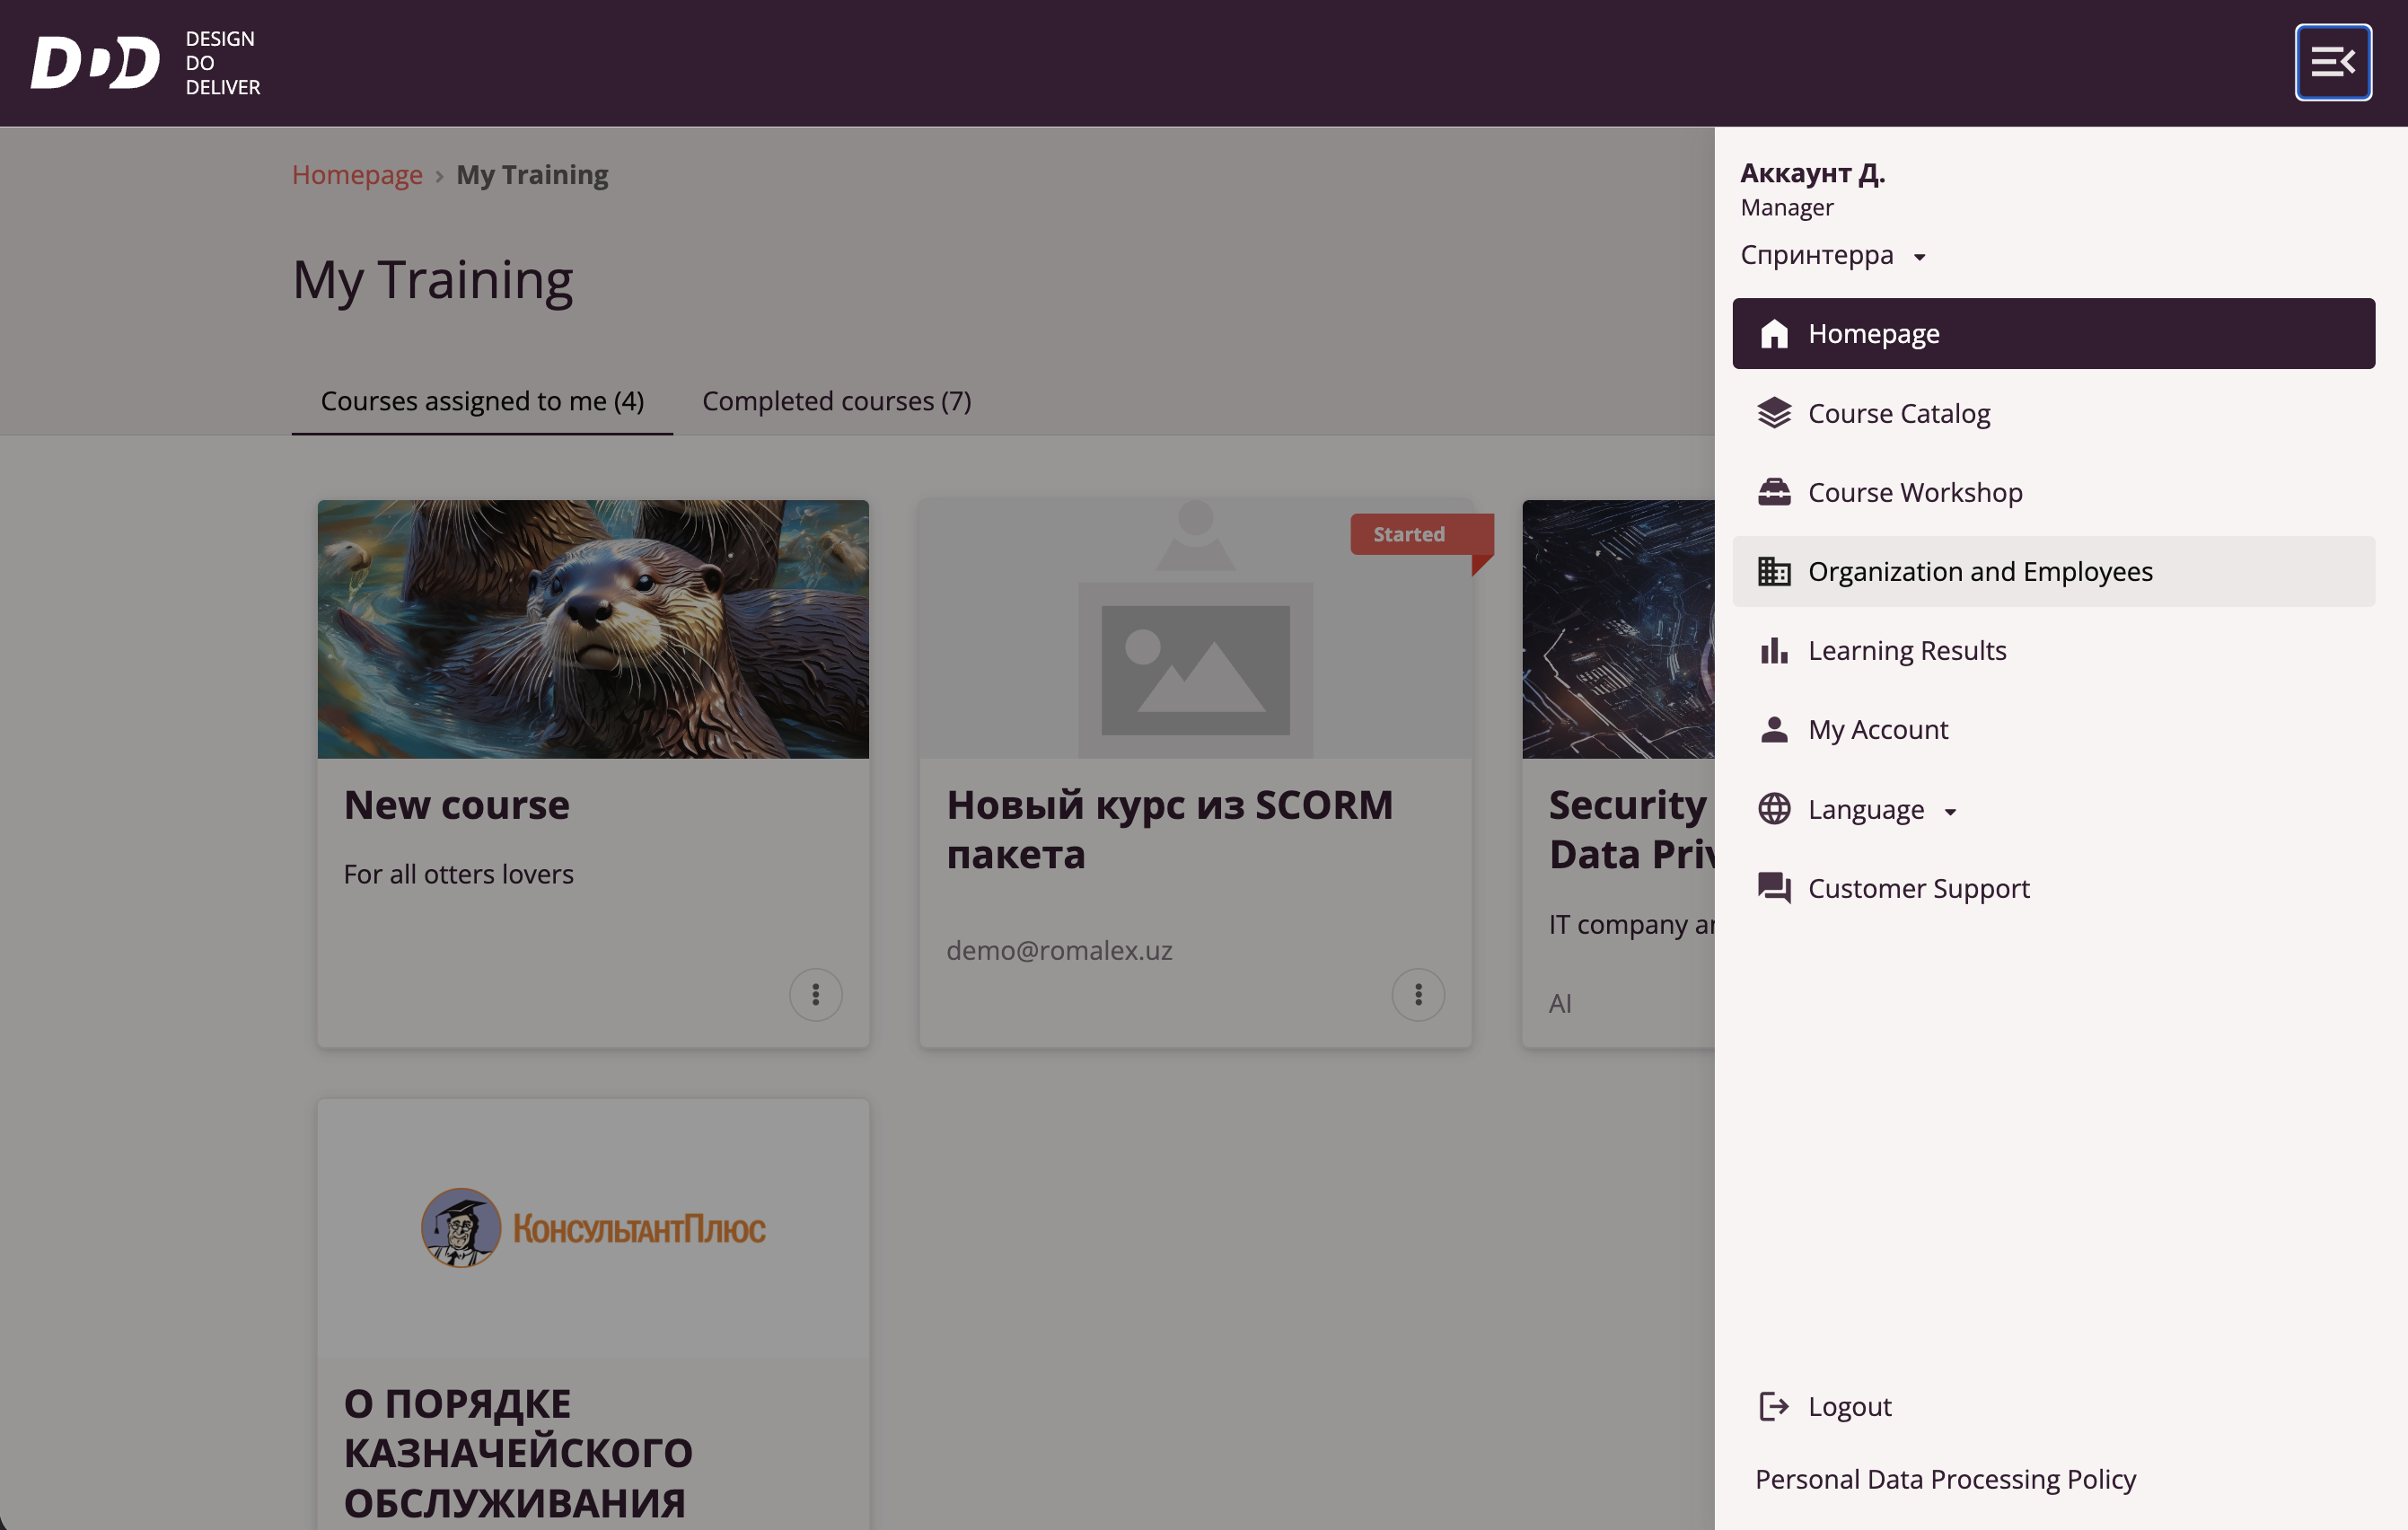
Tri-D System Main Menu
To access the Main Menu, the user must click the icon in the top right corner. This icon is available on all pages of the Tri-D system.
Available menu options depending on role:
- "Home" — Available to all roles. Returns to the Tri-D system home page from any other page.
- "Course Catalog" — Available to all roles. Redirects to the Course Catalog page where users can select a course of interest.
- "Course Workshop" — Available to Course Authors, Managers, and Organization Administrators. Allows users to access the Course Workshop interface to create or import courses.
- "Organization and Employees" — Available to Managers and Organization Administrators. Redirects to an interface for managing employees and organizations available in the Tri-D system.
- "Learning Results" — Available to all roles. Redirects to a page with collected learning statistics.
- "My Account" — Available to all roles. Redirects to a page with user account information.
- "Language" — Available to all roles. Allows switching the interface language. Currently available: Russian, English, and Uzbek.
- "User Support" — Available to all roles. Opens a form allowing users to describe an issue and submit it to Support Services.
- "Log Out" — Available to all roles. Allows the user to log out of the Tri-D system.
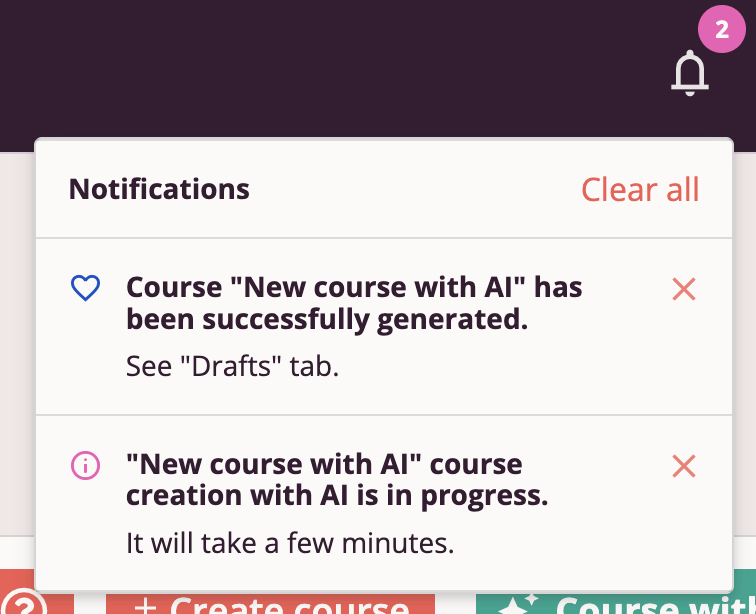
Tri-D System Notification Center
Users with roles Organization Administrator, Manager, and Course Author have access to the Notification Center, displayed in the top right corner.
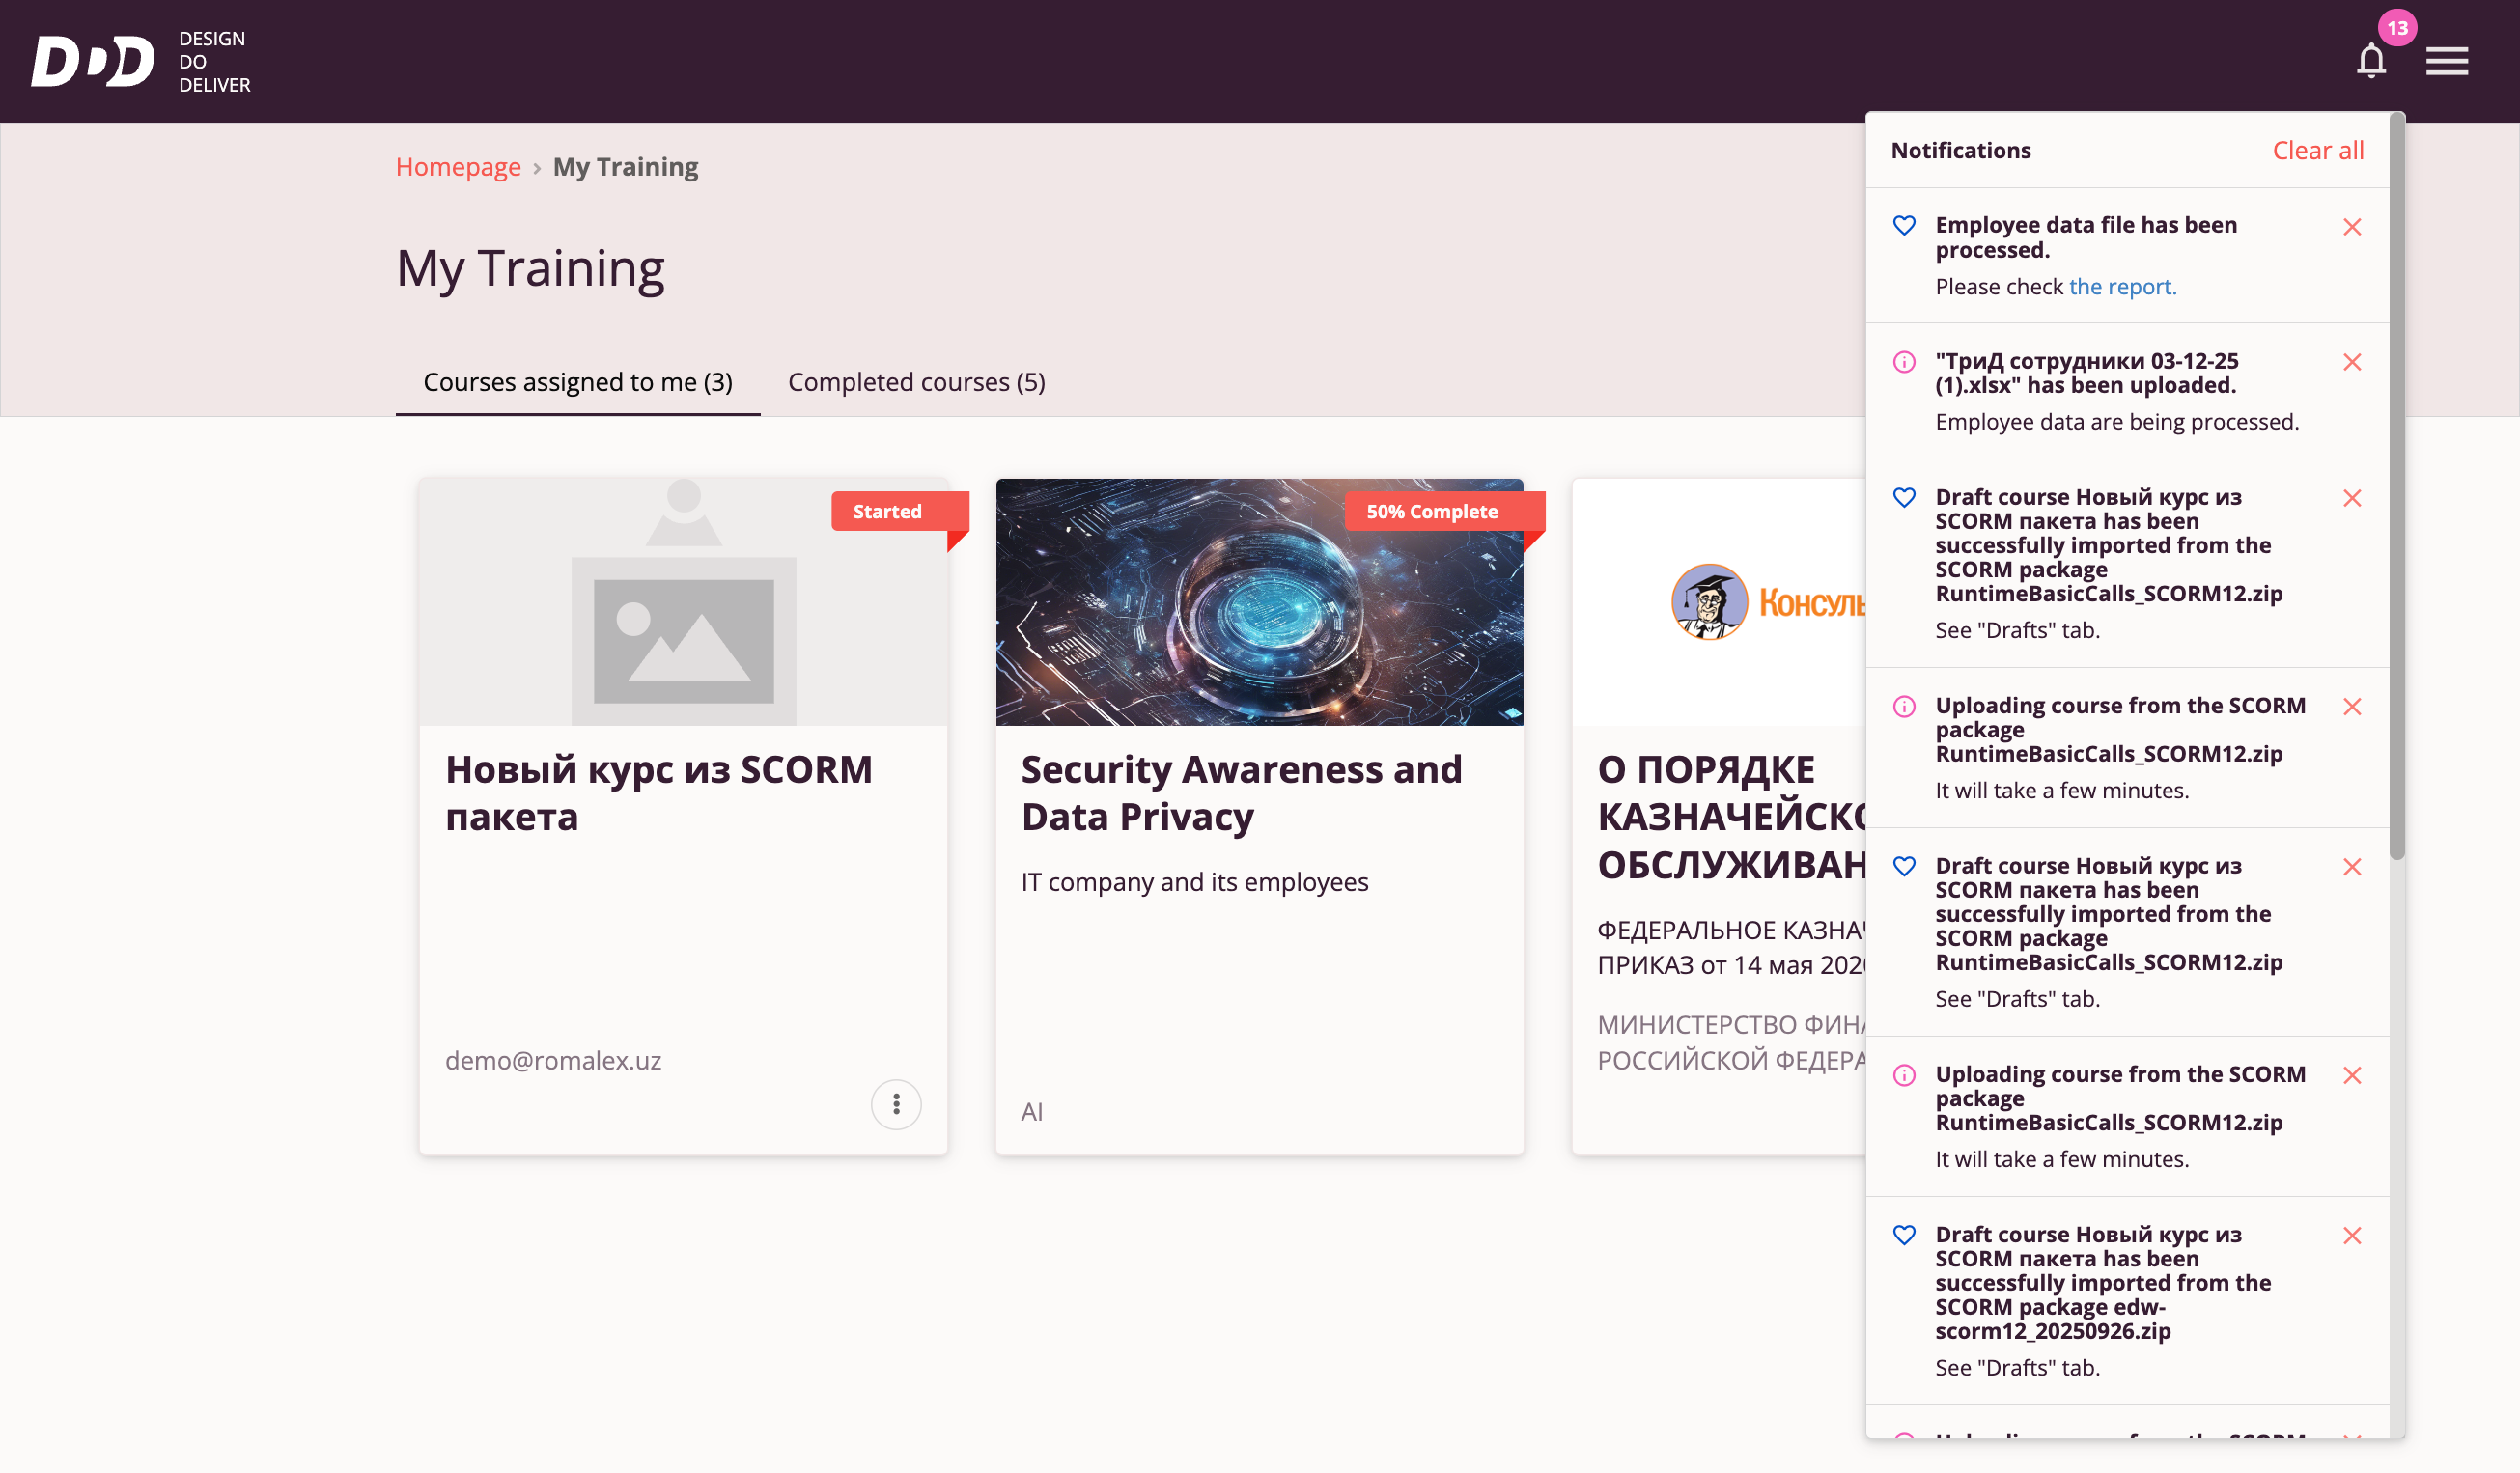
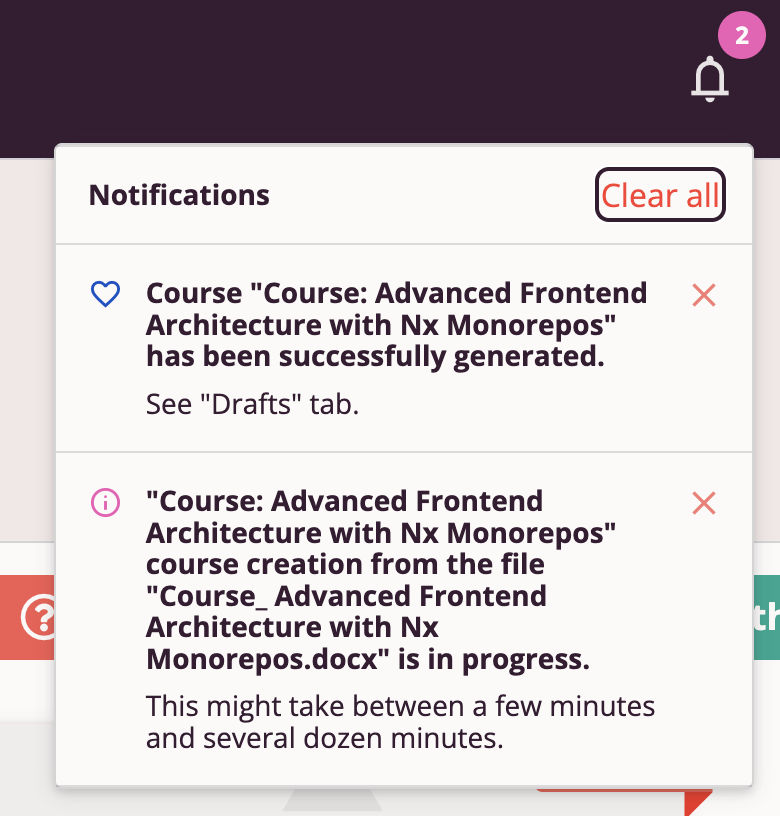
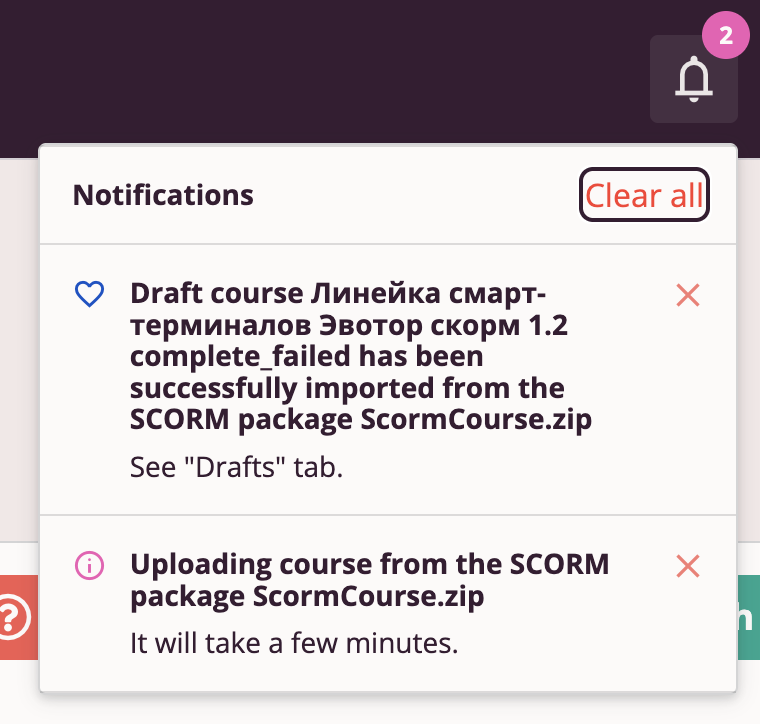
The Notification Center delivers various system messages to the user, e.g., about course publication, course import, employee list import, etc.
Notifications are displayed in reverse chronological order (newest at the top). Users can clear displayed notifications individually or all at once.
Course Catalog
Clicking "Course Catalog" in the Main Menu or on the Tri-D System Home Page (when no courses are assigned) takes the user to the Course Catalog page.

The Course Catalog displays all courses currently available to the user. For each course, the title, brief description, and author are shown.
Users can also search for a course using the search bar.
To play a course, the user clicks on the desired course.
For publicly available courses, the Course Catalog offers a context menu with a "Share" option.
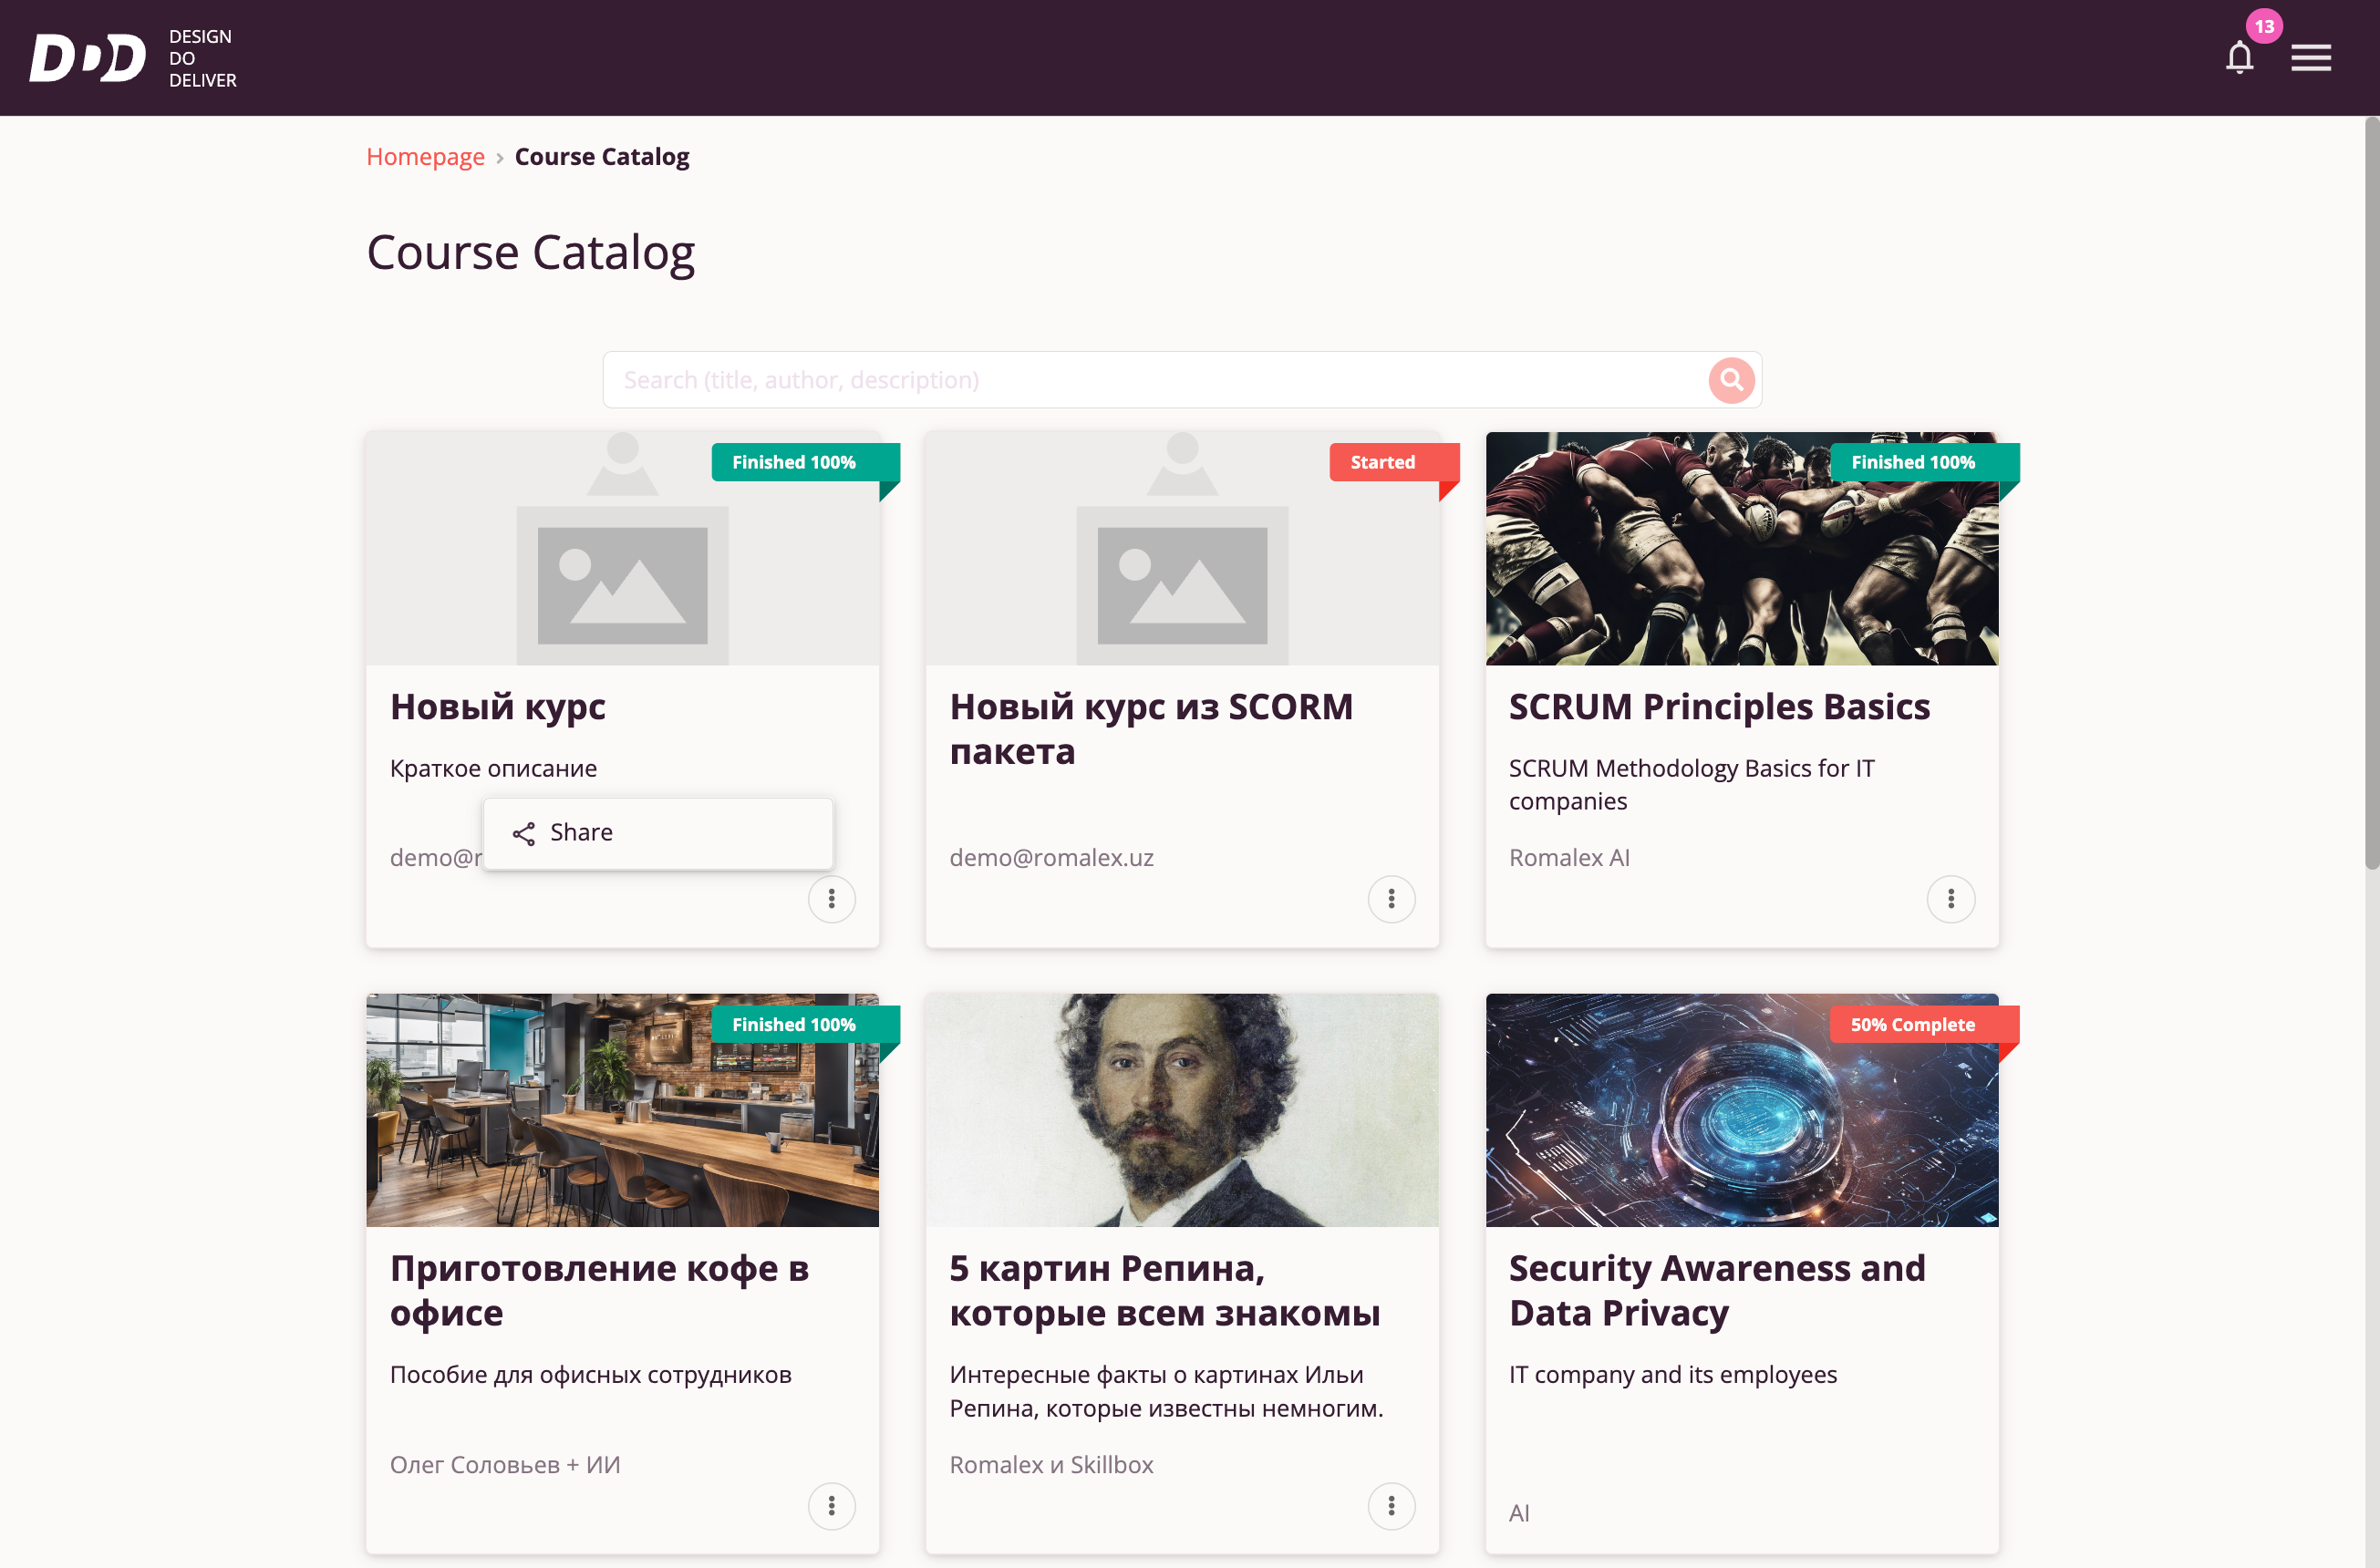
Share a Course
Selecting "Share" allows the user to share a link to the selected course via popular social networks and messengers. Users can also obtain a direct link to the course or an embed code.

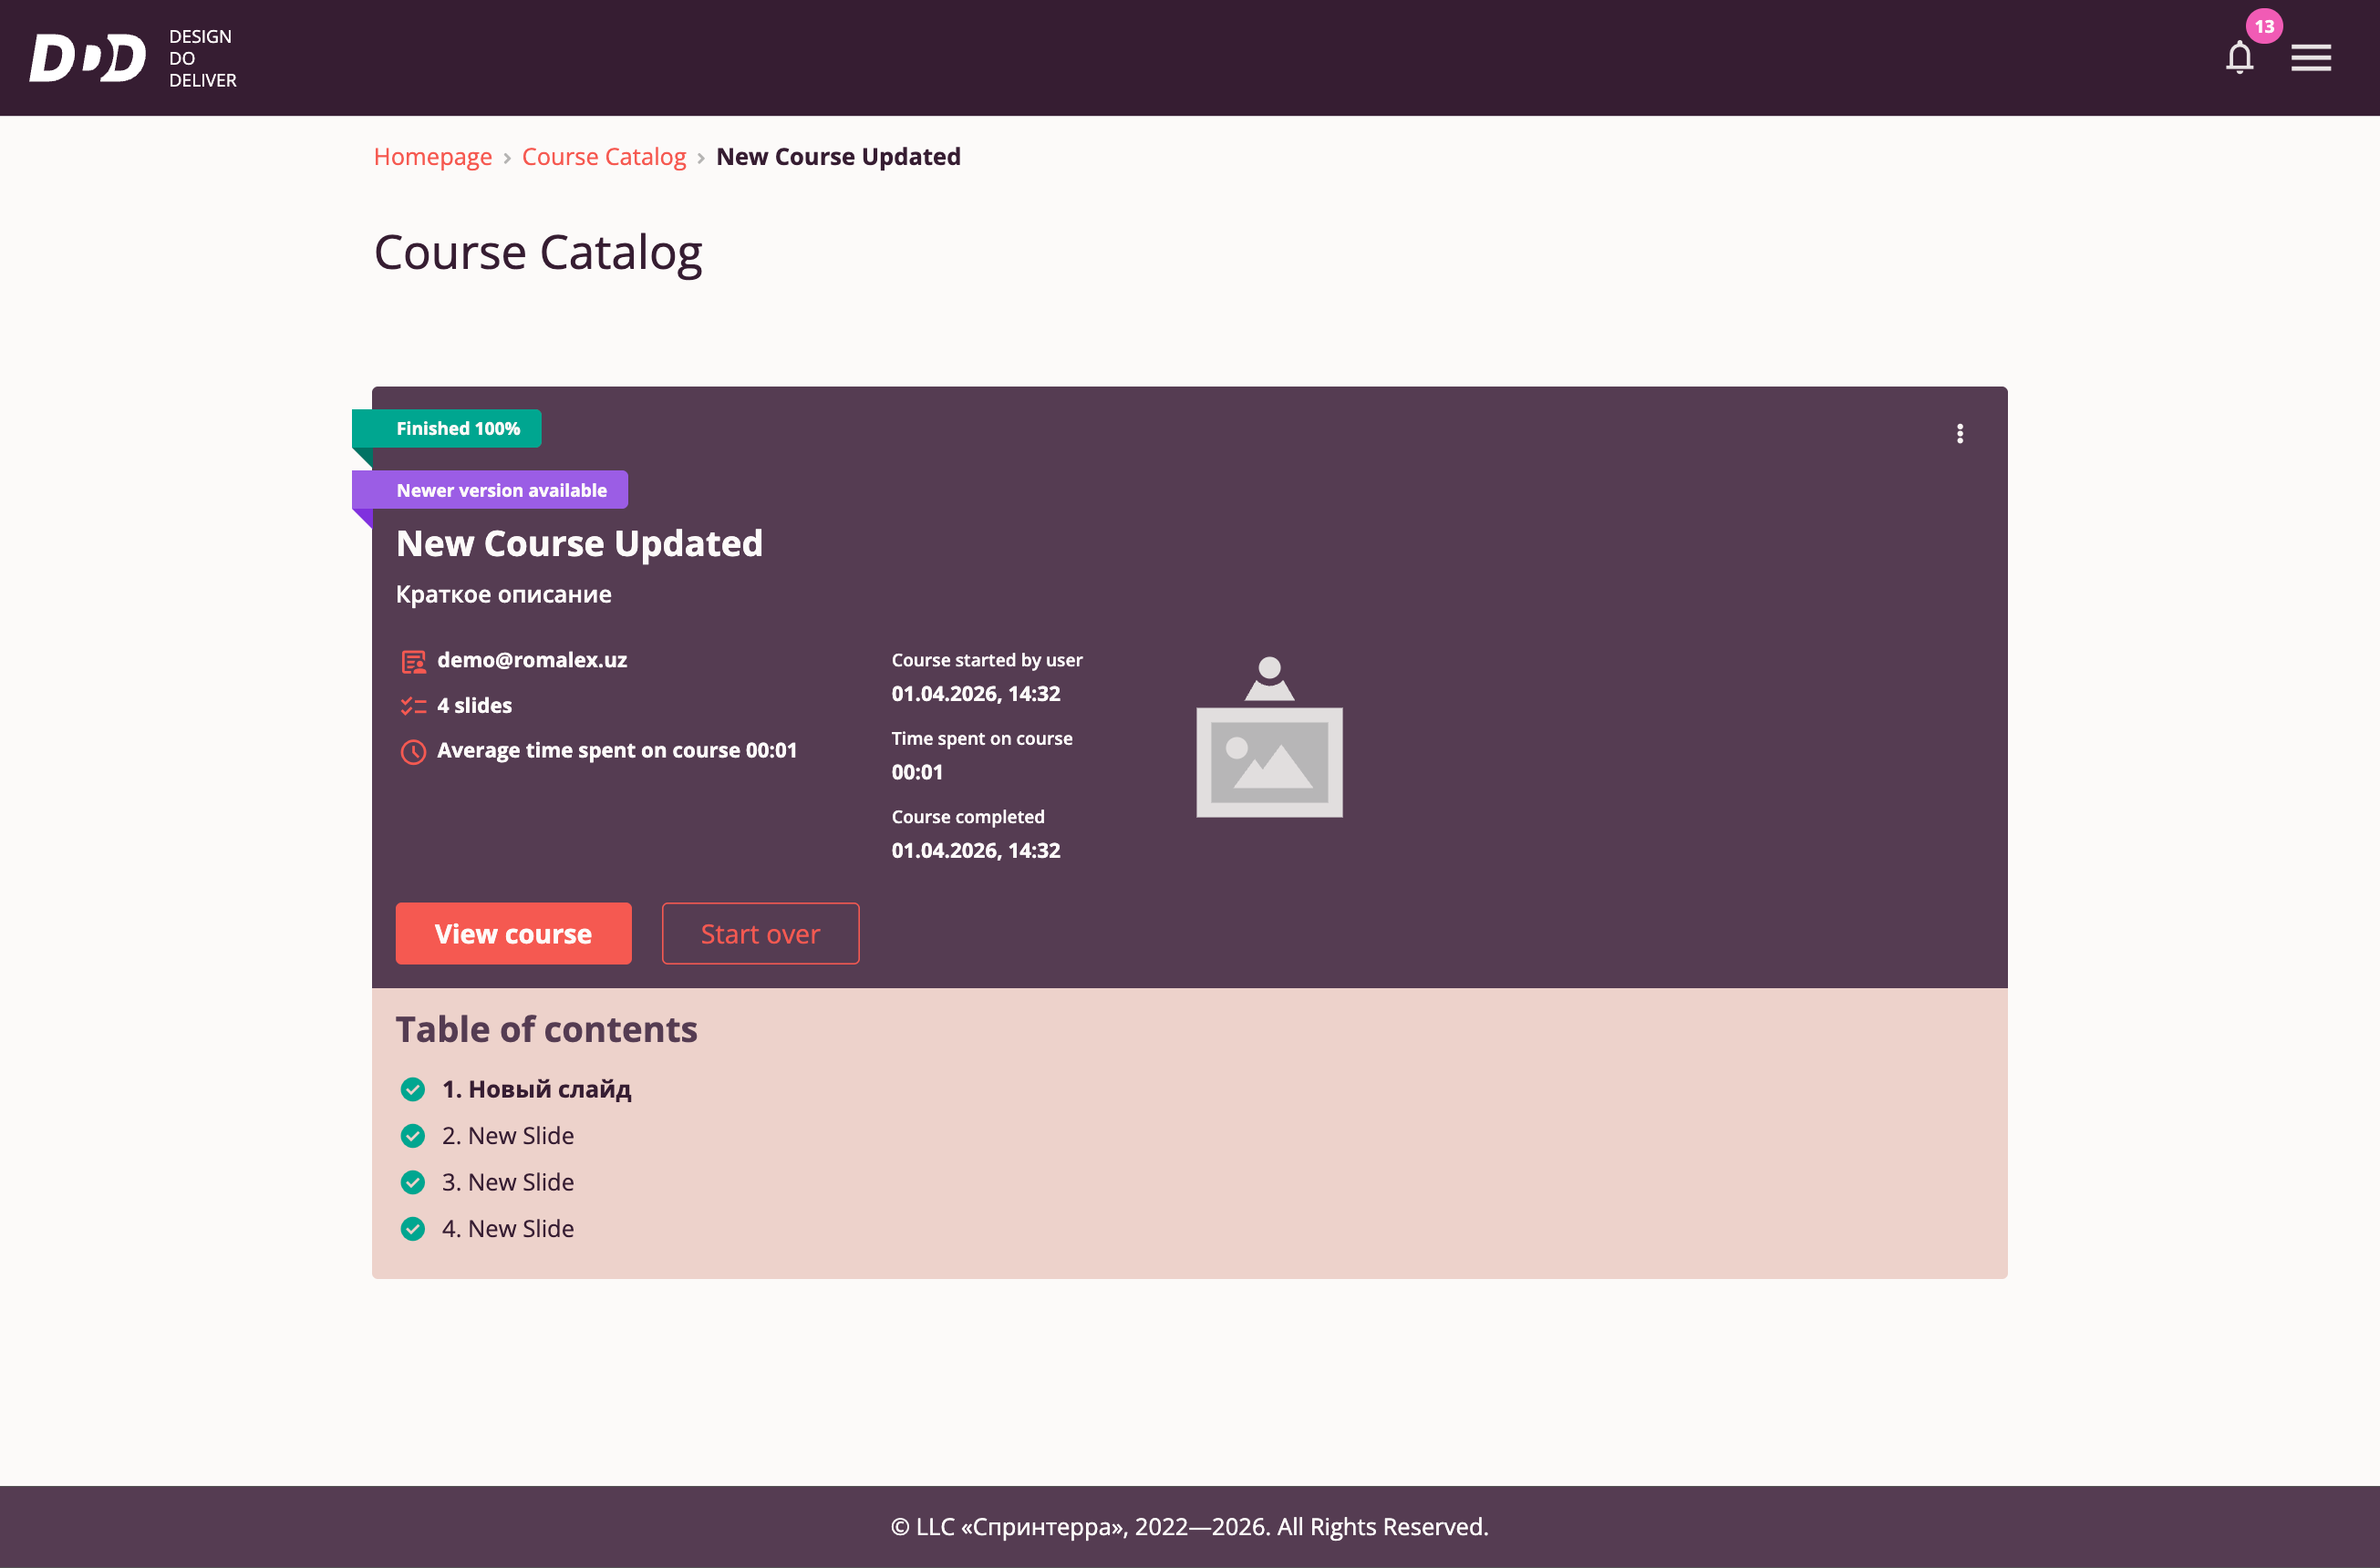
Tri-D Course Player Interface
After clicking a course in the Course Catalog, the user enters the Course Player.
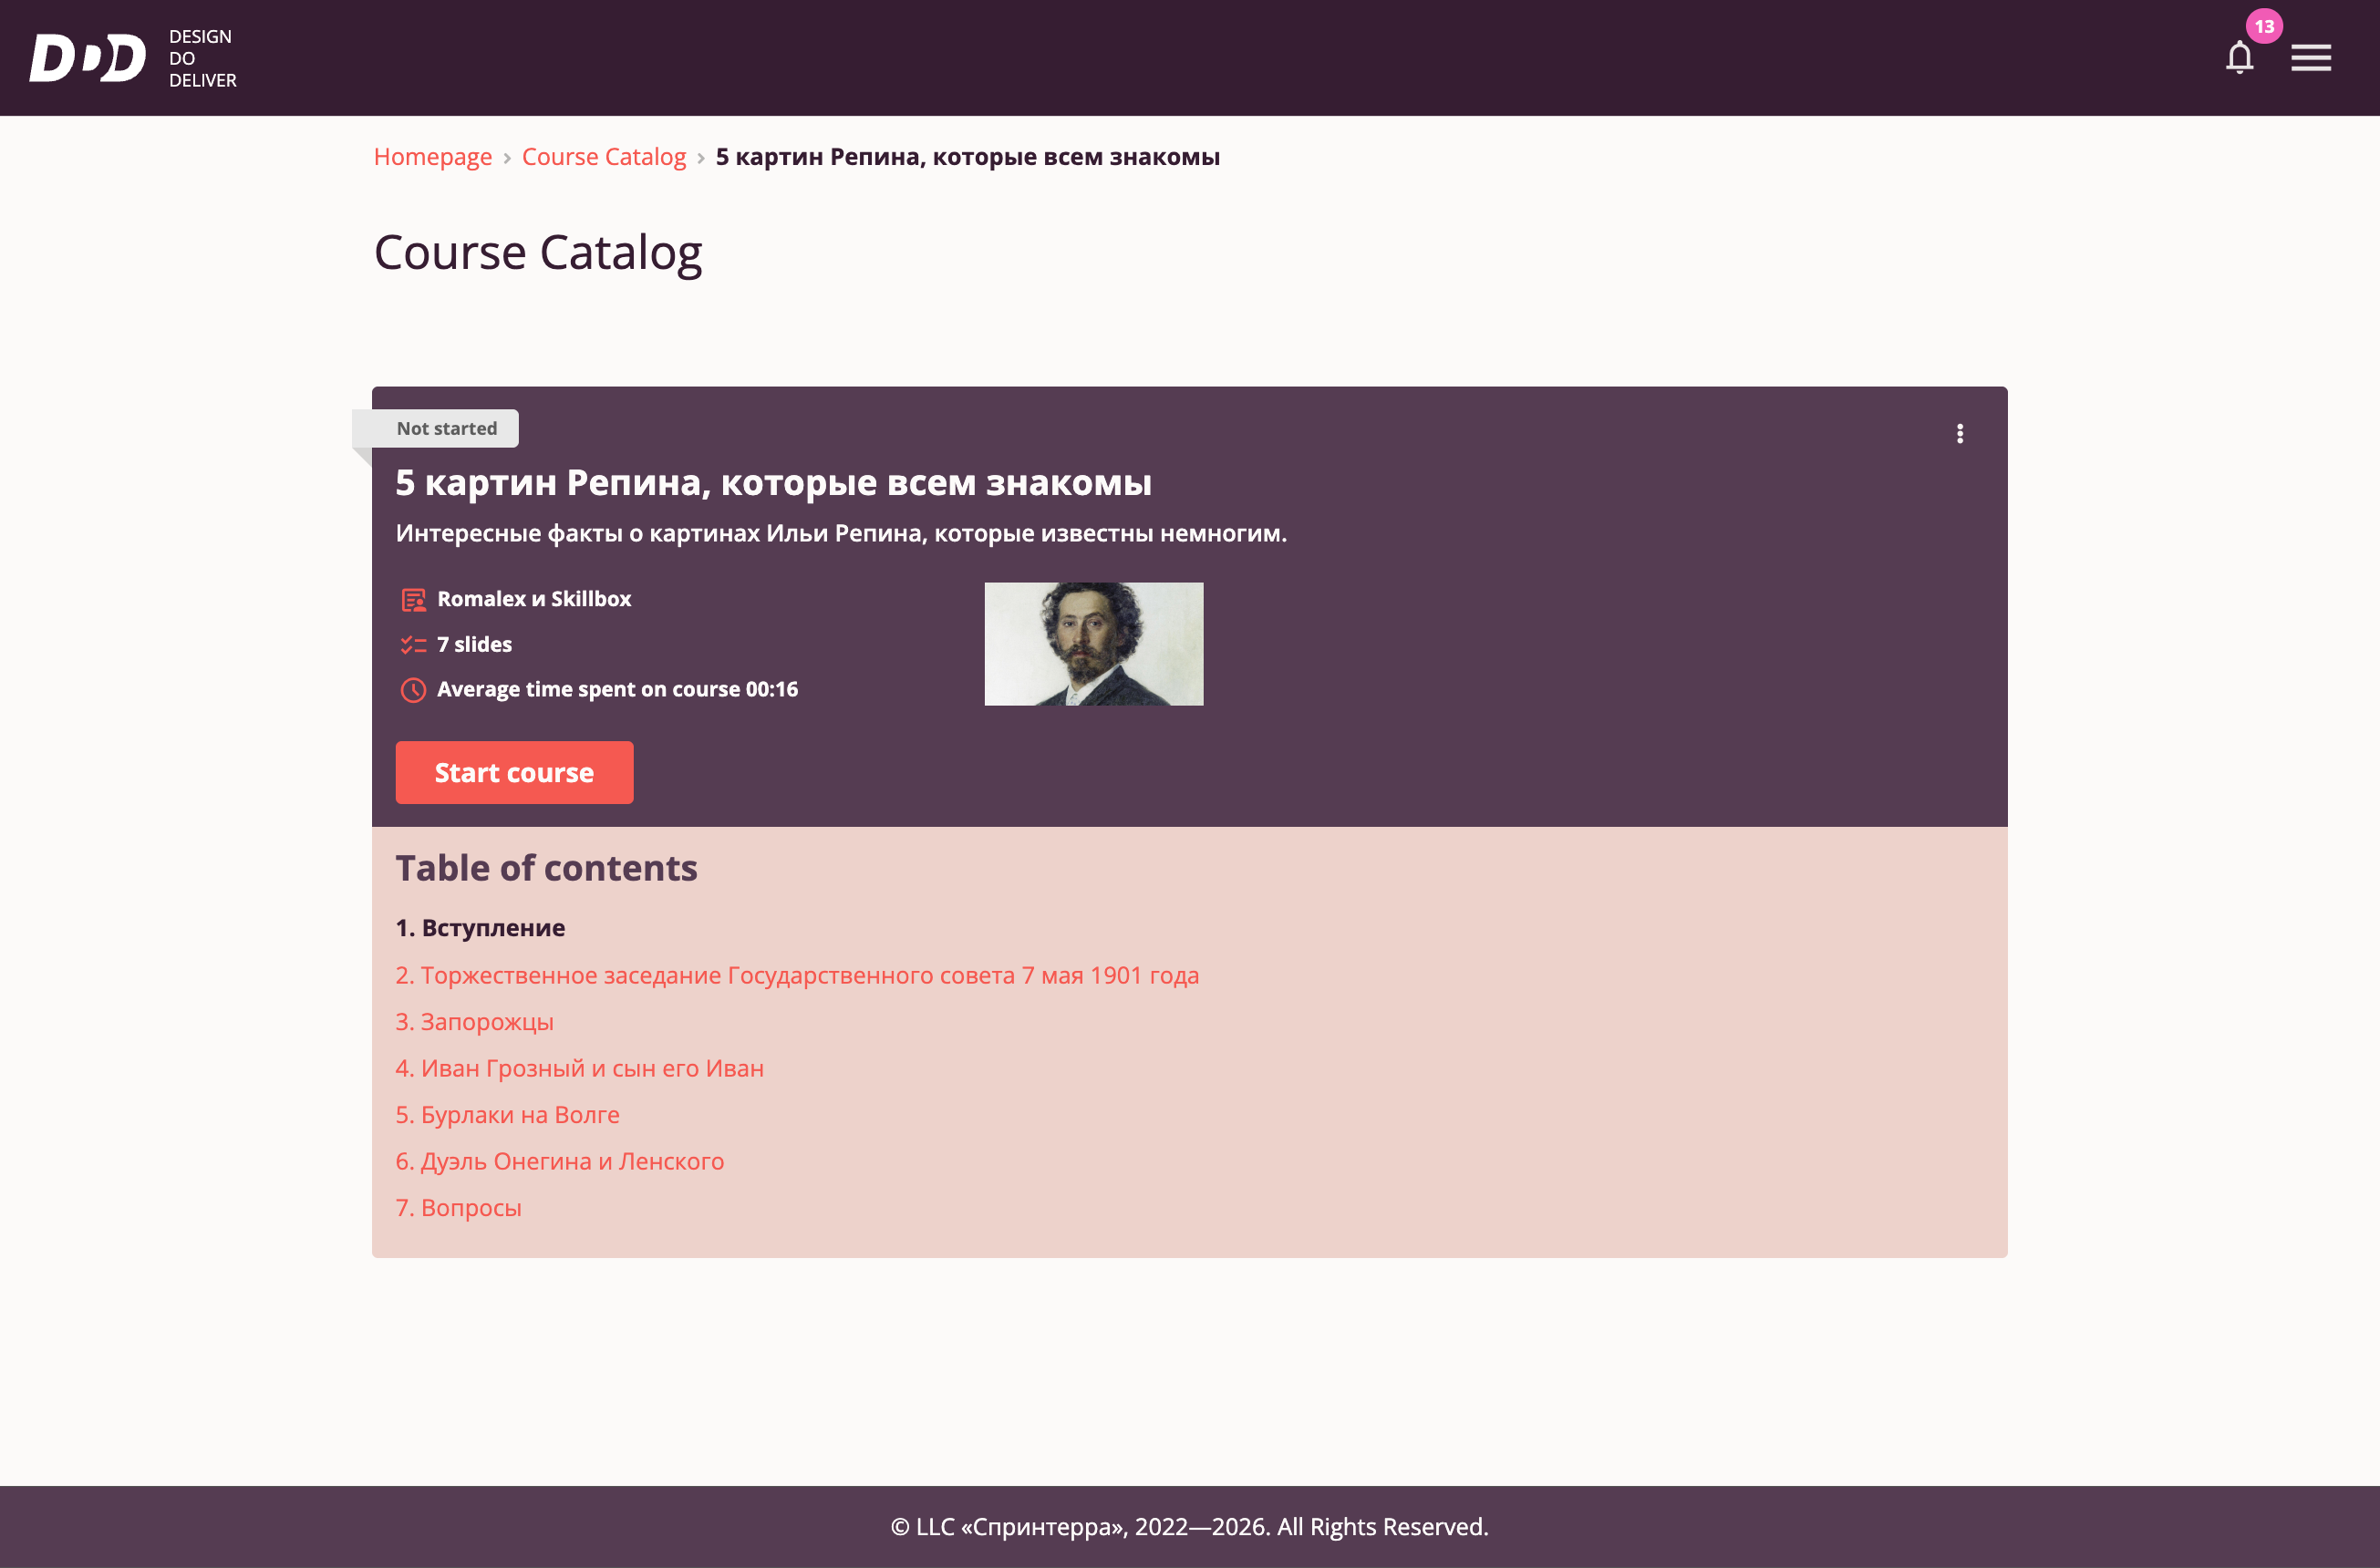
On the Course Player landing page, the following elements are displayed:
- Course title and brief description
- Course cover image
- Number of slides in the course
- Estimated completion time
- Course content table of contents
- "Start Course" button — begins course playback. If the course was already started, the button changes to "Continue Course"; if completed, it changes to "View".
- Context menu with "Share" option — allows sharing the course link via social networks and messengers.
When the course author releases a new version, users are offered to retake the course — the Course Player interface shows a "Retake Course" button. Clicking this starts the new version, and progress on the old version is reset.
Course Playback
After clicking "Start Course"/"Continue"/"View", course playback begins.
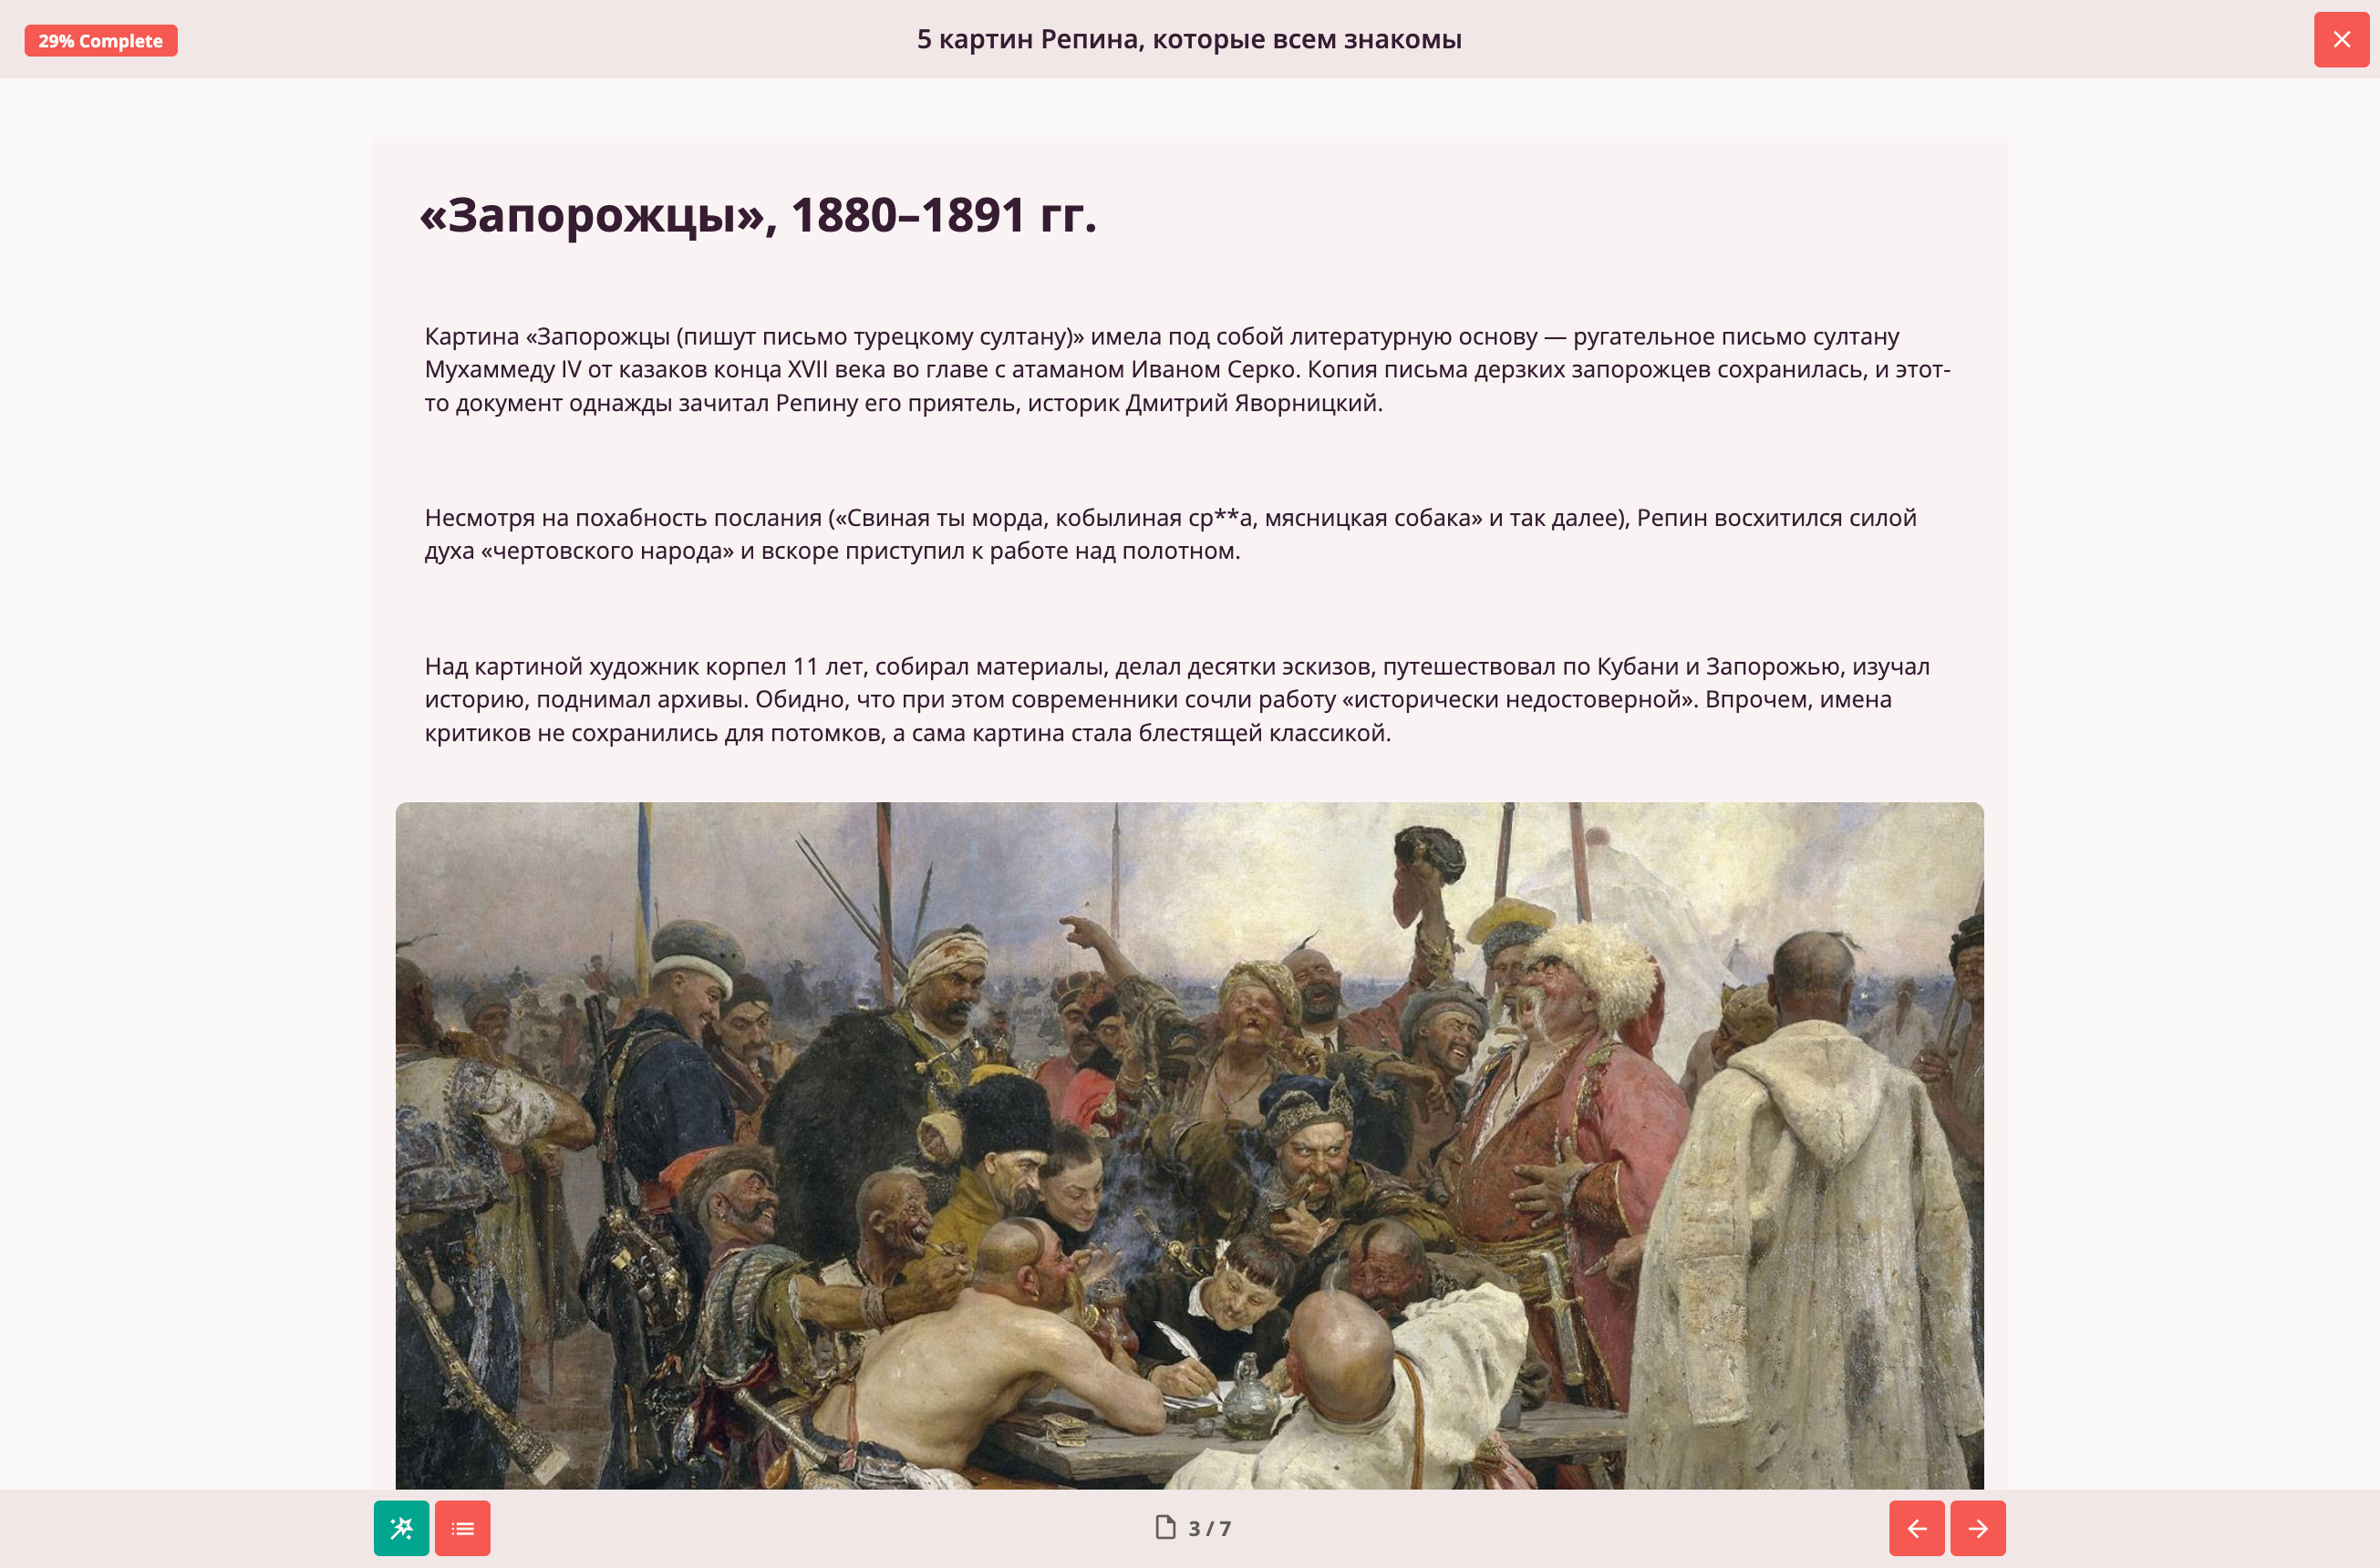
The user sees the slide content and a navigation panel displaying:
- Course progress
- Navigation buttons for moving between slides
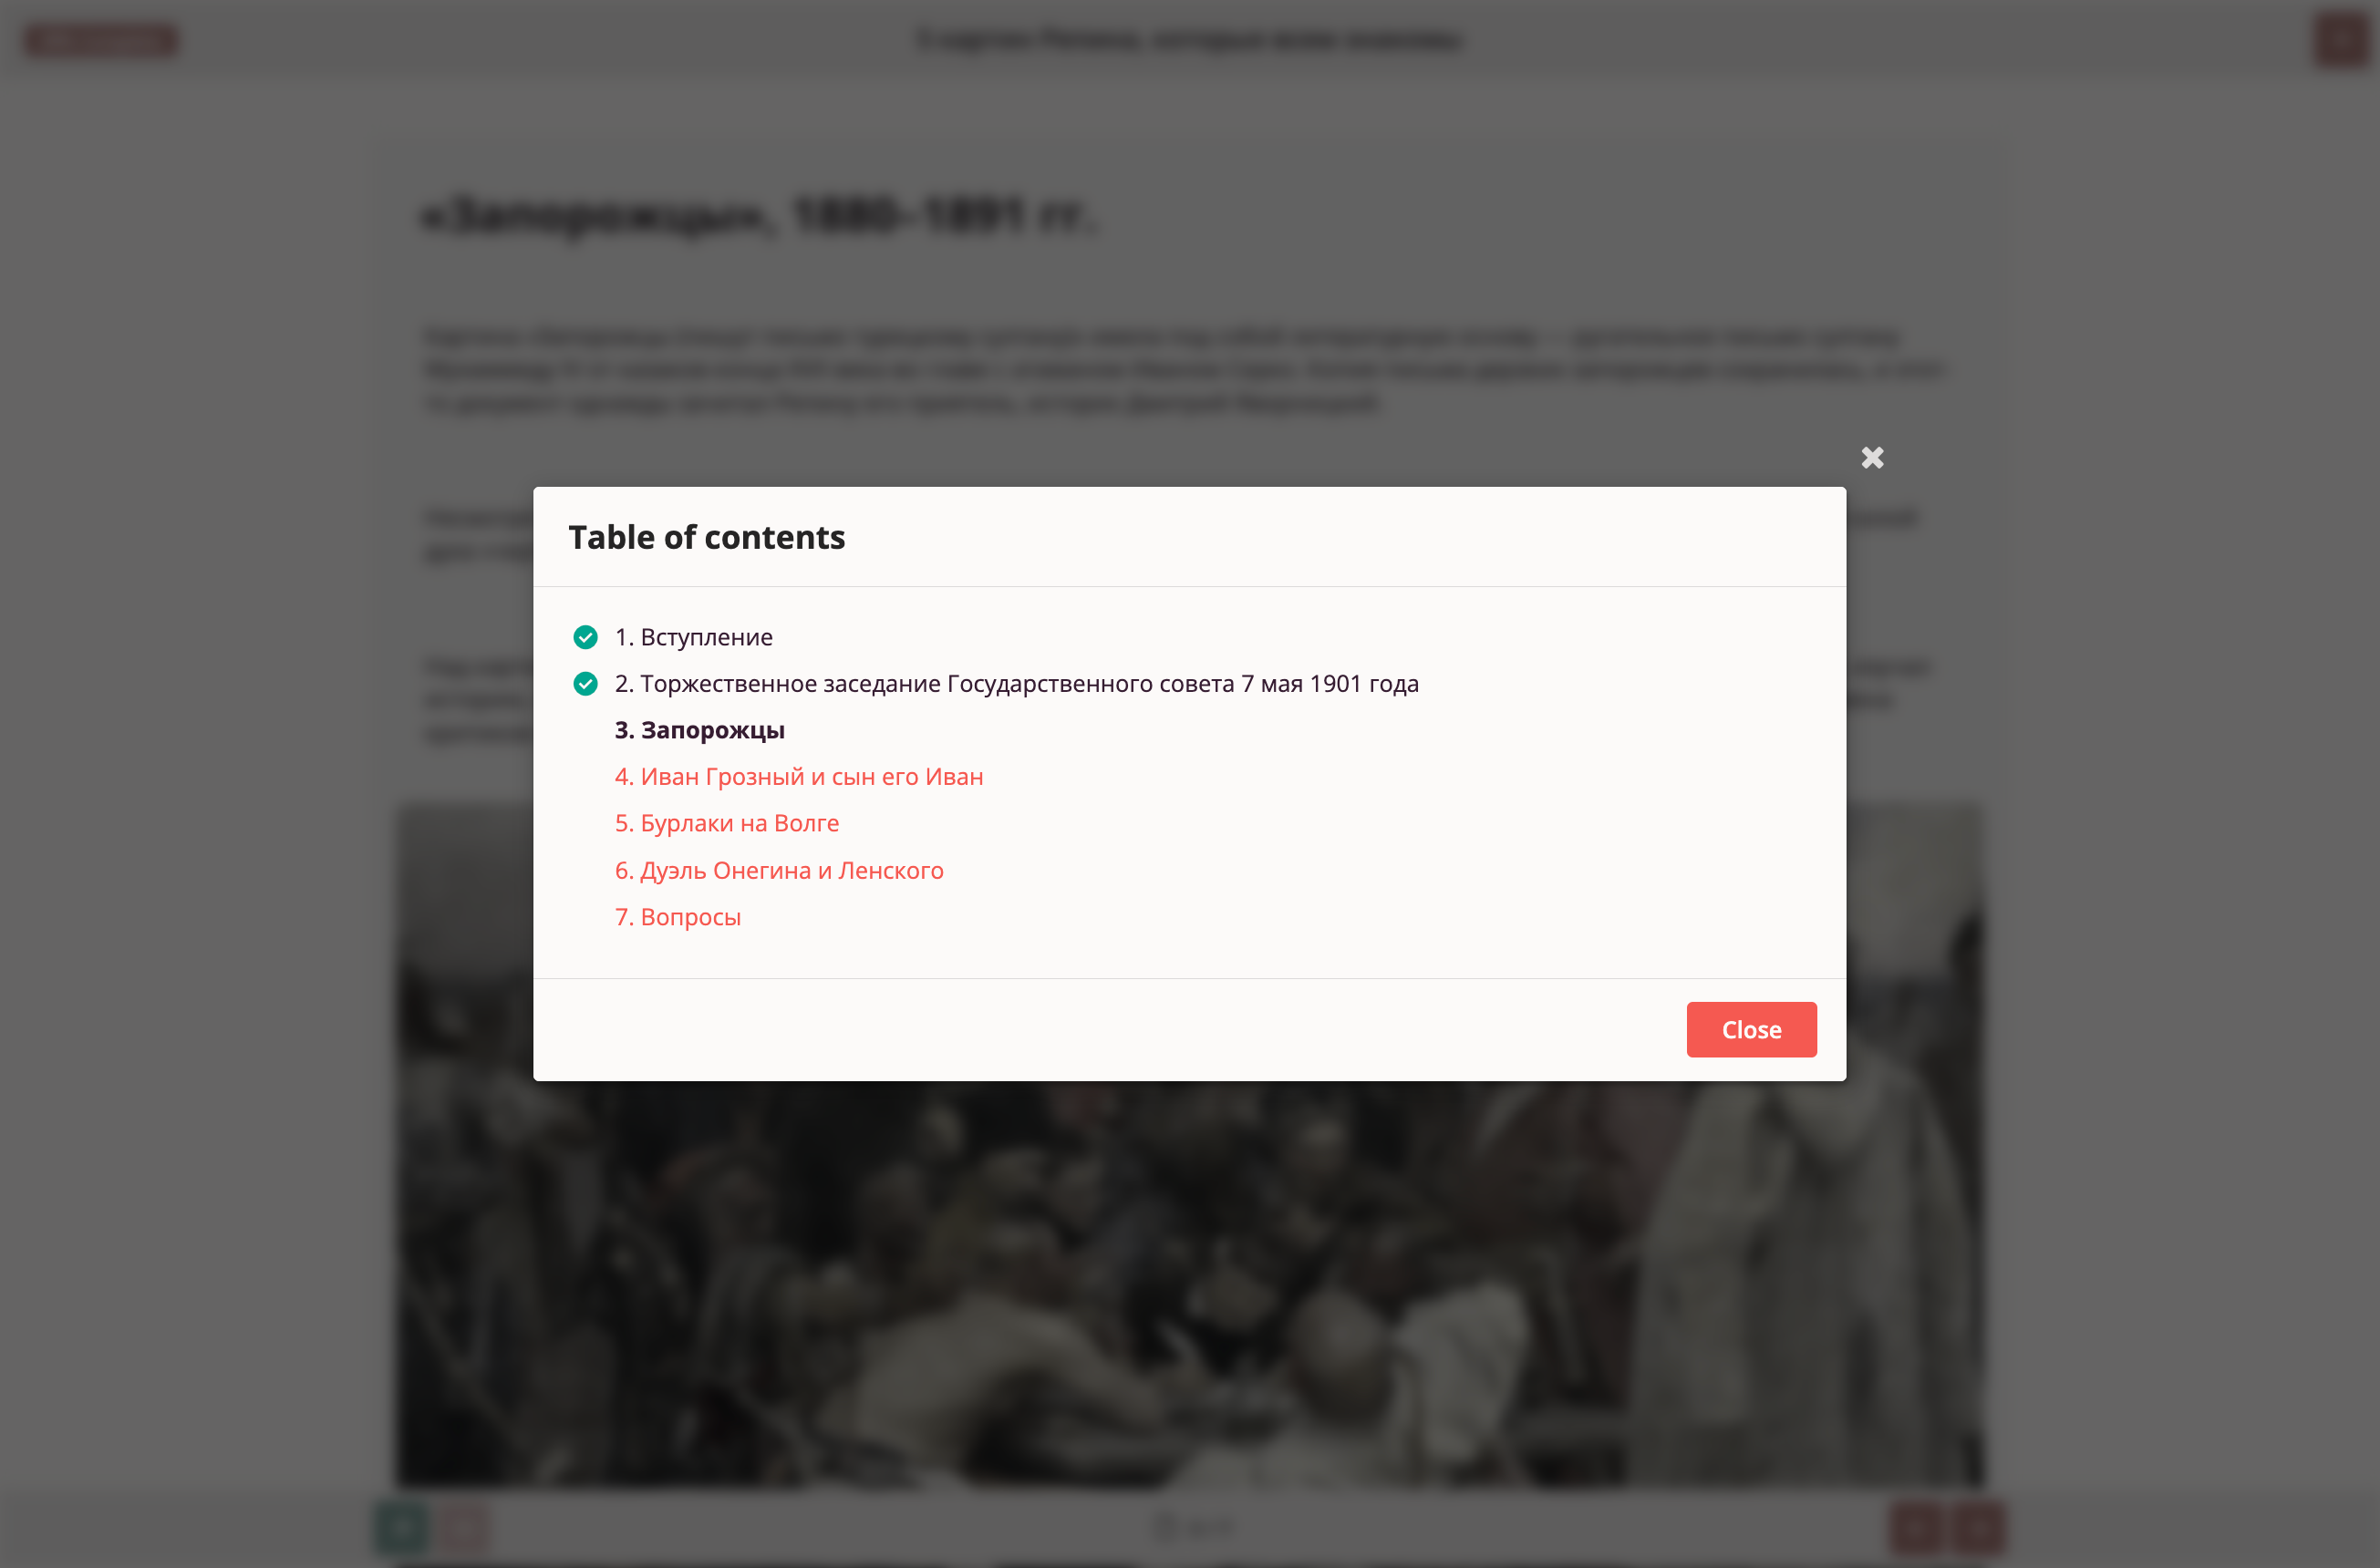
Additionally, users can open the Table of Contents for faster navigation between slides.
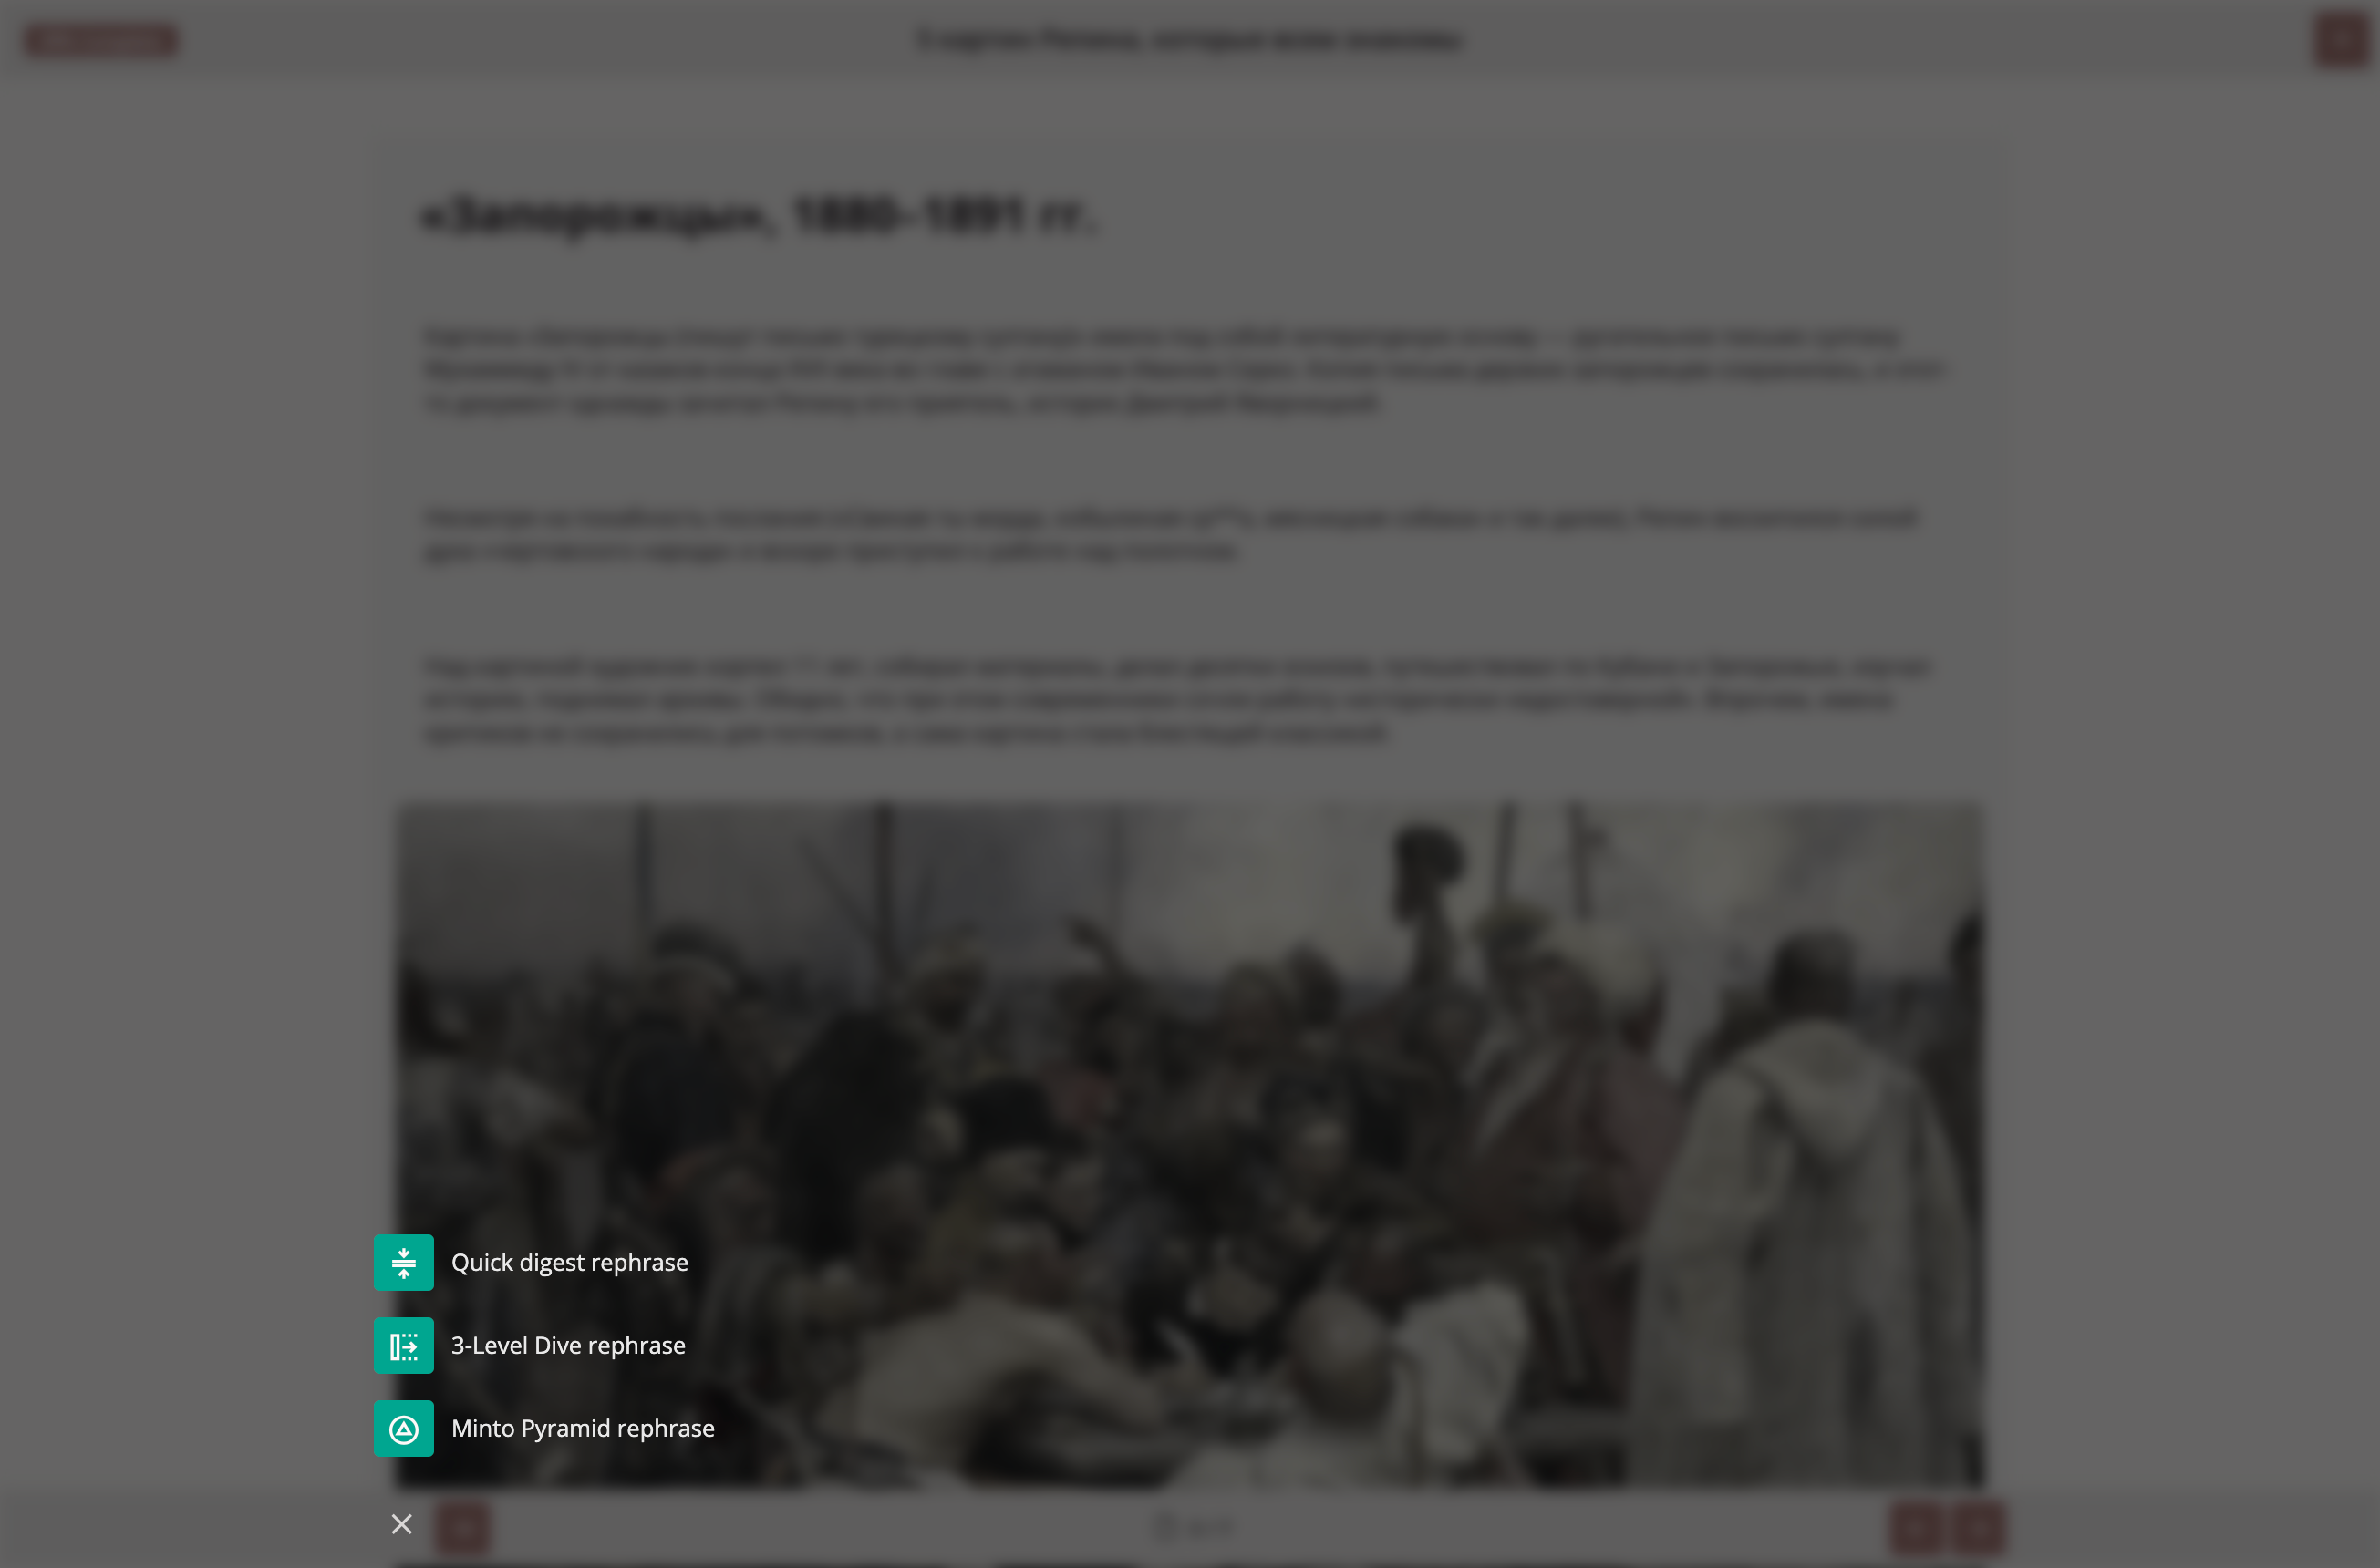
AI Assistant
The "AI Assistant" feature provides a simplified, semantically structured summary of slide content for deeper subject immersion. Users are encouraged to try this feature. Three summary templates are available:
- Summarize concisely
- Paraphrase with in-depth analysis (three levels deep)
- Summarize slide content using the Minto Pyramid Principle (presenting ideas from main to specific)
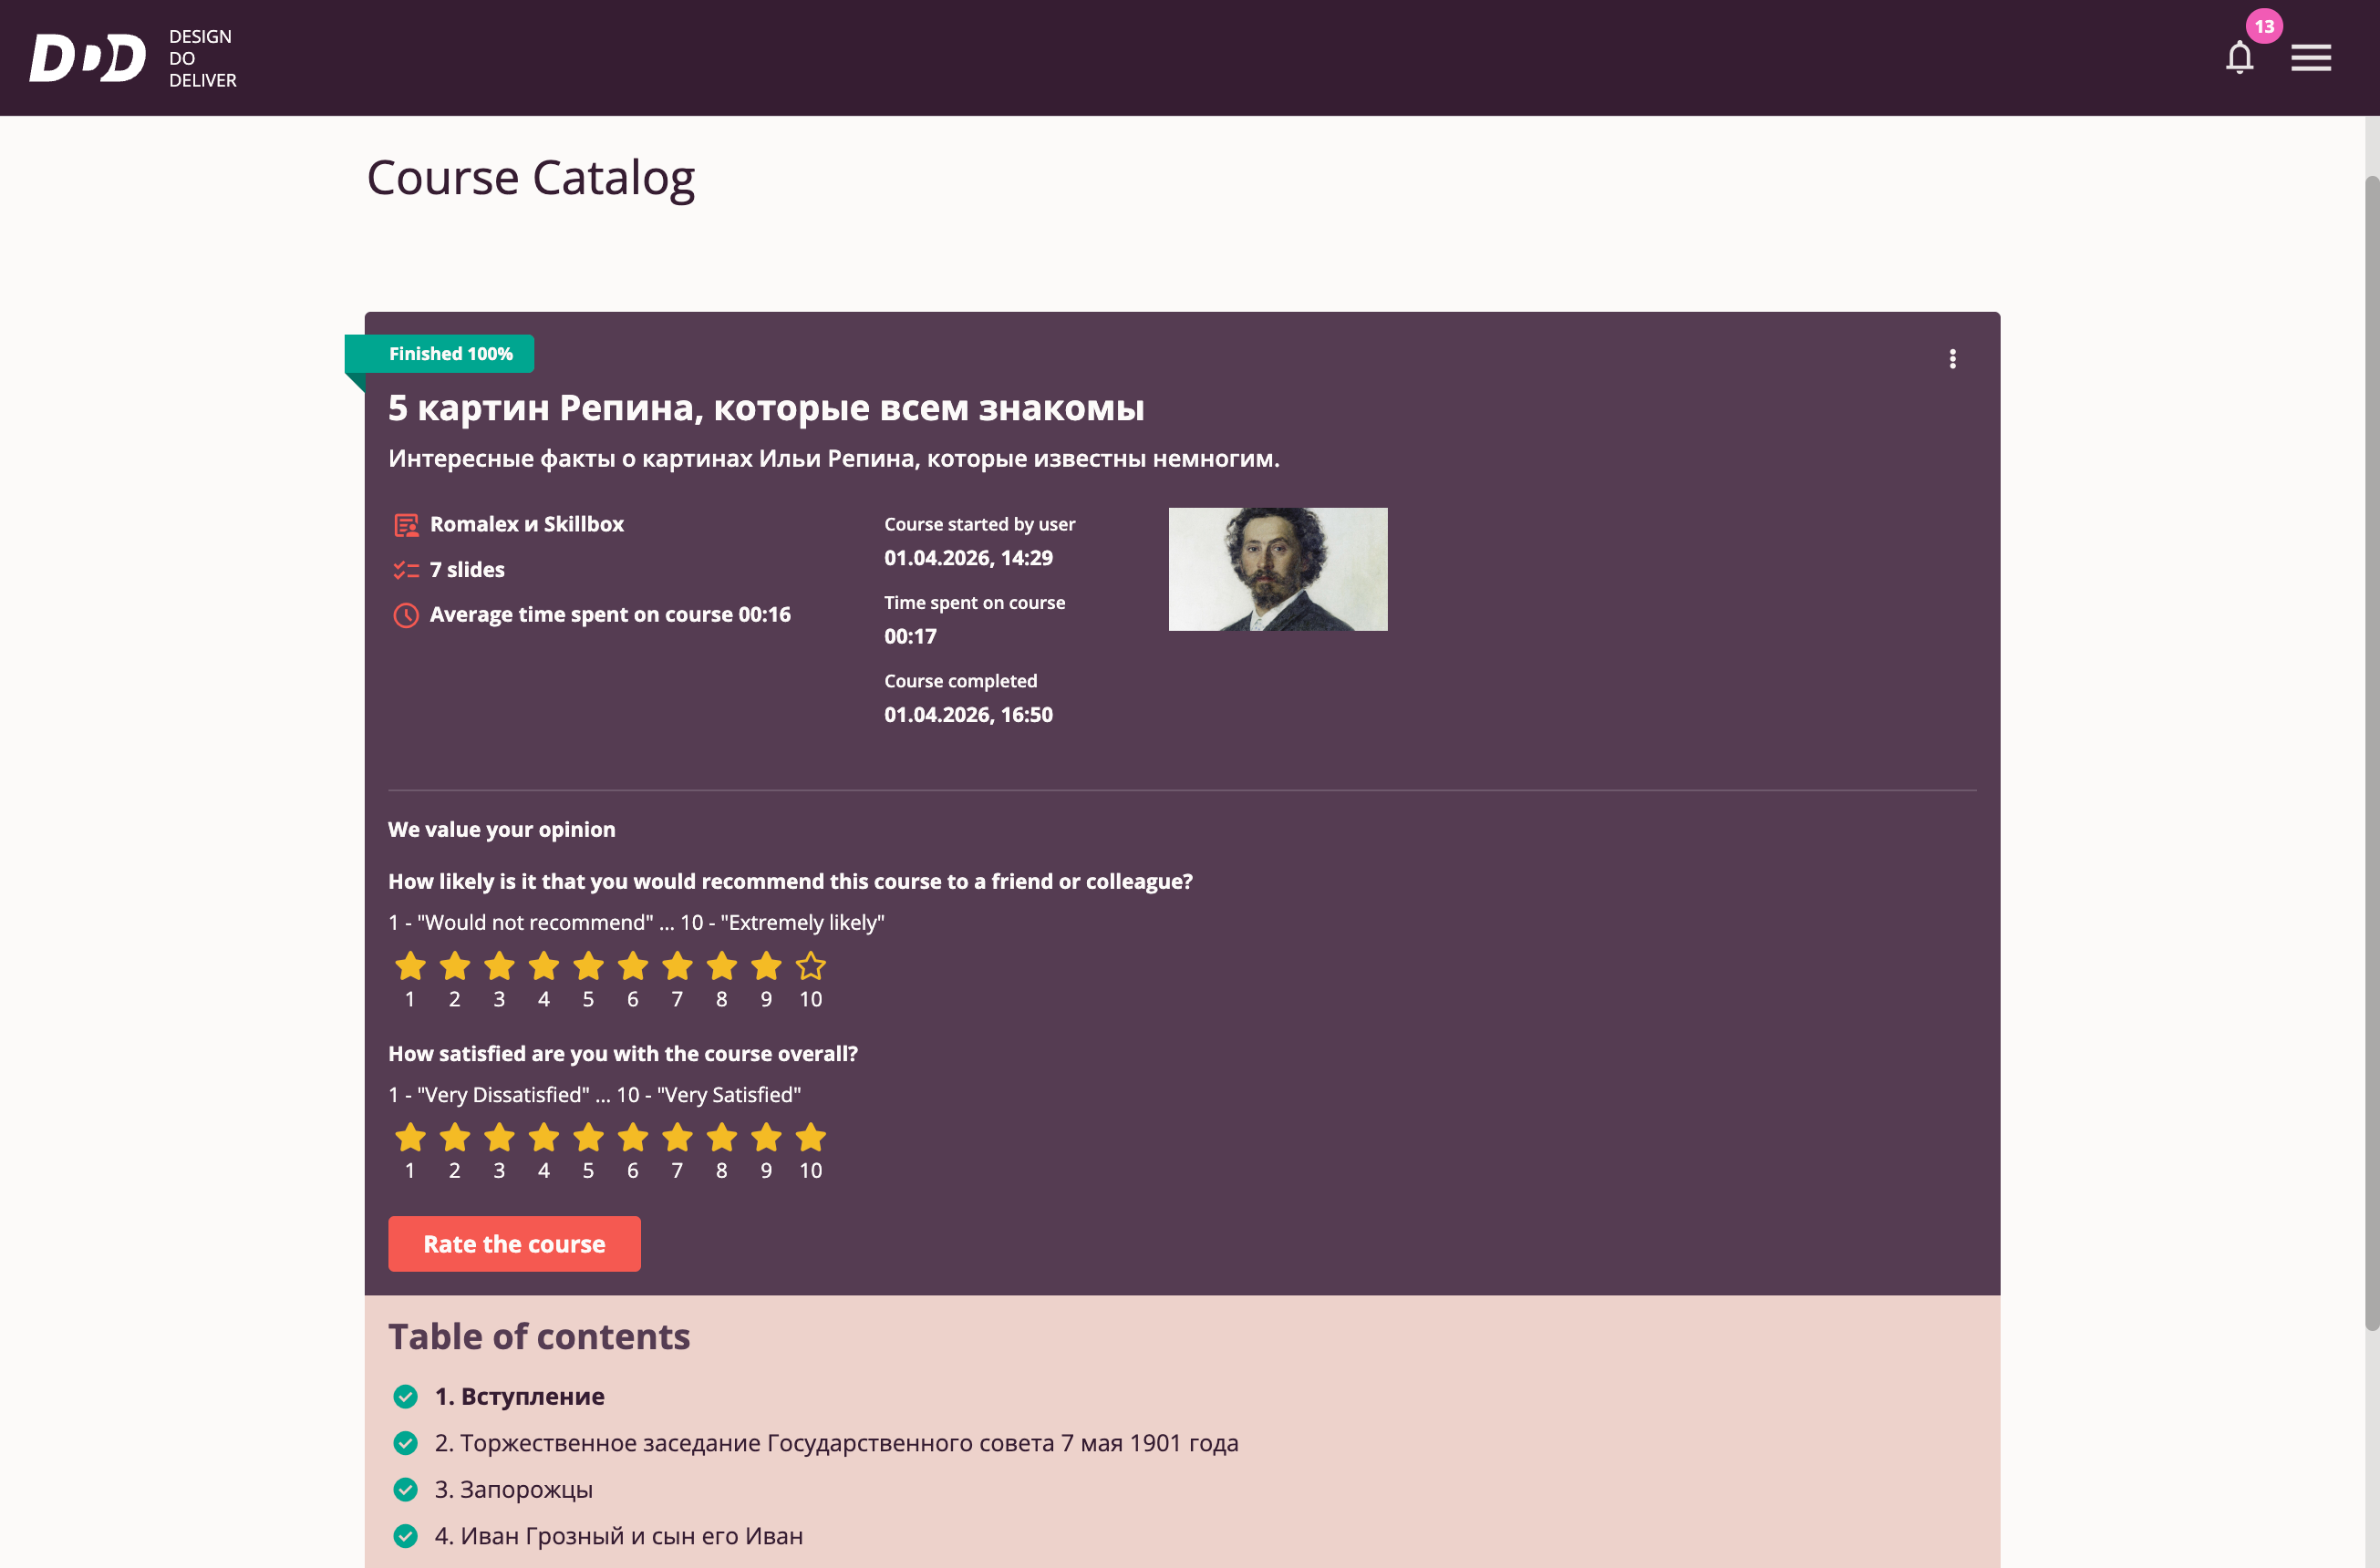
Completing Course Playback
When the user reaches the final slide, progress reaches 100%. The user is shown brief completion statistics and prompted to rate the course.
Course Expectations
Course Workshop
Clicking "Course Workshop" in the Tri-D System Main Menu takes the user to the Course Workshop page.
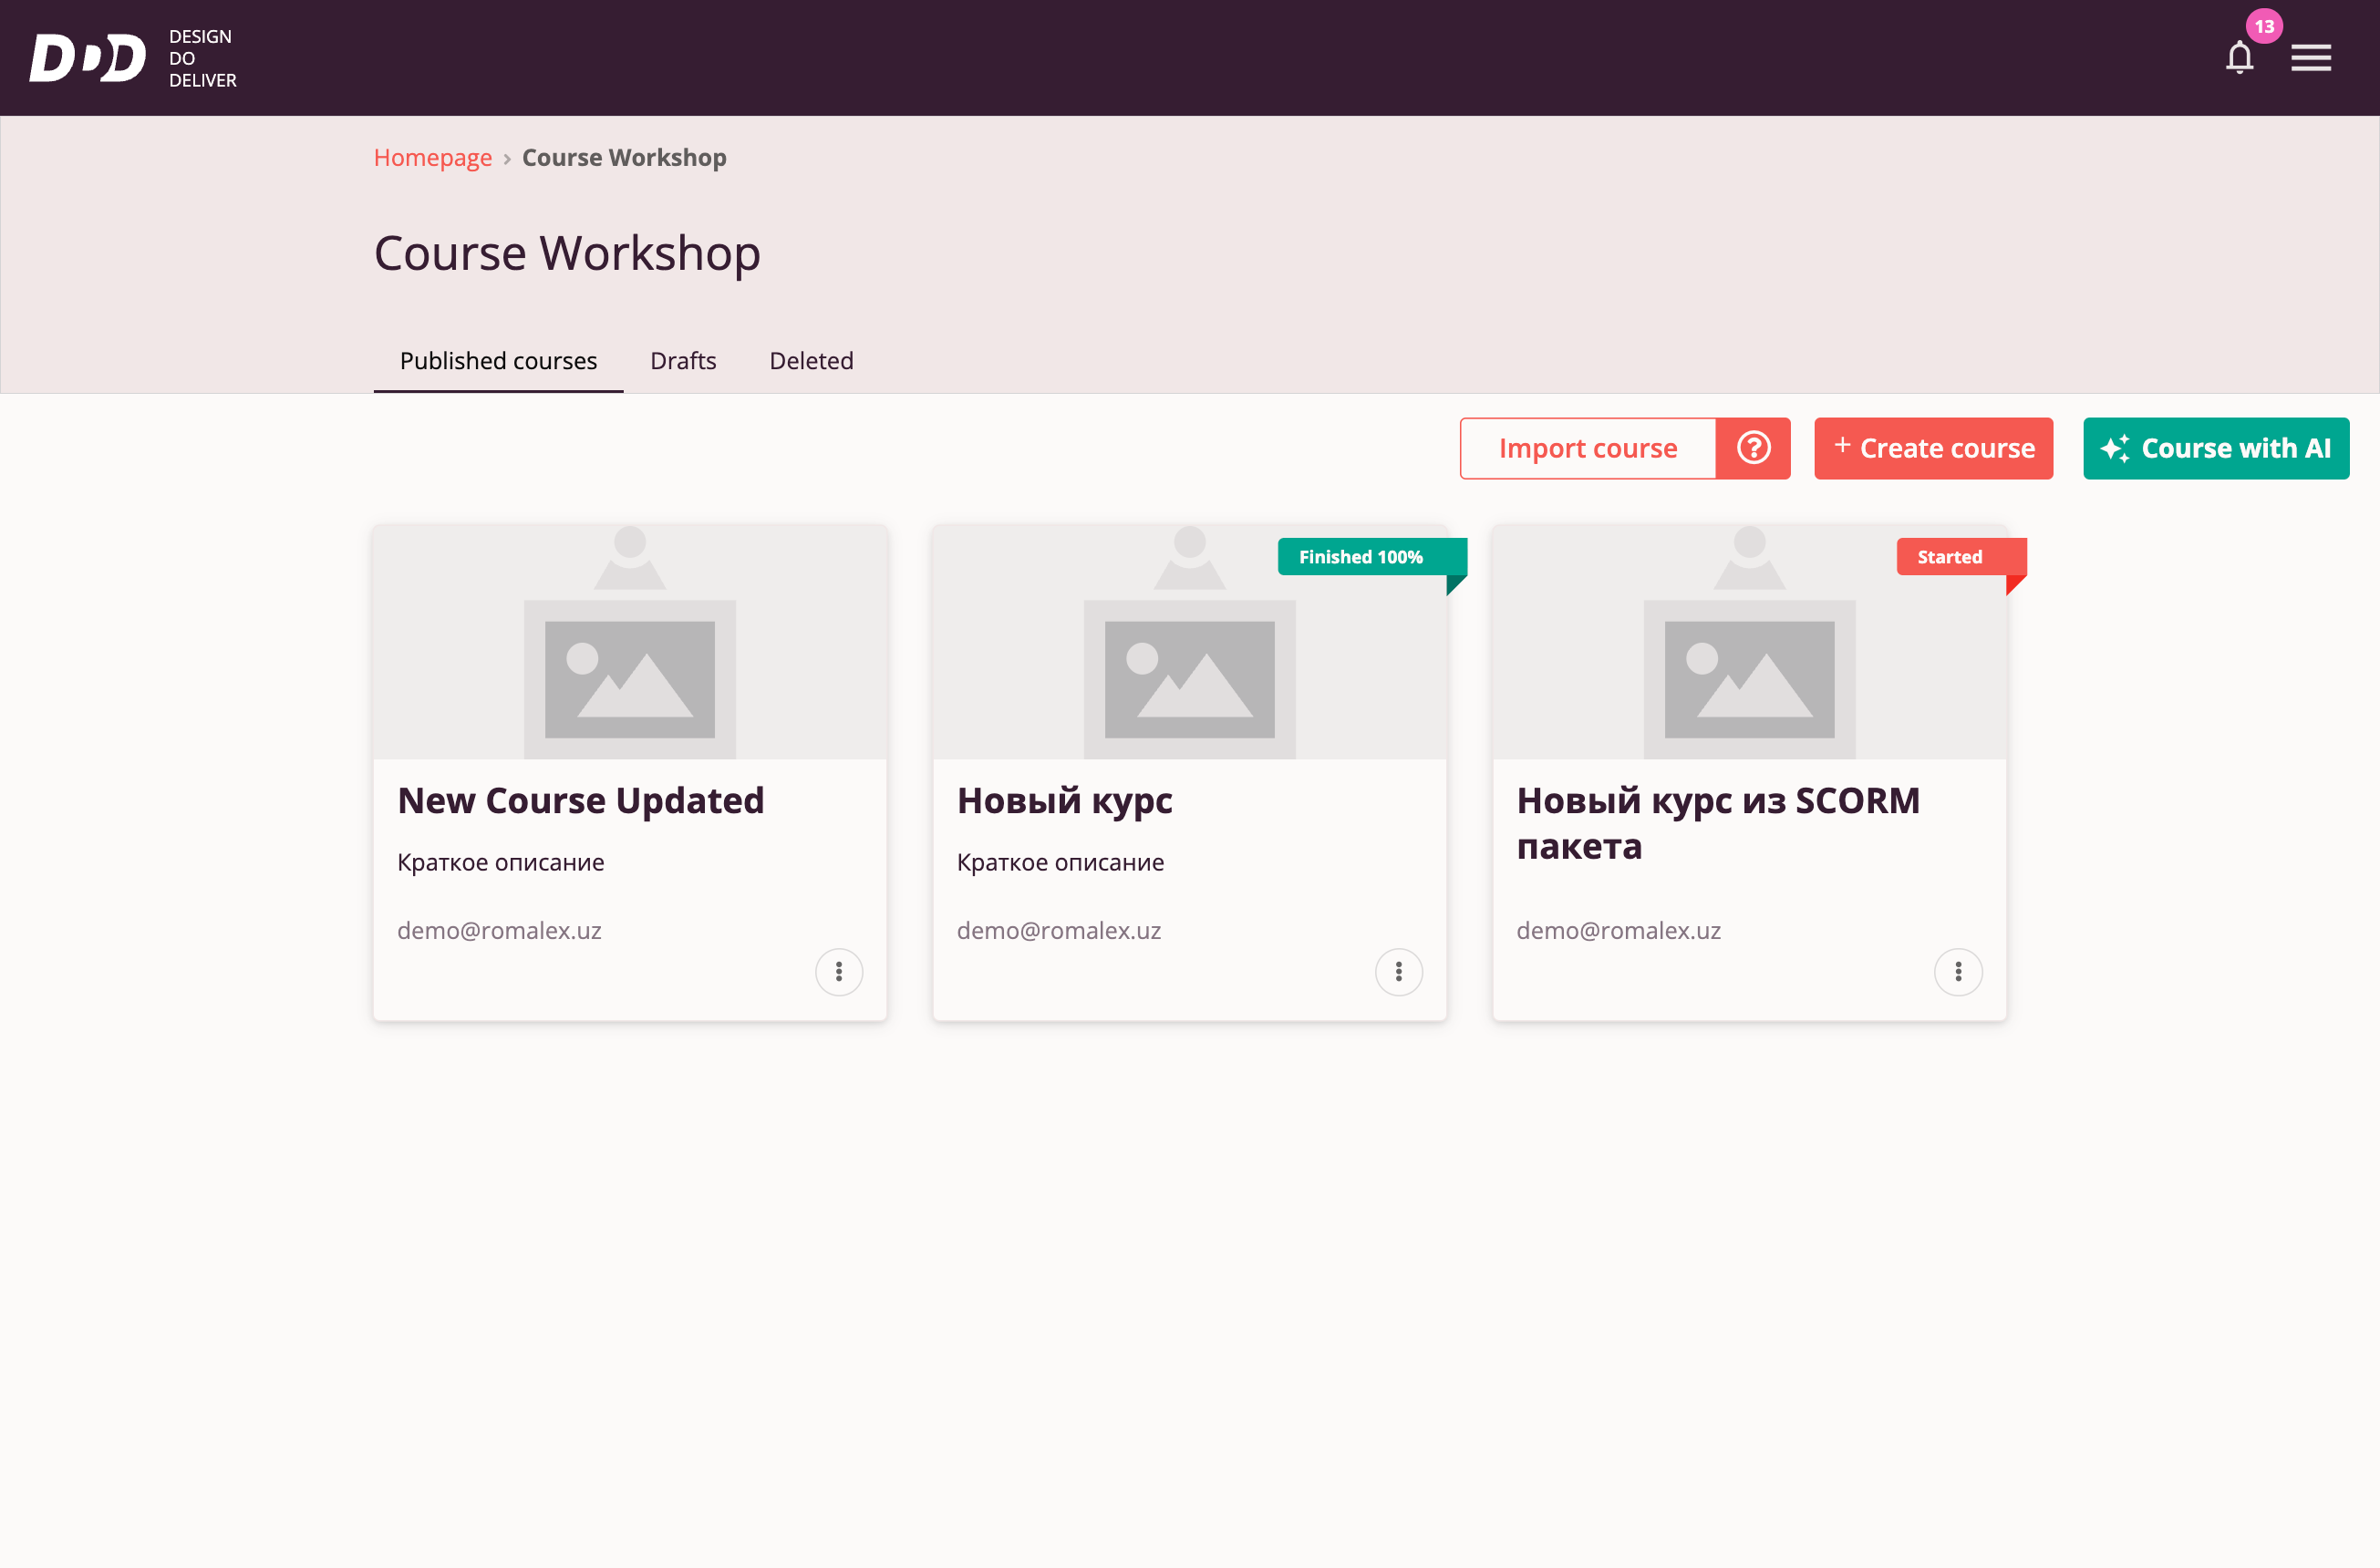
This functionality is available to users with roles: Course Author, Manager, and Organization Administrator.
From the Course Workshop page, users can:
- View and play their published courses and drafts
- Import a ready-made course
- Create a new course manually or with the help of neural networks
Basic Principles of Course Creation and Publication
- A course draft is where content development occurs. Drafts are accessible to the course author or manually added course owners.
- As content is ready, a draft can be published. A published course becomes available and/or assignable to other Tri-D system users.
- Each published course has a single draft containing the latest content changes. Drafts may contain unpublished changes.
- Publishing a draft with content changes creates a new version of the published course.
- Users who start an edited published course from scratch always receive the latest version.
- Users who open a started published course with an outdated version receive a system notification about the new version, with options to restart with the new version or continue with the current one.
- Users who view a completed course with an outdated version see their learning results from the version they completed, and also receive a notification about the new version with an option to retake the course from scratch in the latest version.
Creating a Course Manually
To begin manual course creation, click the "Create Course" button.

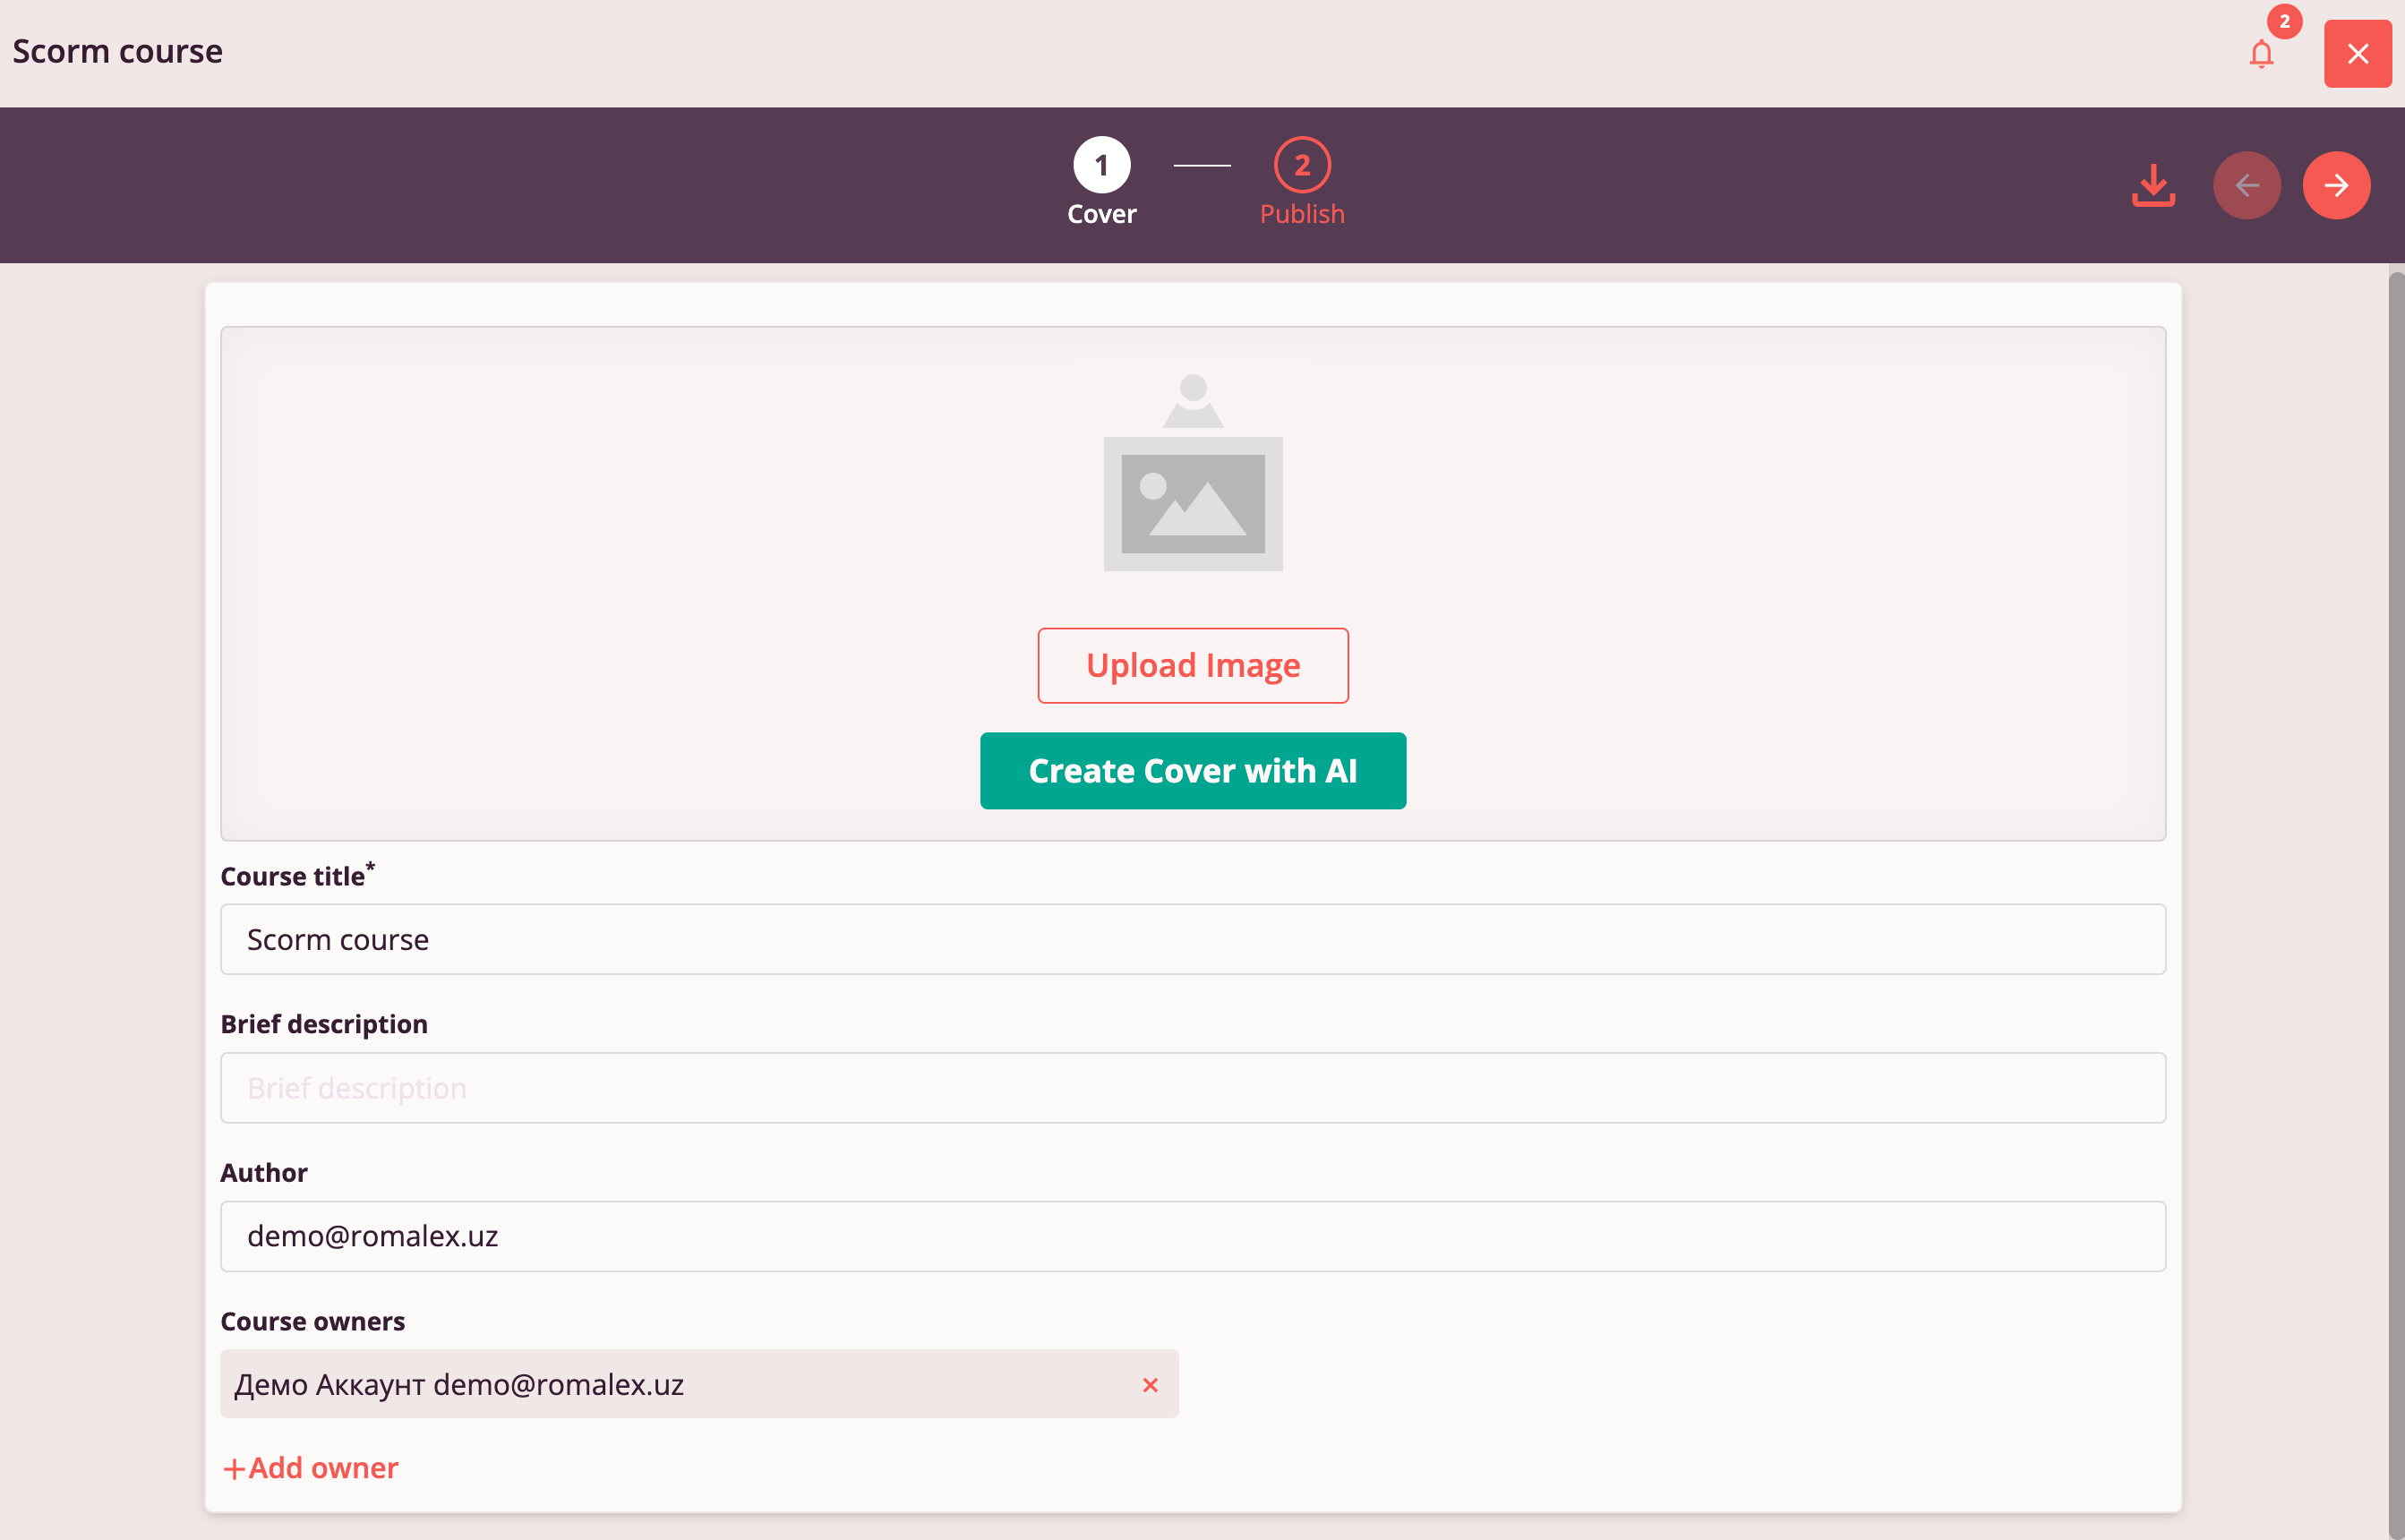
Step 1: Cover, Title, Brief Description, Author
Cover image, title, brief description, and author are course parameters displayed on the course card in the Course Catalog and course lists in the Tri-D interface.
Courses can be searched by title, brief description, and author/owner.
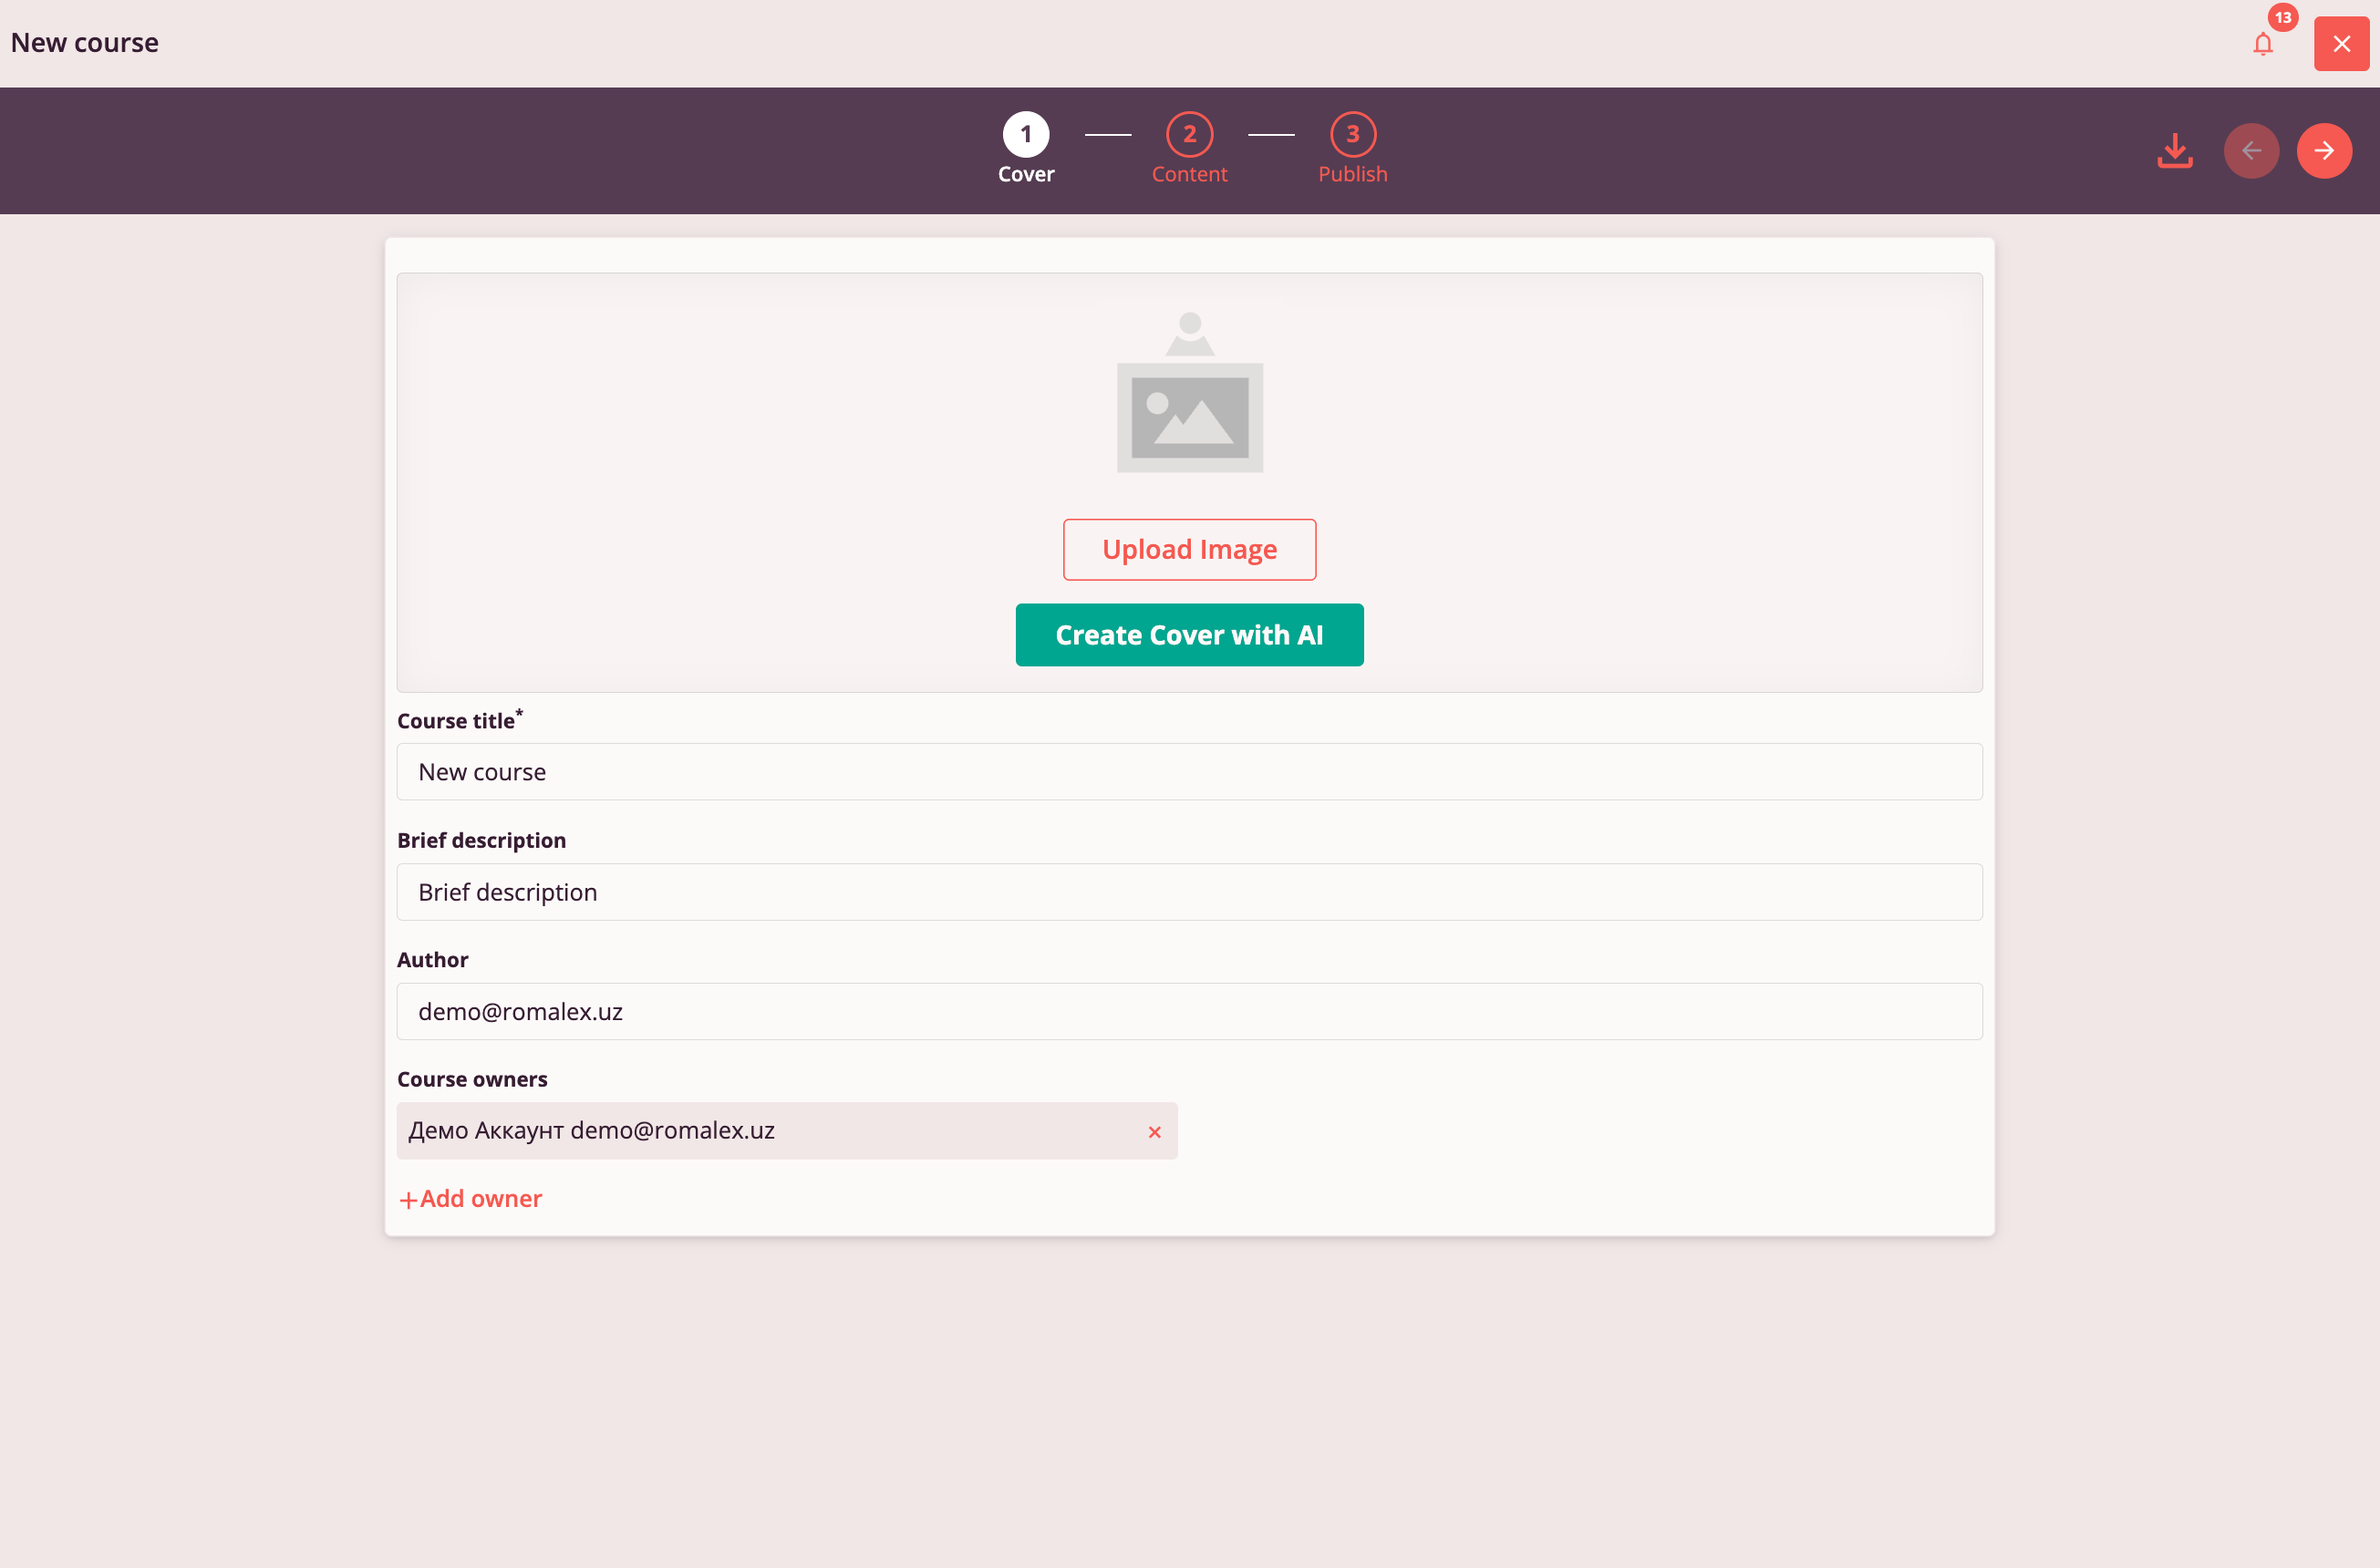
All changes to course parameters are applied and saved in the course draft automatically. The course title is mandatory.
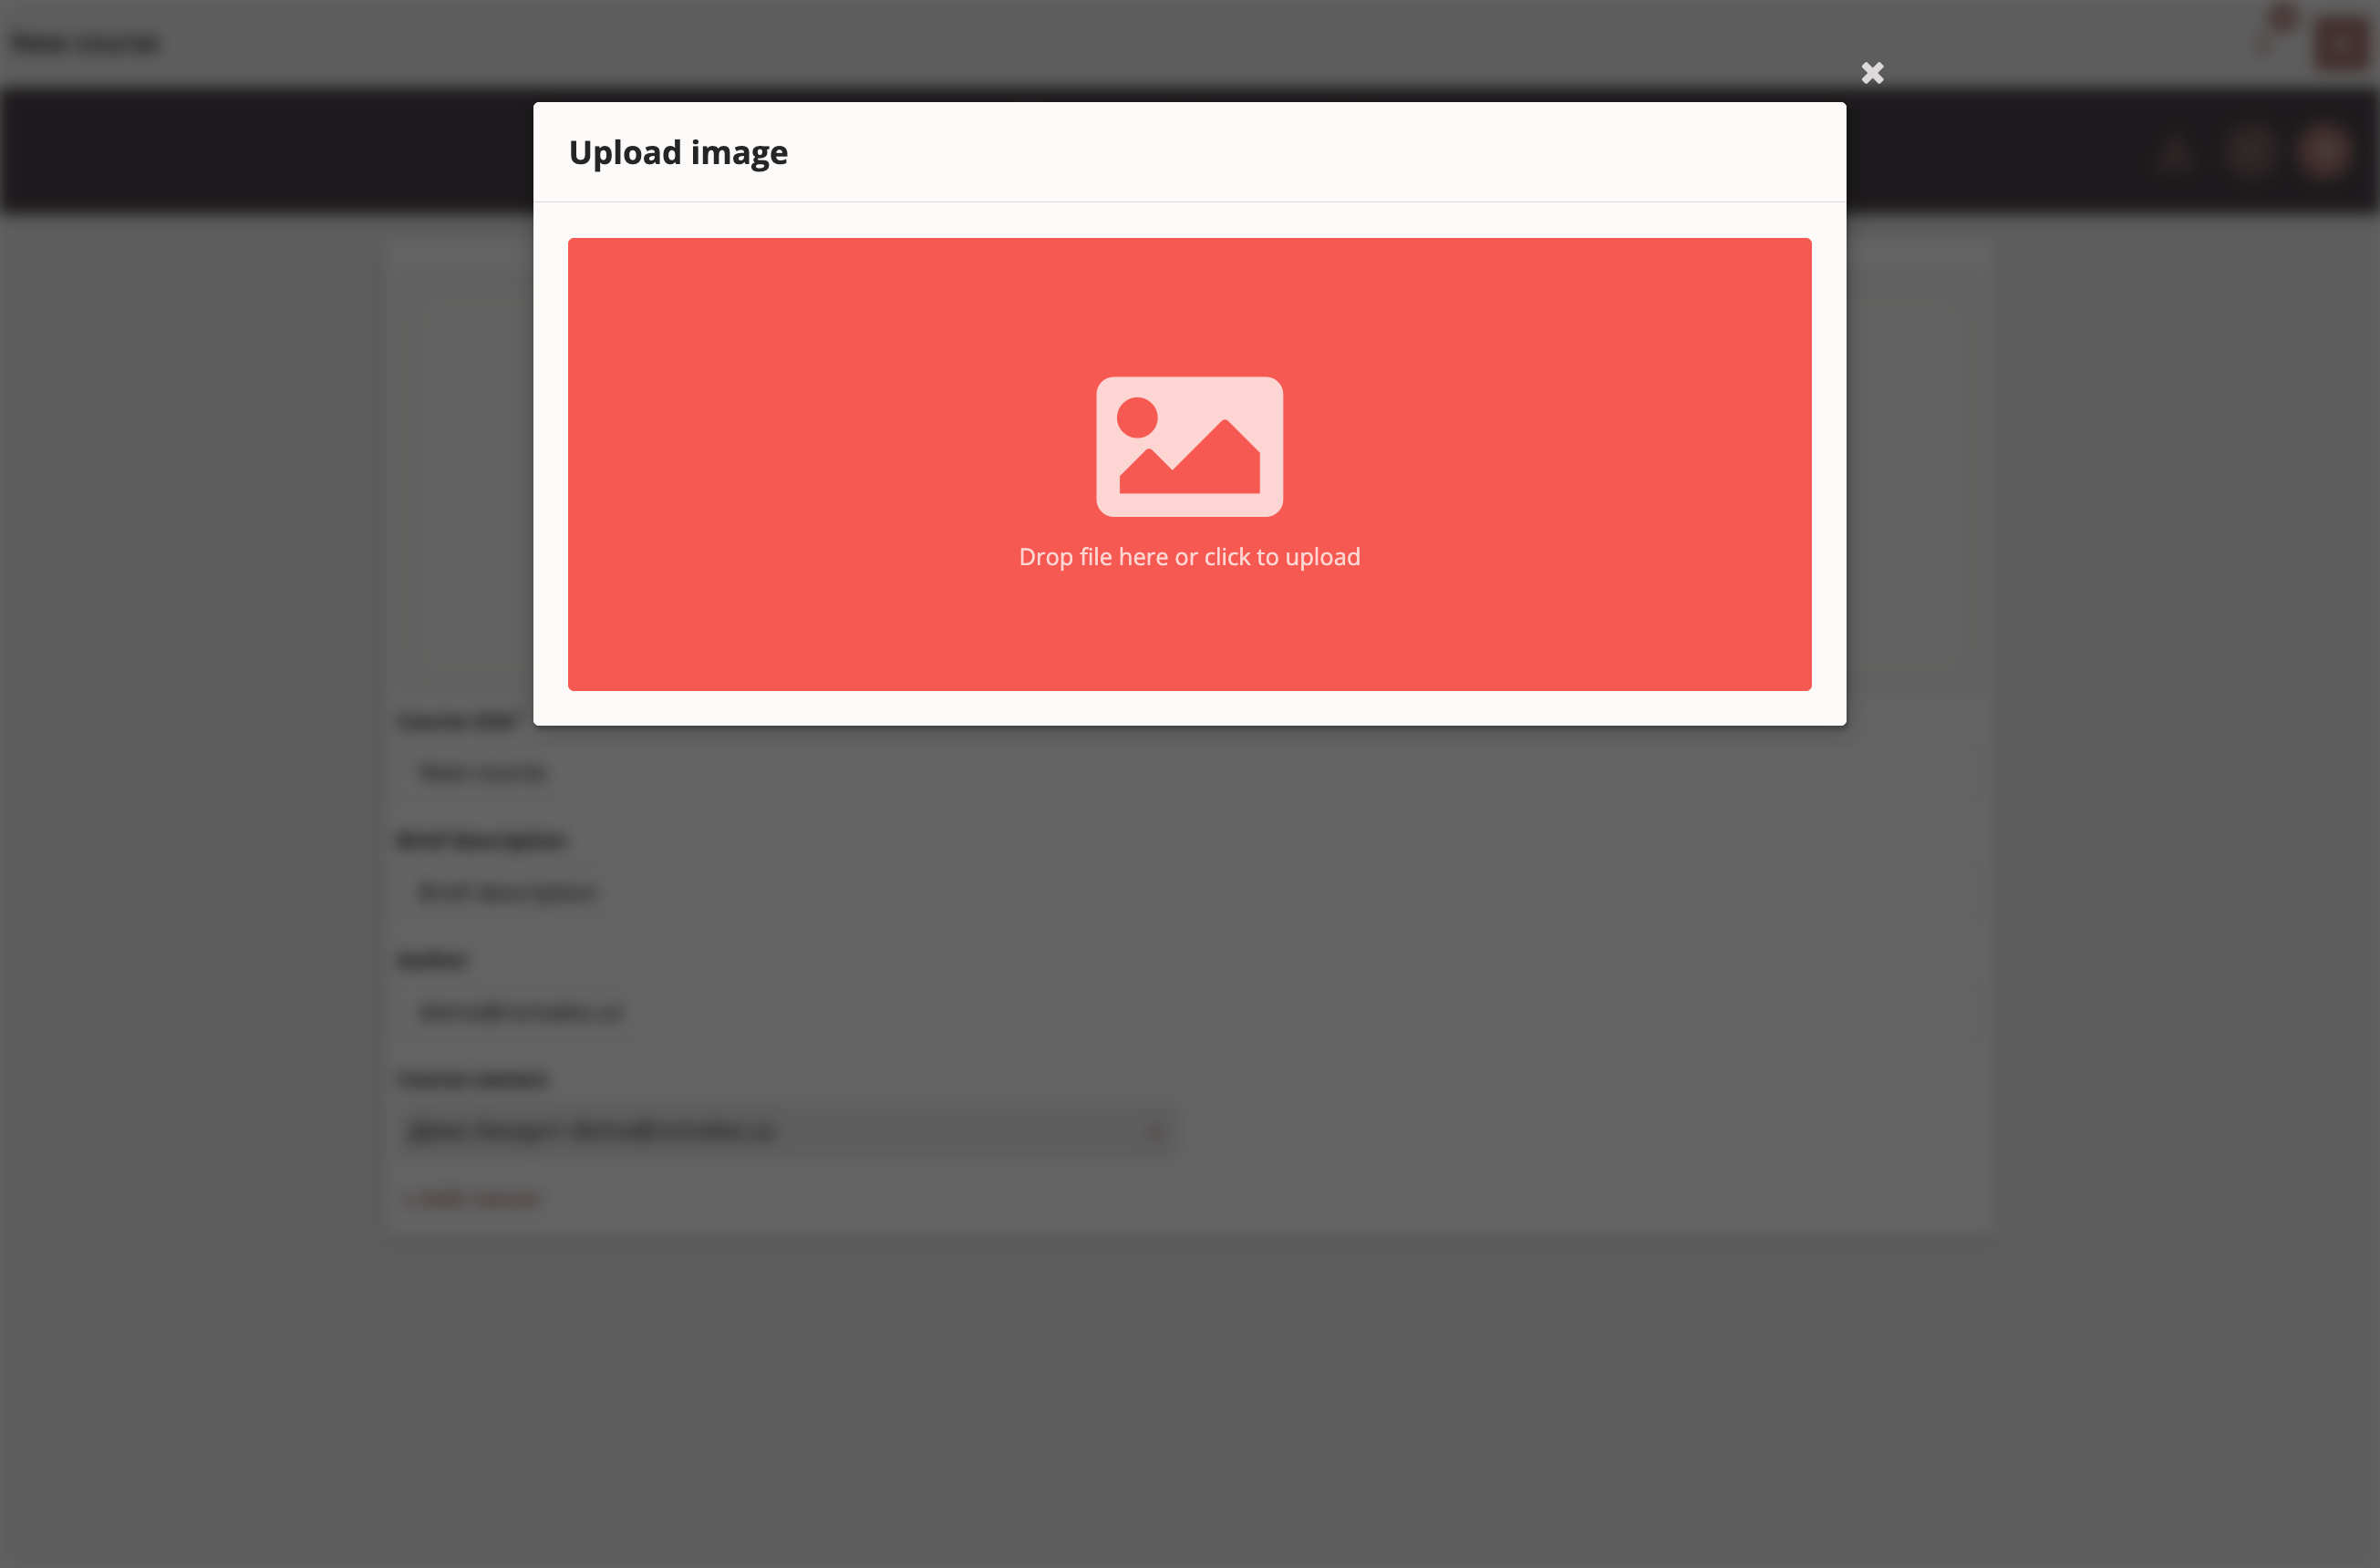
The course author can upload an image from their device. Supported formats: jpg, bmp, png, gif, svg.
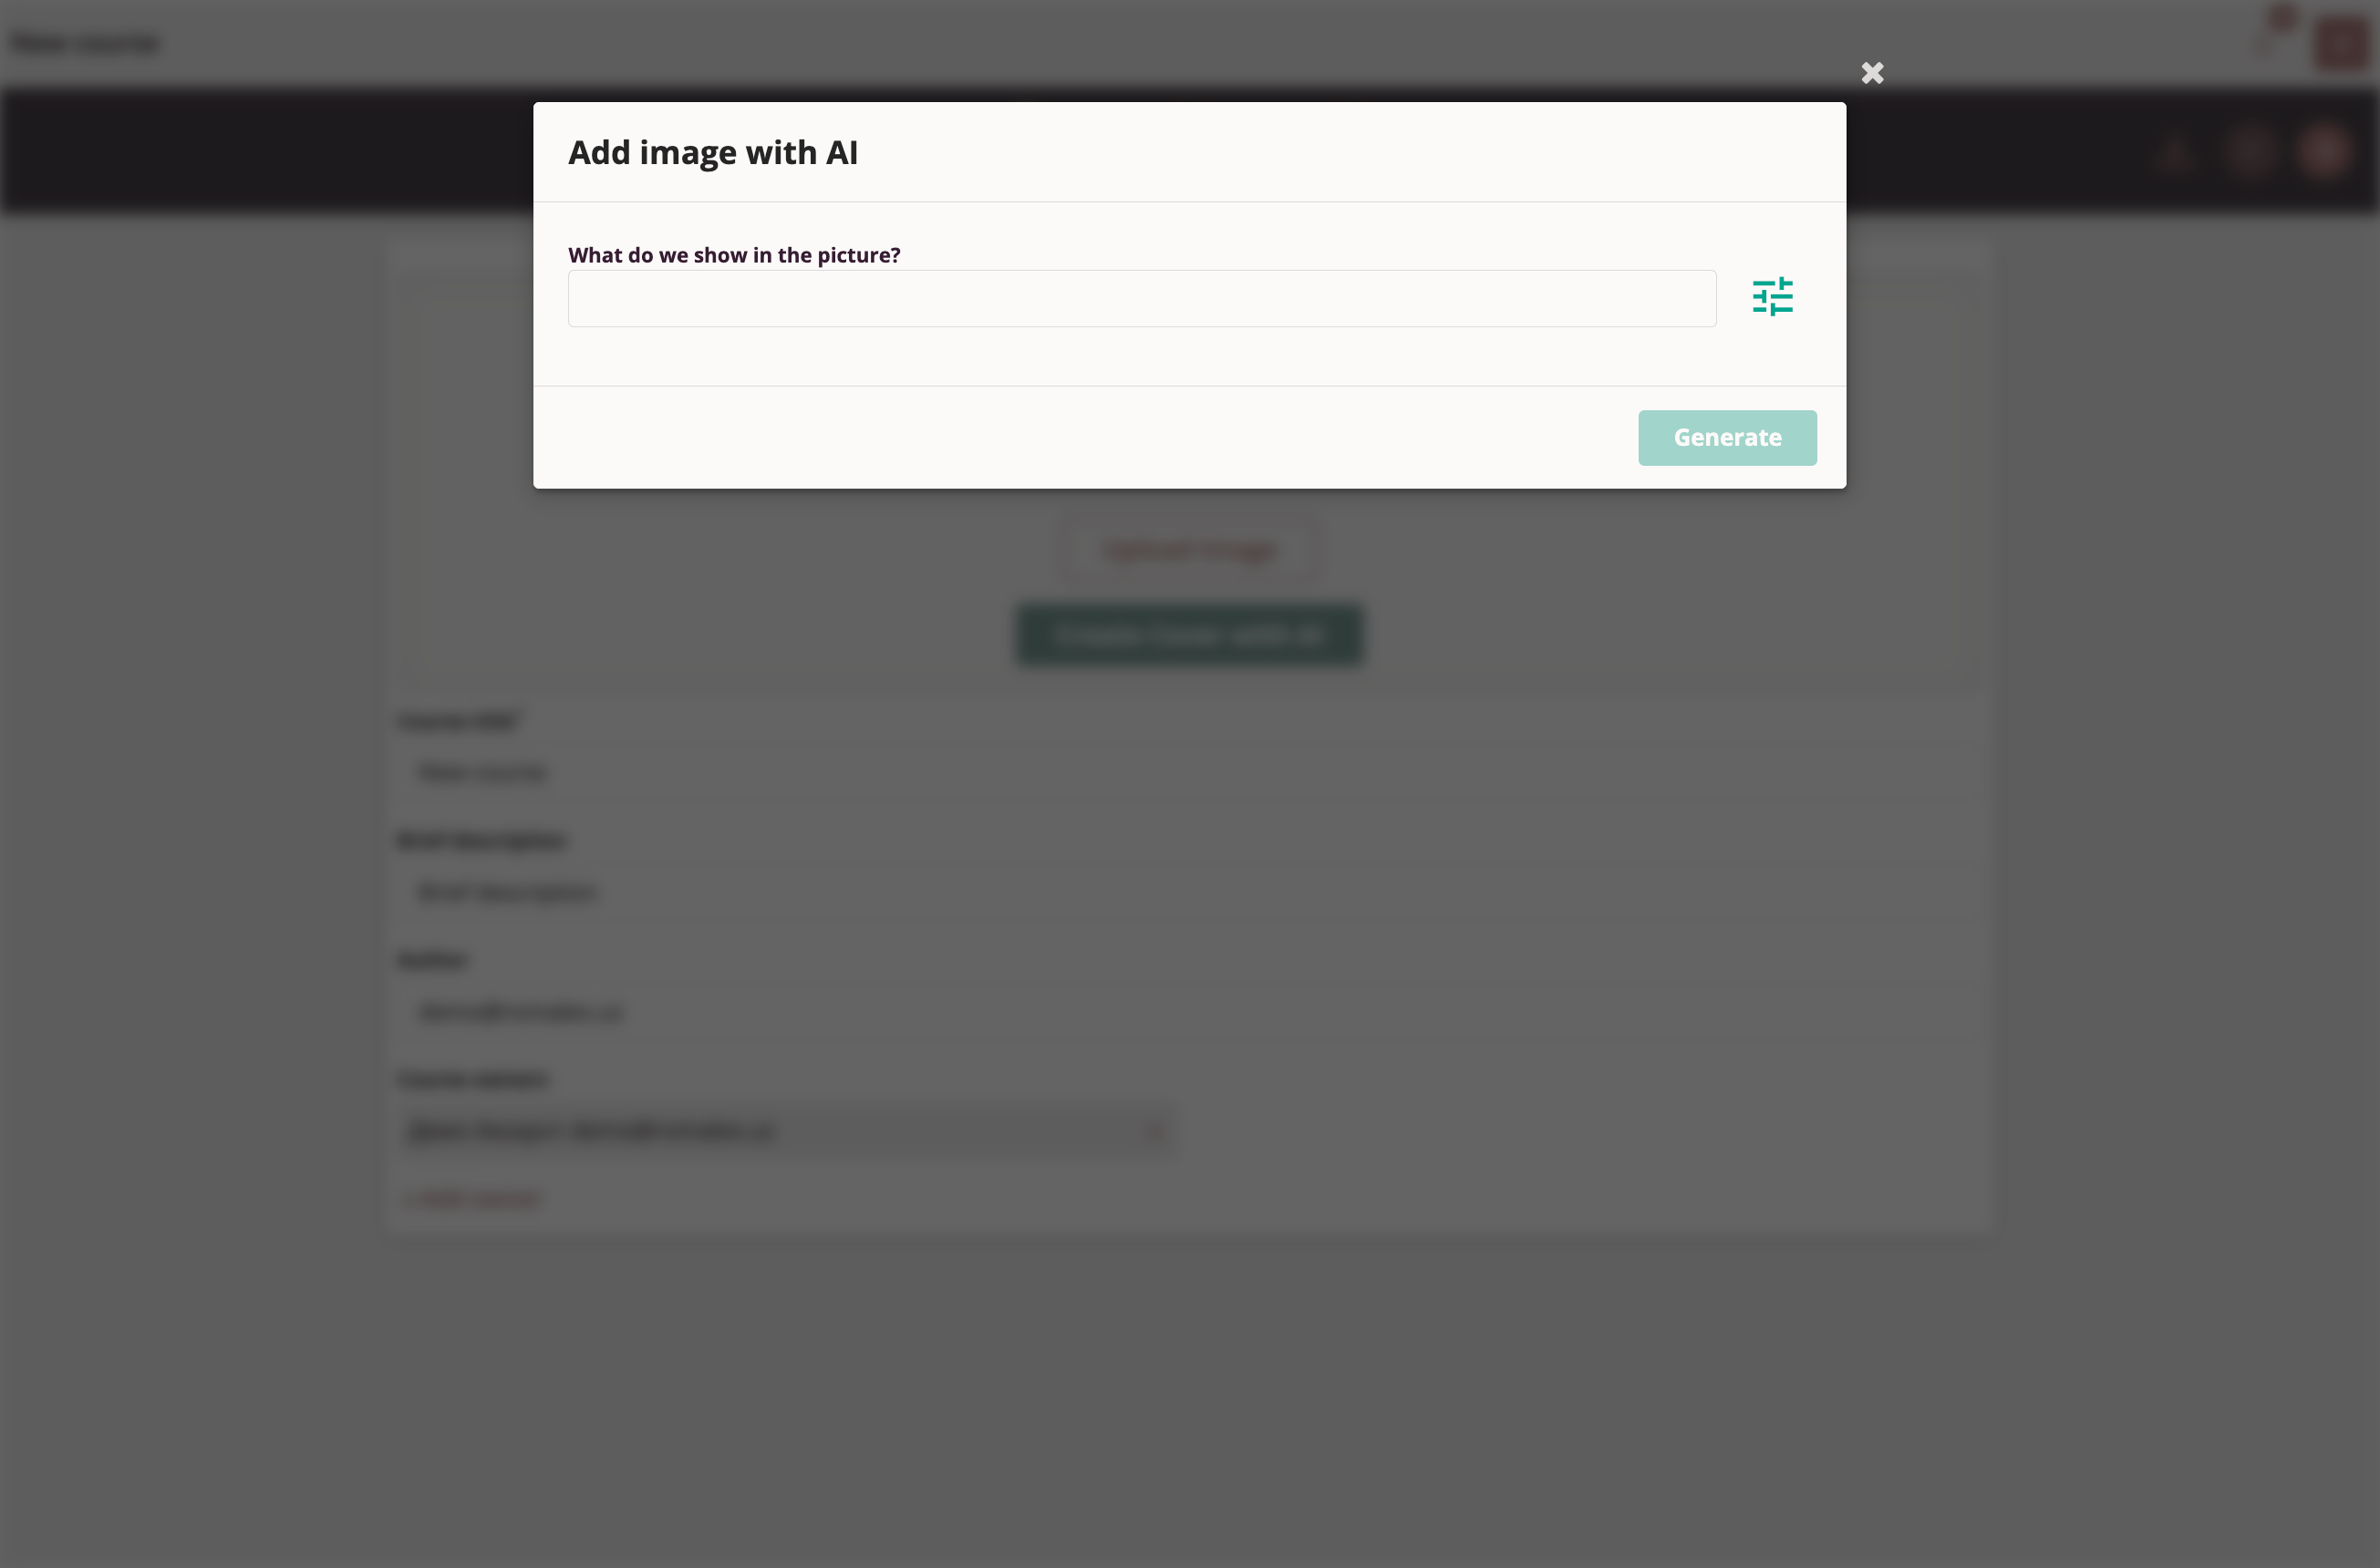
Upload Image
The course author can also use AI assistance to create a course cover image.
Key to creating quality images is a well-crafted prompt for generating images, illustrations, or pictures. Users are encouraged to experiment in creating their unique masterpieces.
Advanced users can select a suitable neural network for image generation from available options and adjust styling.
Neural Network for Image Generation
Before adding an image to the course cover, the author can preview the result and regenerate the image if needed.
AI-Generated Image

We recommend adding alt text for visually impaired users. Screen readers will then help visually impaired users understand what is depicted in the image.
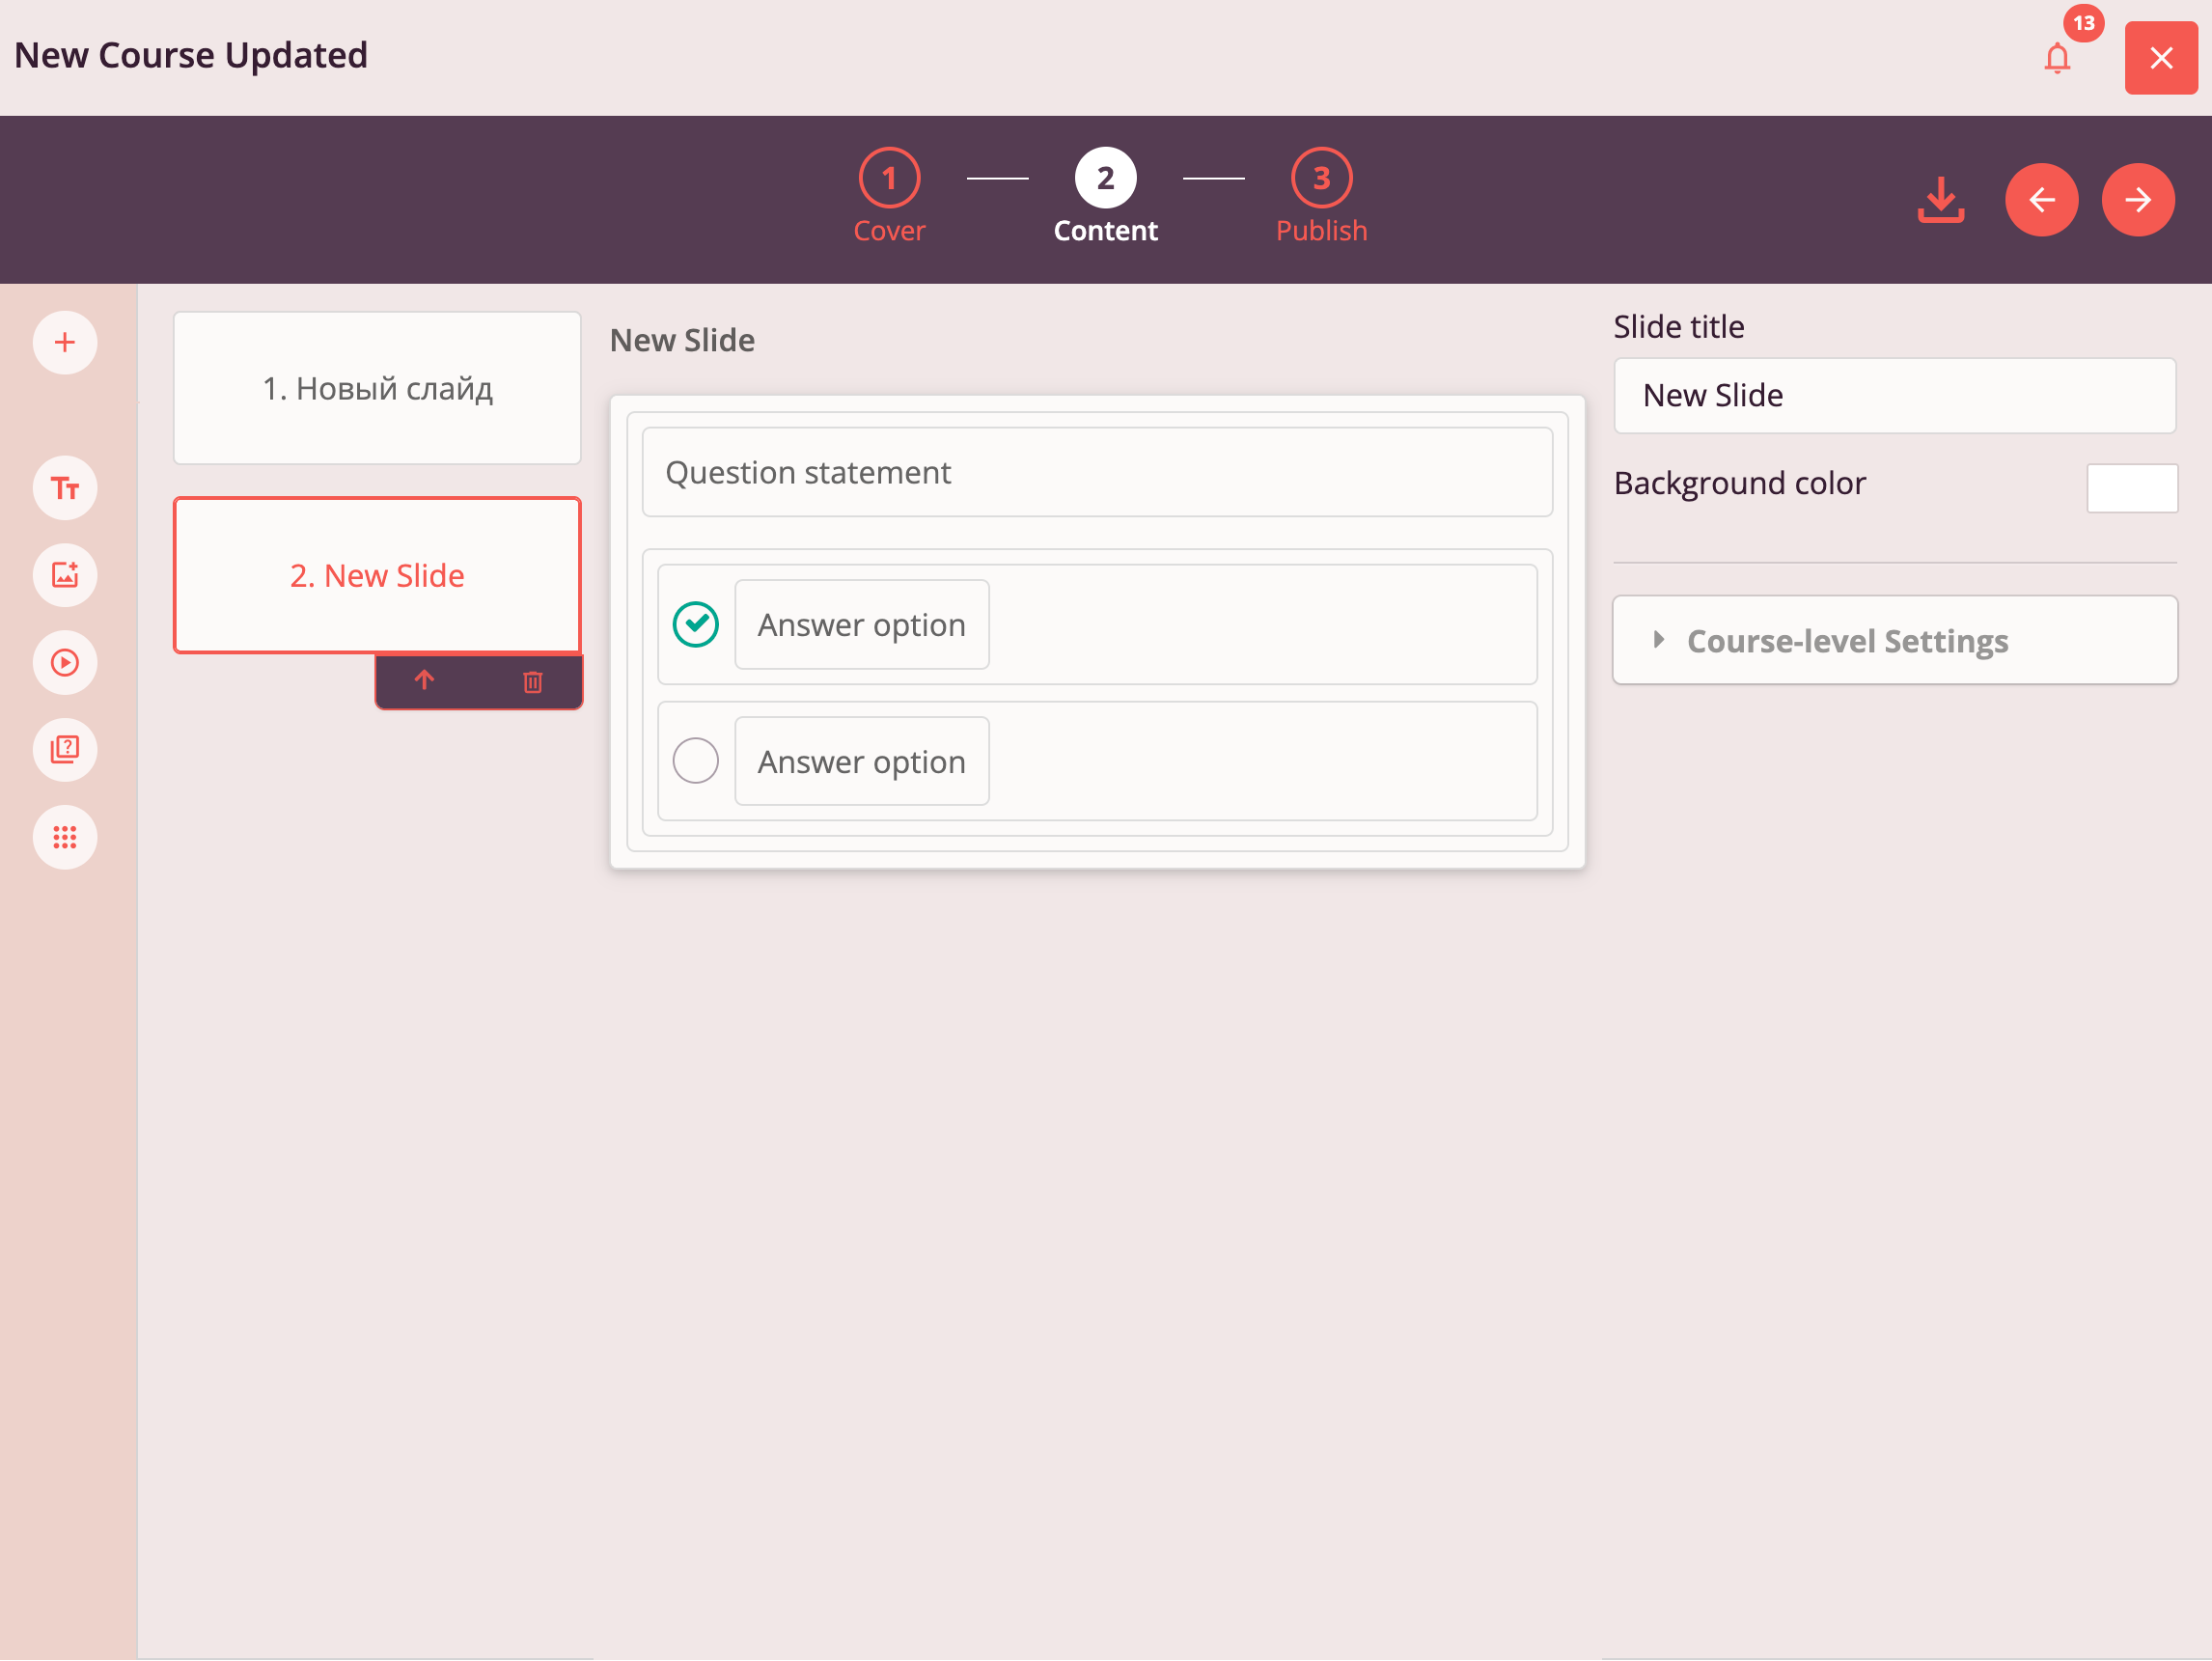
Step 2: Slides and Content
On Step 2 of the Tri-D Course Editor, the course author can:
- Add or remove slides
- Add to a slide, remove from a slide, move within a slide, or edit content objects:
- Headings
- Text blocks
- Images
- Videos
- Quiz questions
- Tables
- Set or change display parameters for added content objects
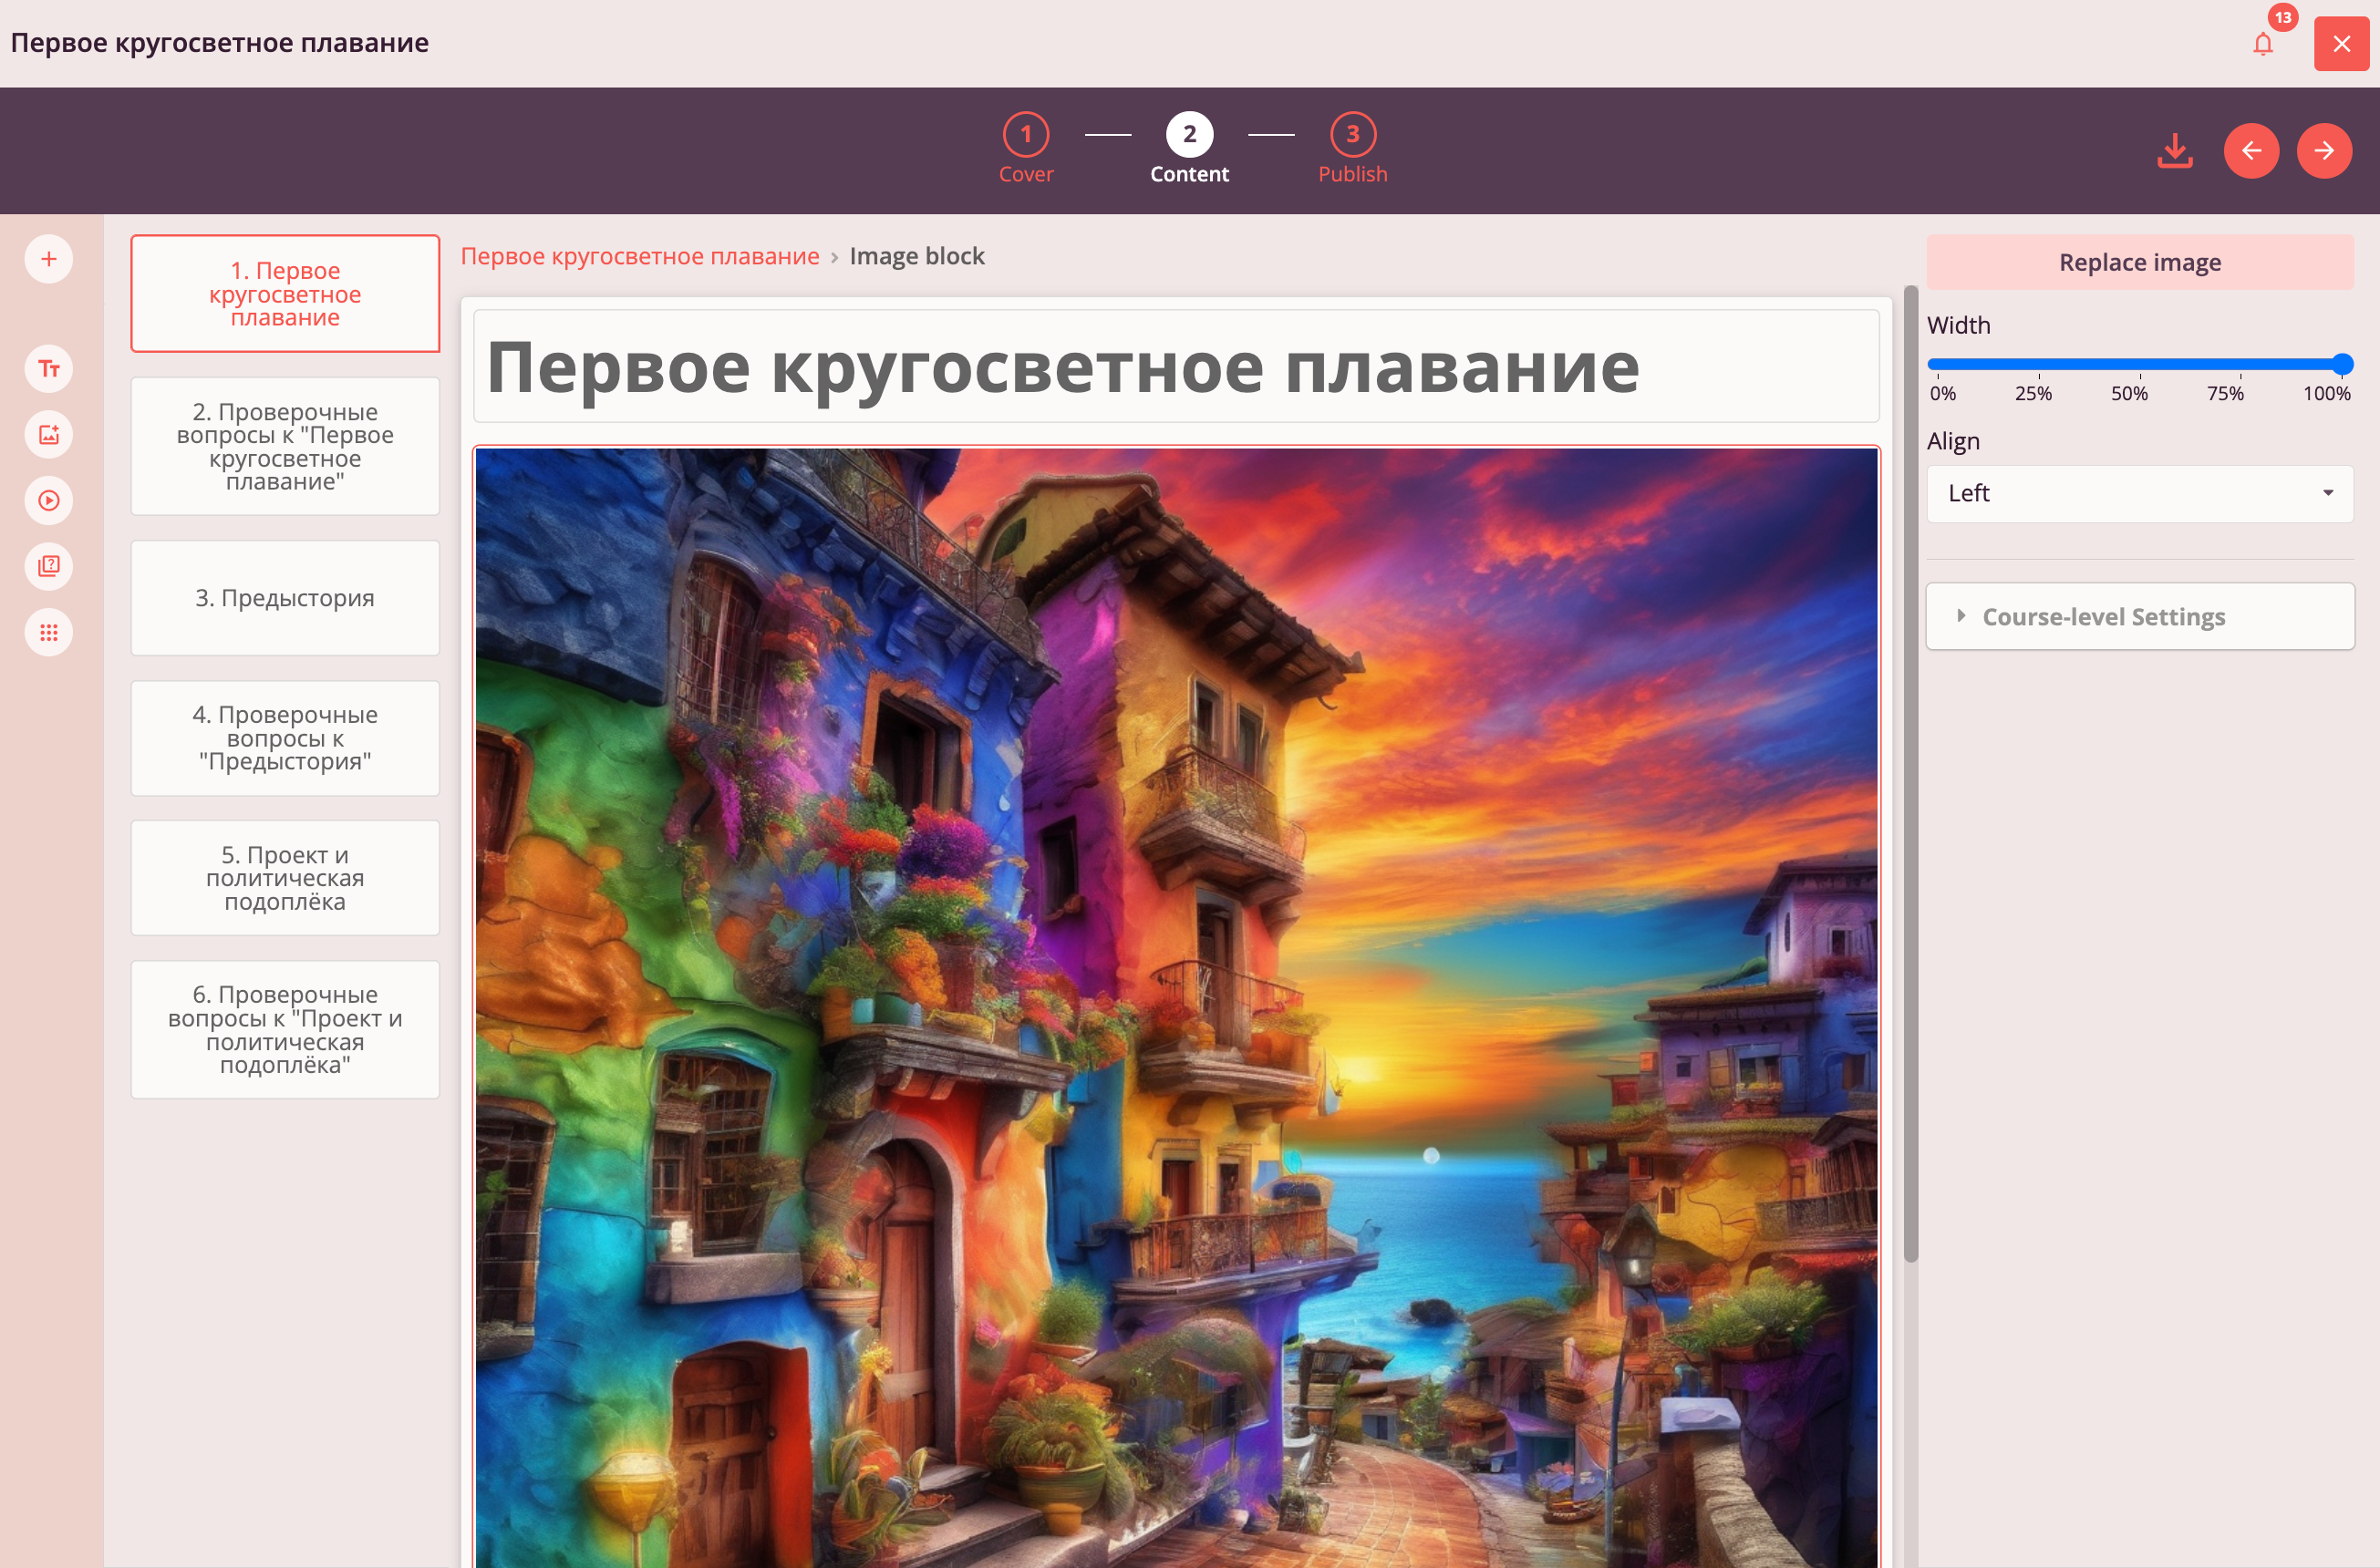
*Left panel:*
- Object addition panel
- Slide list
*Center panel:*
Slide content display area with ability to select a content object
*Right panel:*
Editable parameters panel for the selected content object
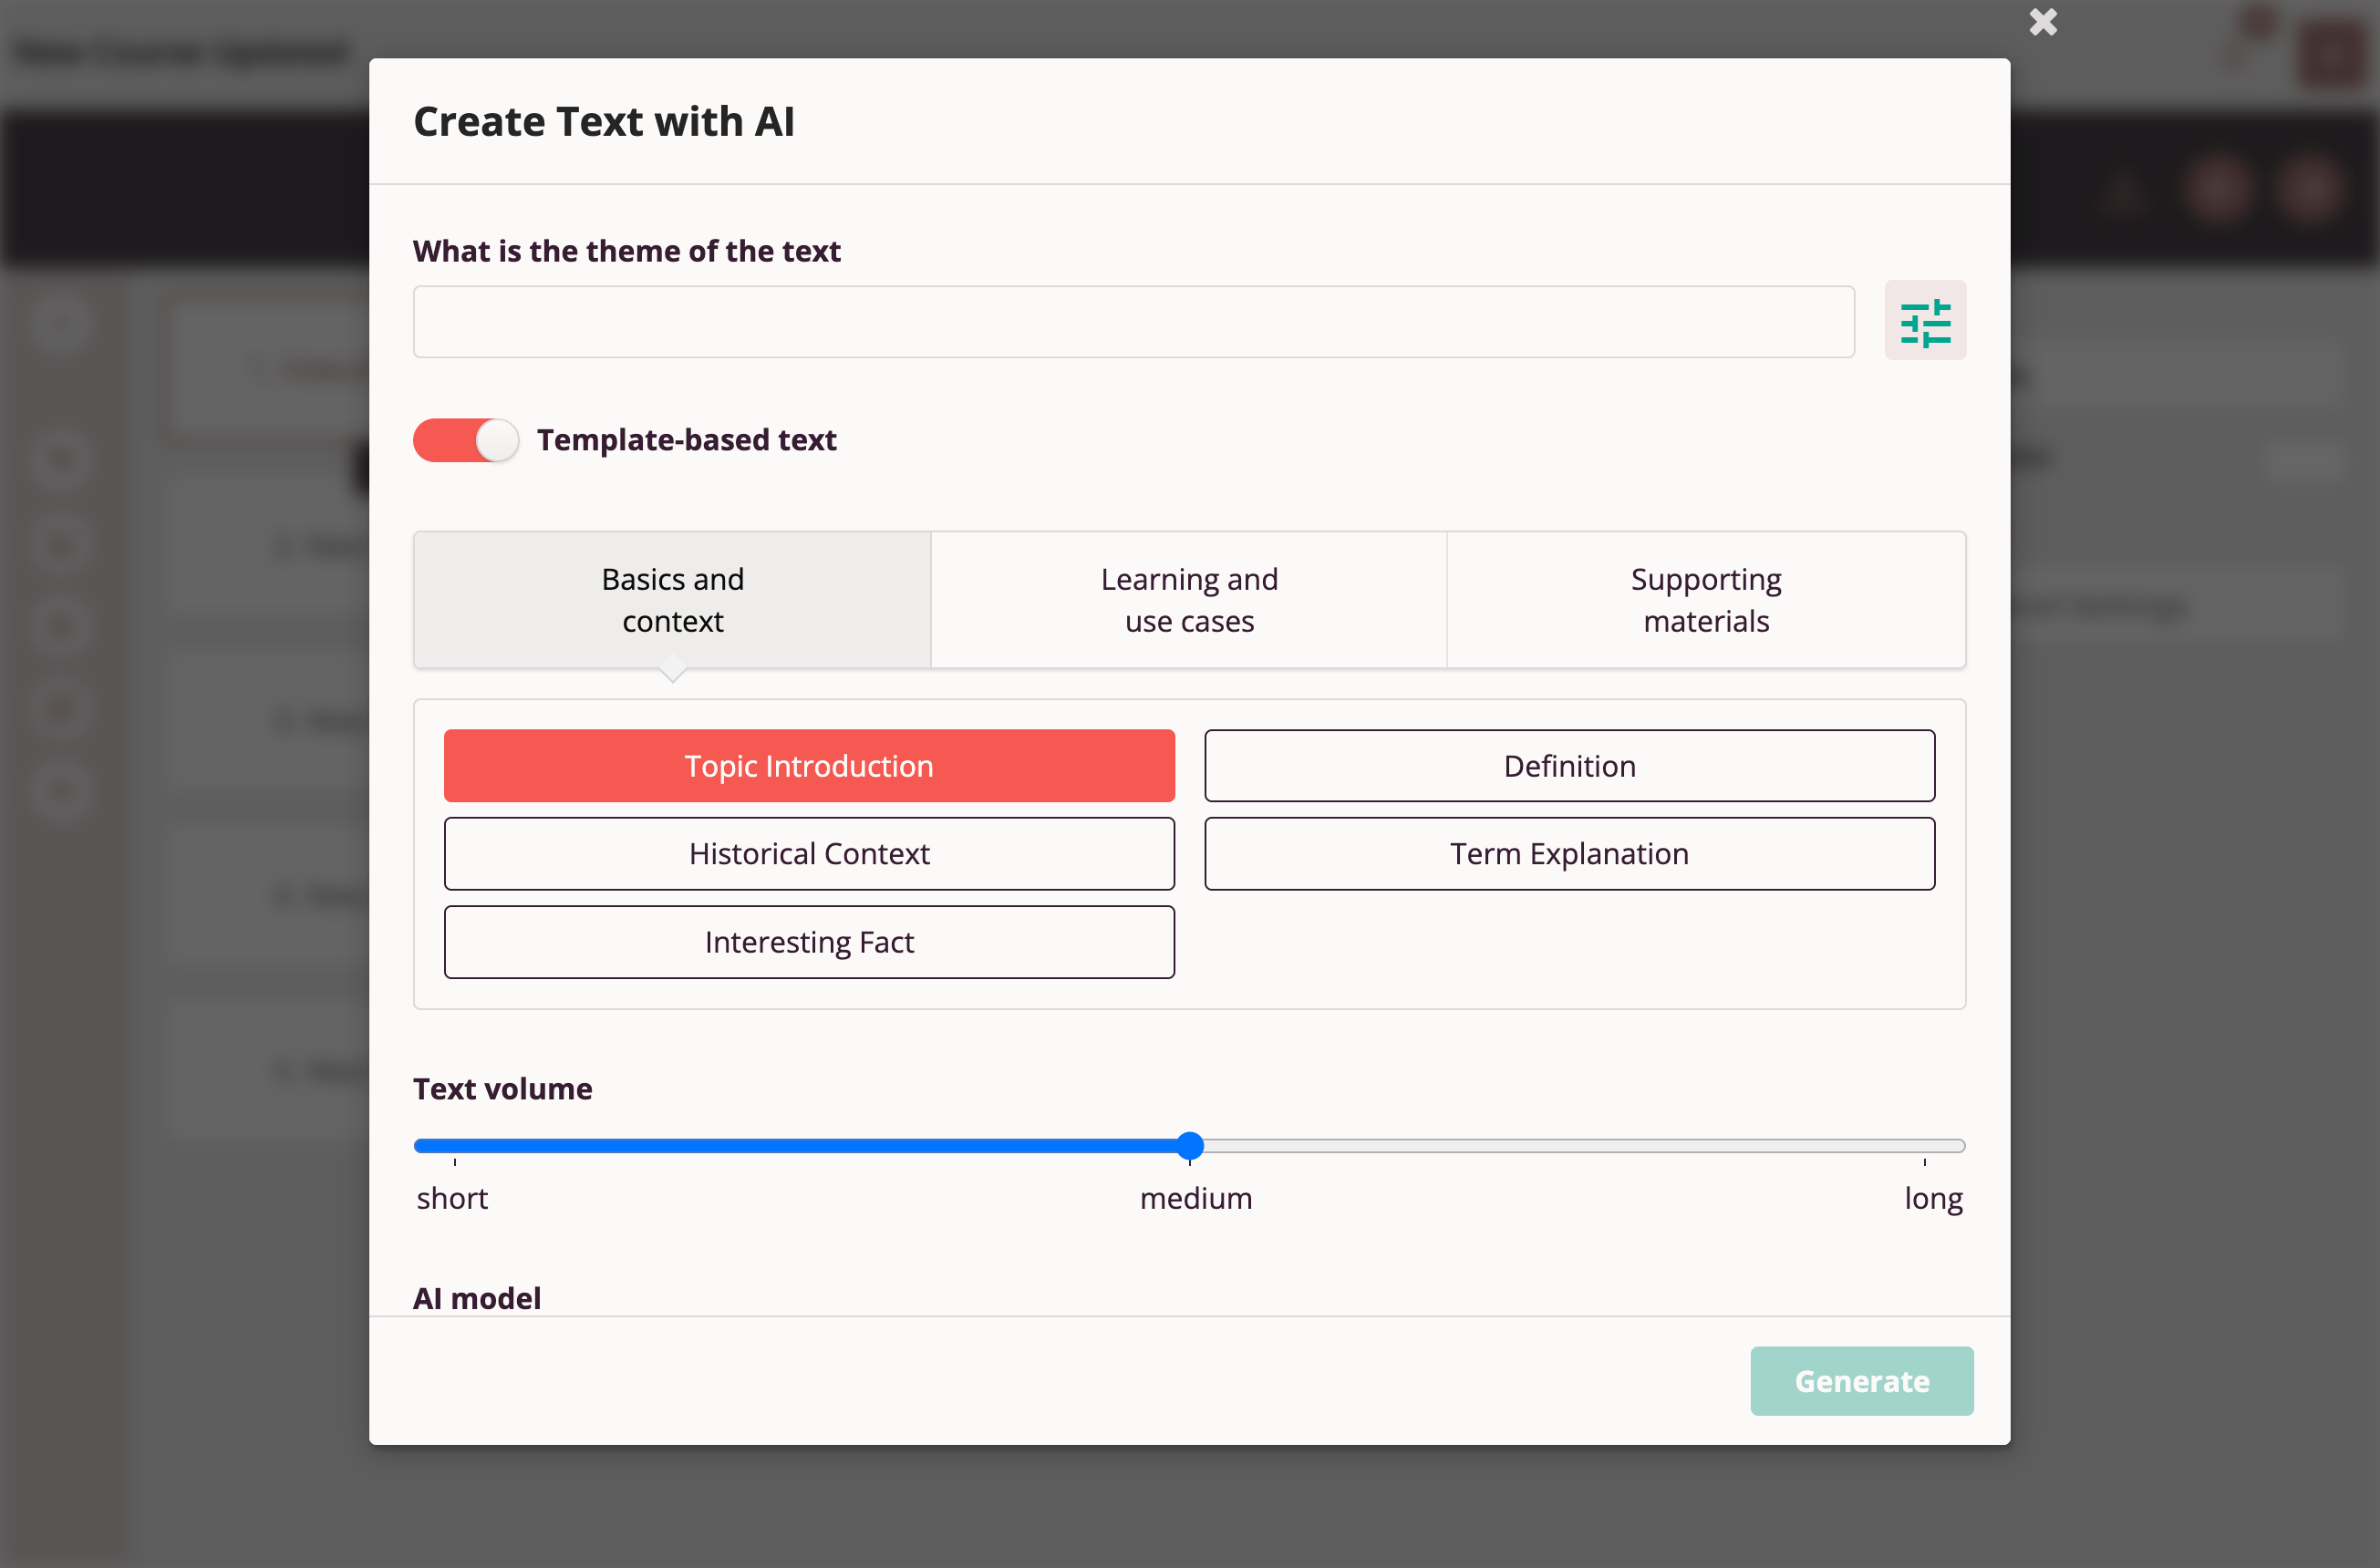
AI Text Generation
Course authors can use AI to generate text on a specified topic. AI is an excellent assistant for solving the "blank page problem" when the course topic is known but material is lacking.
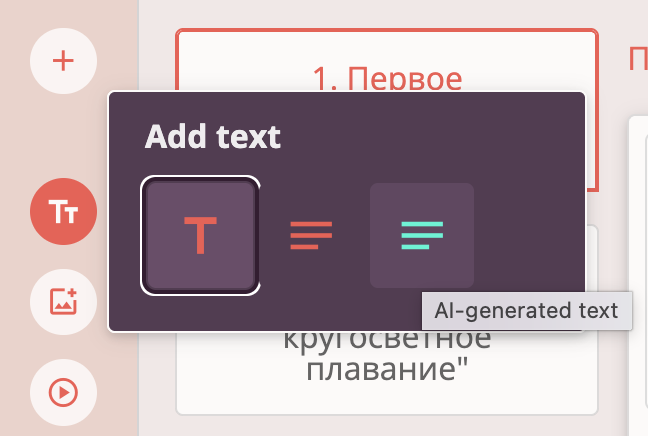
Creating quality text descriptions requires carefully prepared prompts. Users are encouraged to experiment in crafting high-quality prompts for high-quality content.
Advanced users can select a suitable neural network for text generation, adjust desired text volume, and choose a presentation template suited to their goals.
Adding Video via Link from Rutube, VK Video, YouTube
Authors can add video to a slide using a link from Rutube, VK Video, or YouTube. Tri-D allows embedding video via embed code or direct link.
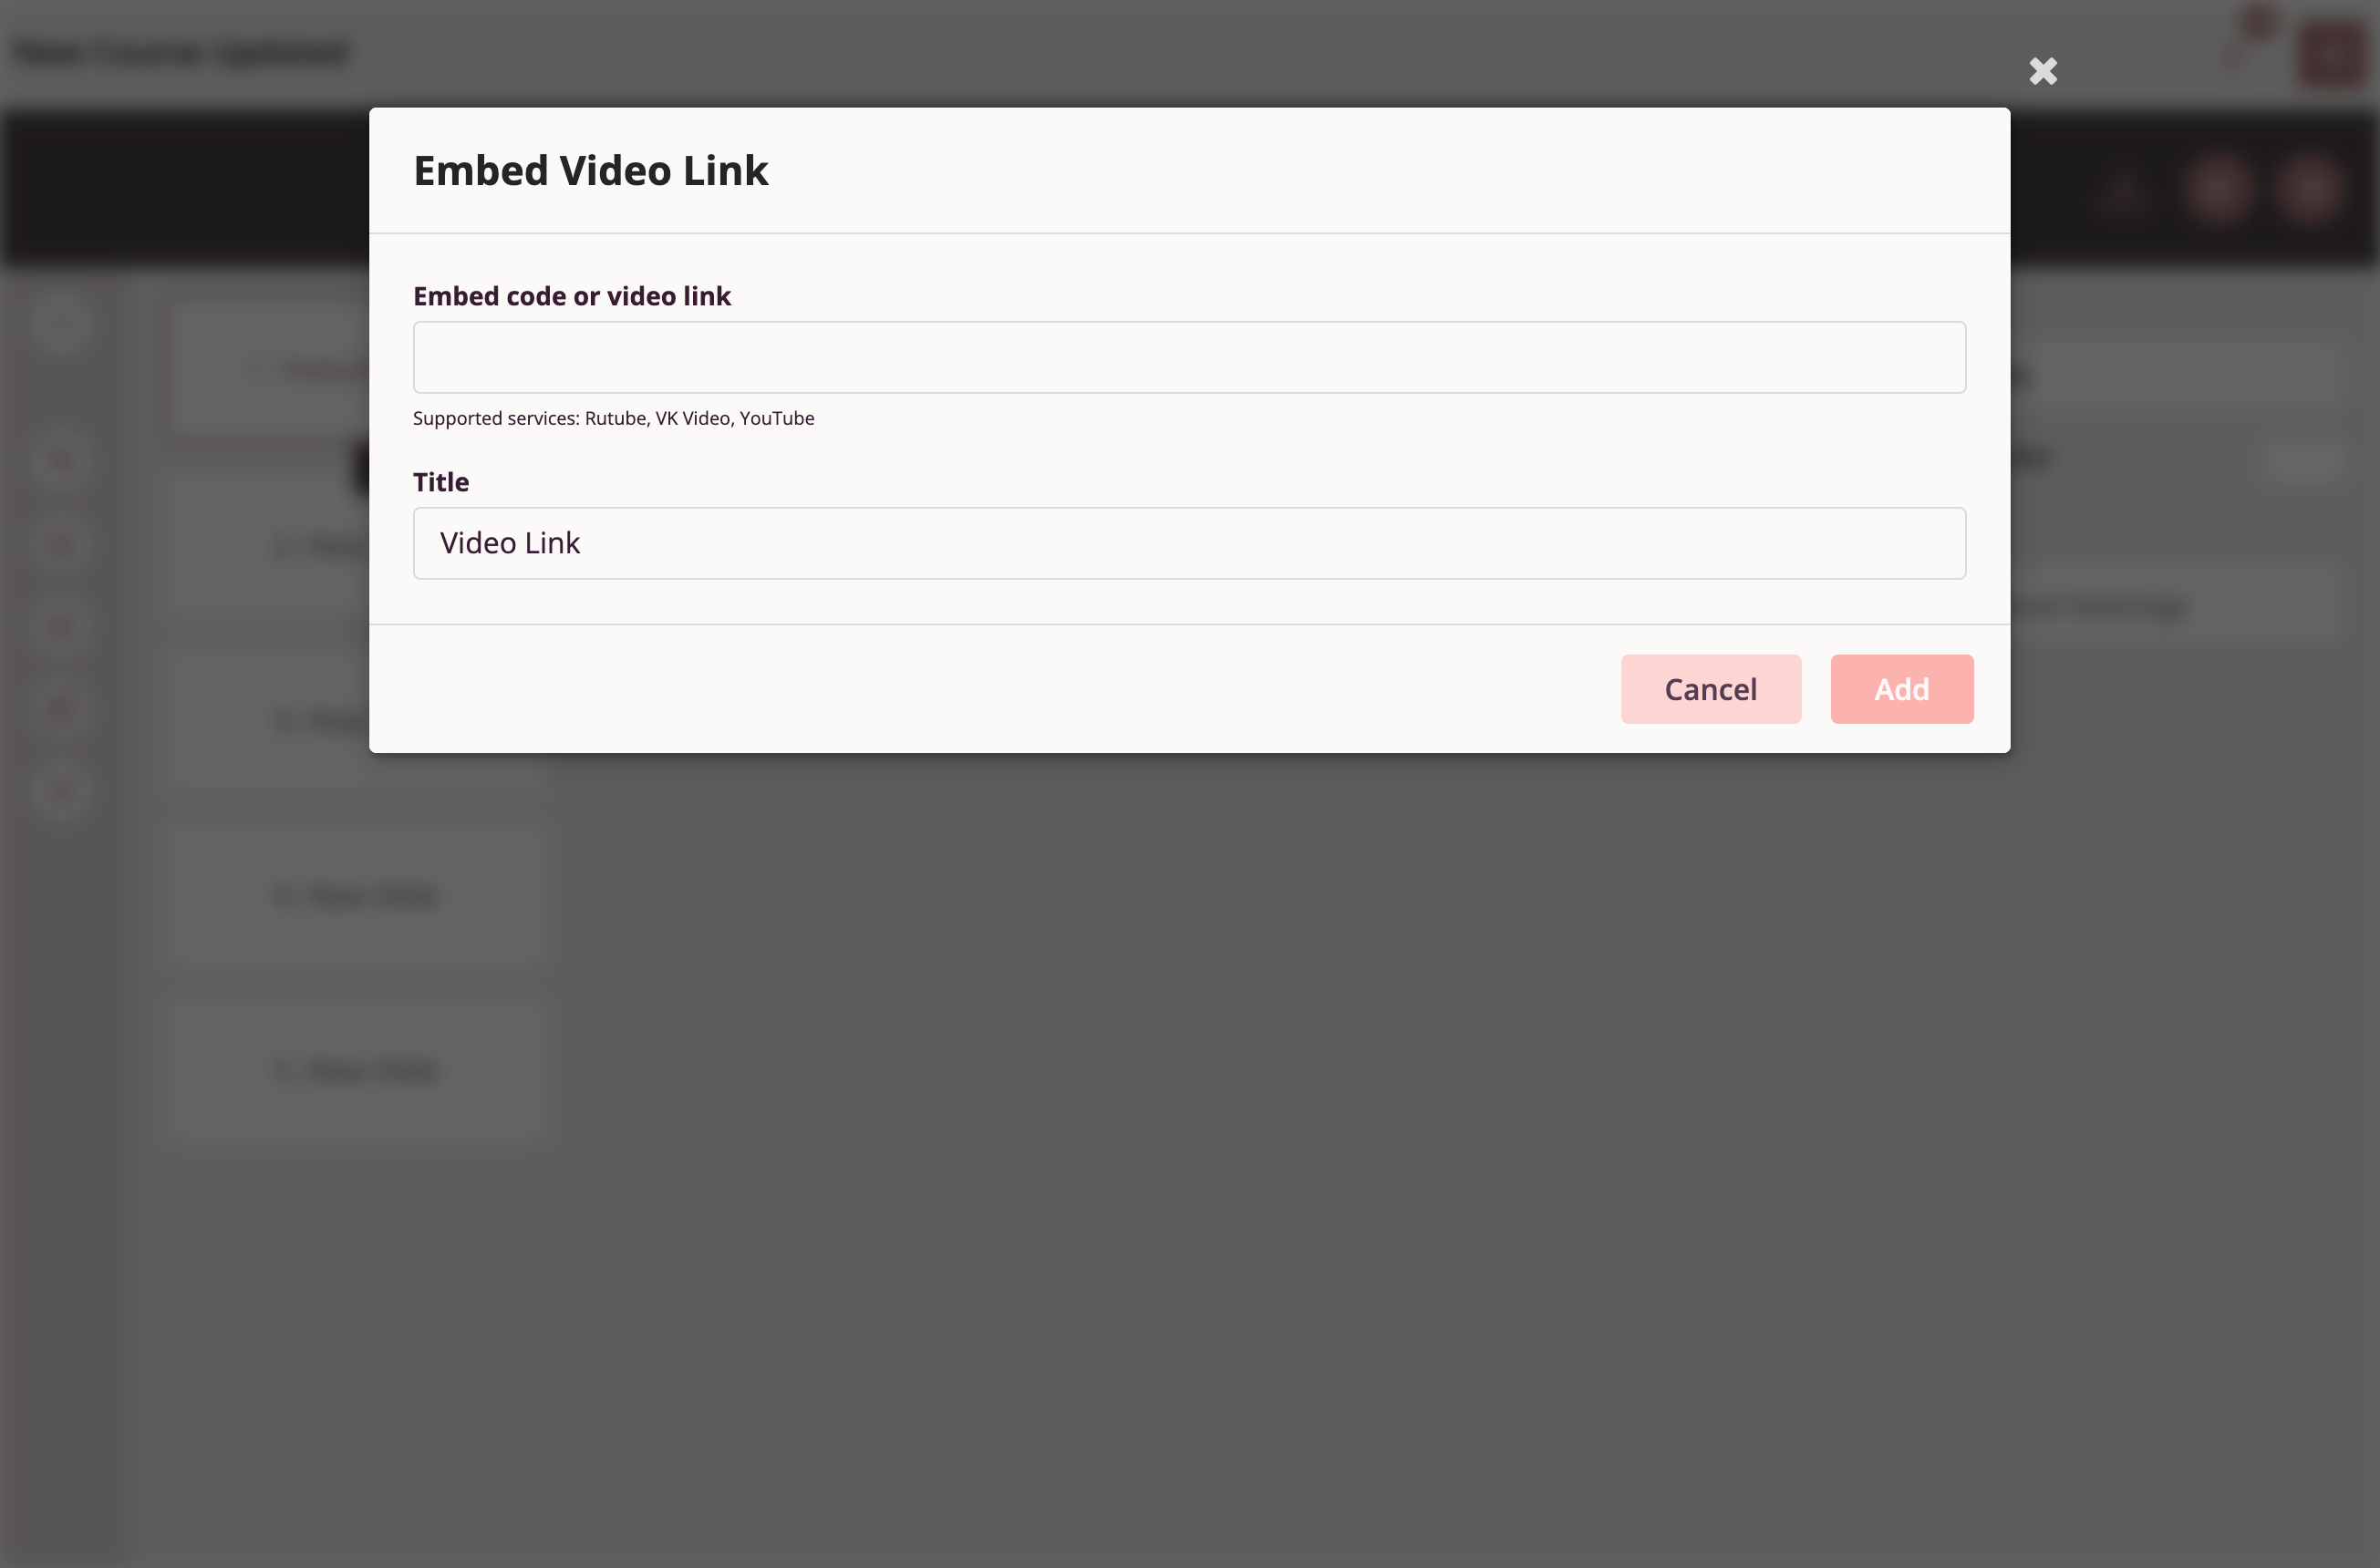
For embedded video objects, you can configure:
- Dimensions
- Alignment on the slide
- Autoplay settings

Creating a Single-Answer Question
A question in Tri-D is an object comprising the question body (text, image) and an answer field (type and interactivity depend on question type). It can be added to a slide or a table cell on a slide.
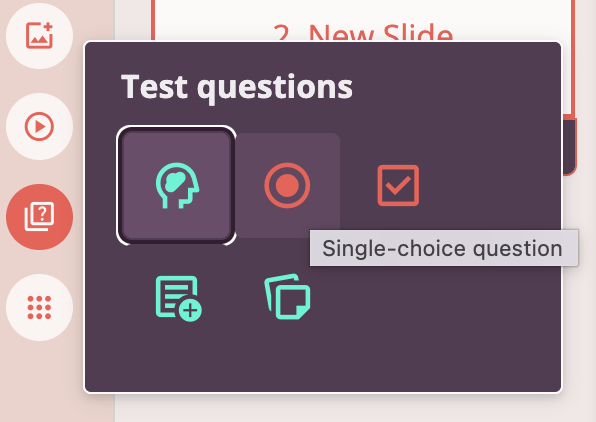
Single-answer implies only one of the proposed options is correct. The system automatically evaluates the answer by comparing it to the predefined correct answer.
To edit the question body, answer field, or answer option, select the corresponding object and make desired changes.
If needed, add an answer option by selecting the corresponding item from the context menu when the answer field is selected.
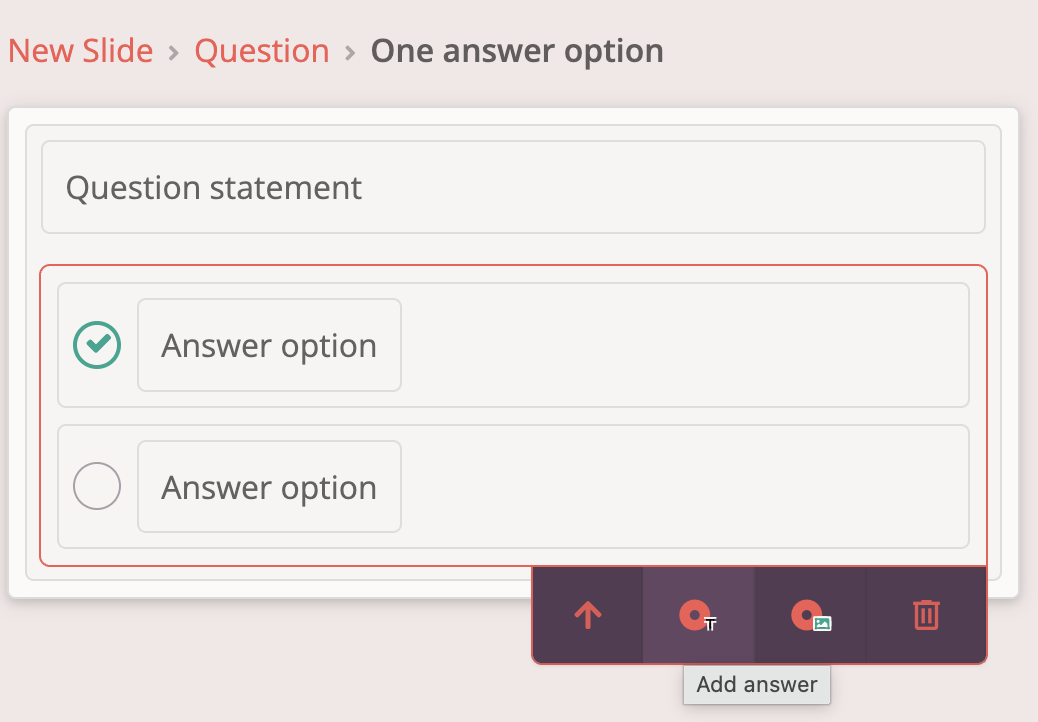
Answer options may include images.

Creating a Multiple-Answer Question
The "Multiple answers" question type implies that more than one proposed option may be correct. The system automatically evaluates the answer by comparing it to predefined correct answers.
Editing content for the question body, answer field, or answer options works similarly to single-answer questions (see above).
Creating Quiz Questions with AI Assistance
Tri-D allows creating quiz questions using a neural network.
Supported question types when creating with AI:
- Single answer
- Multiple answers
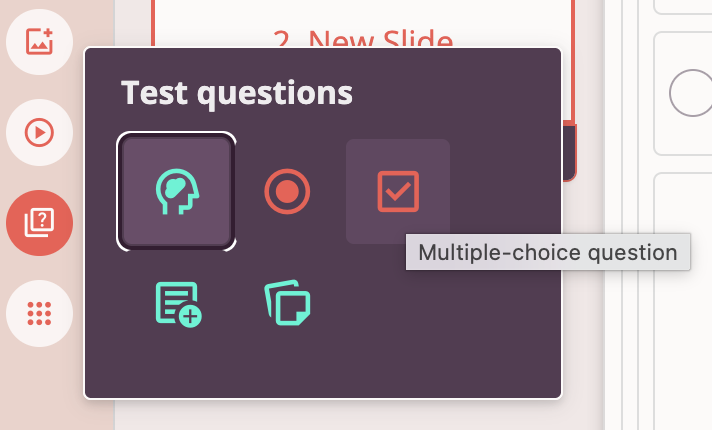
To create a single AI-generated question and add it to a slide, select "AI Question" from the "Quiz Questions" menu.
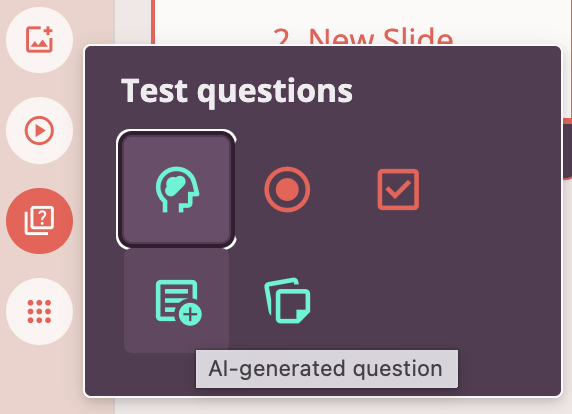
Creating a question with AI requires specifying the question topic and desired question type in detail.
Advanced users can configure question creation parameters more granularly:
- Number of answer options
- Number of correct answers (for multiple-answer questions)
- Question formulation complexity level
- Question formulation type to assess knowledge according to Bloom's taxonomy
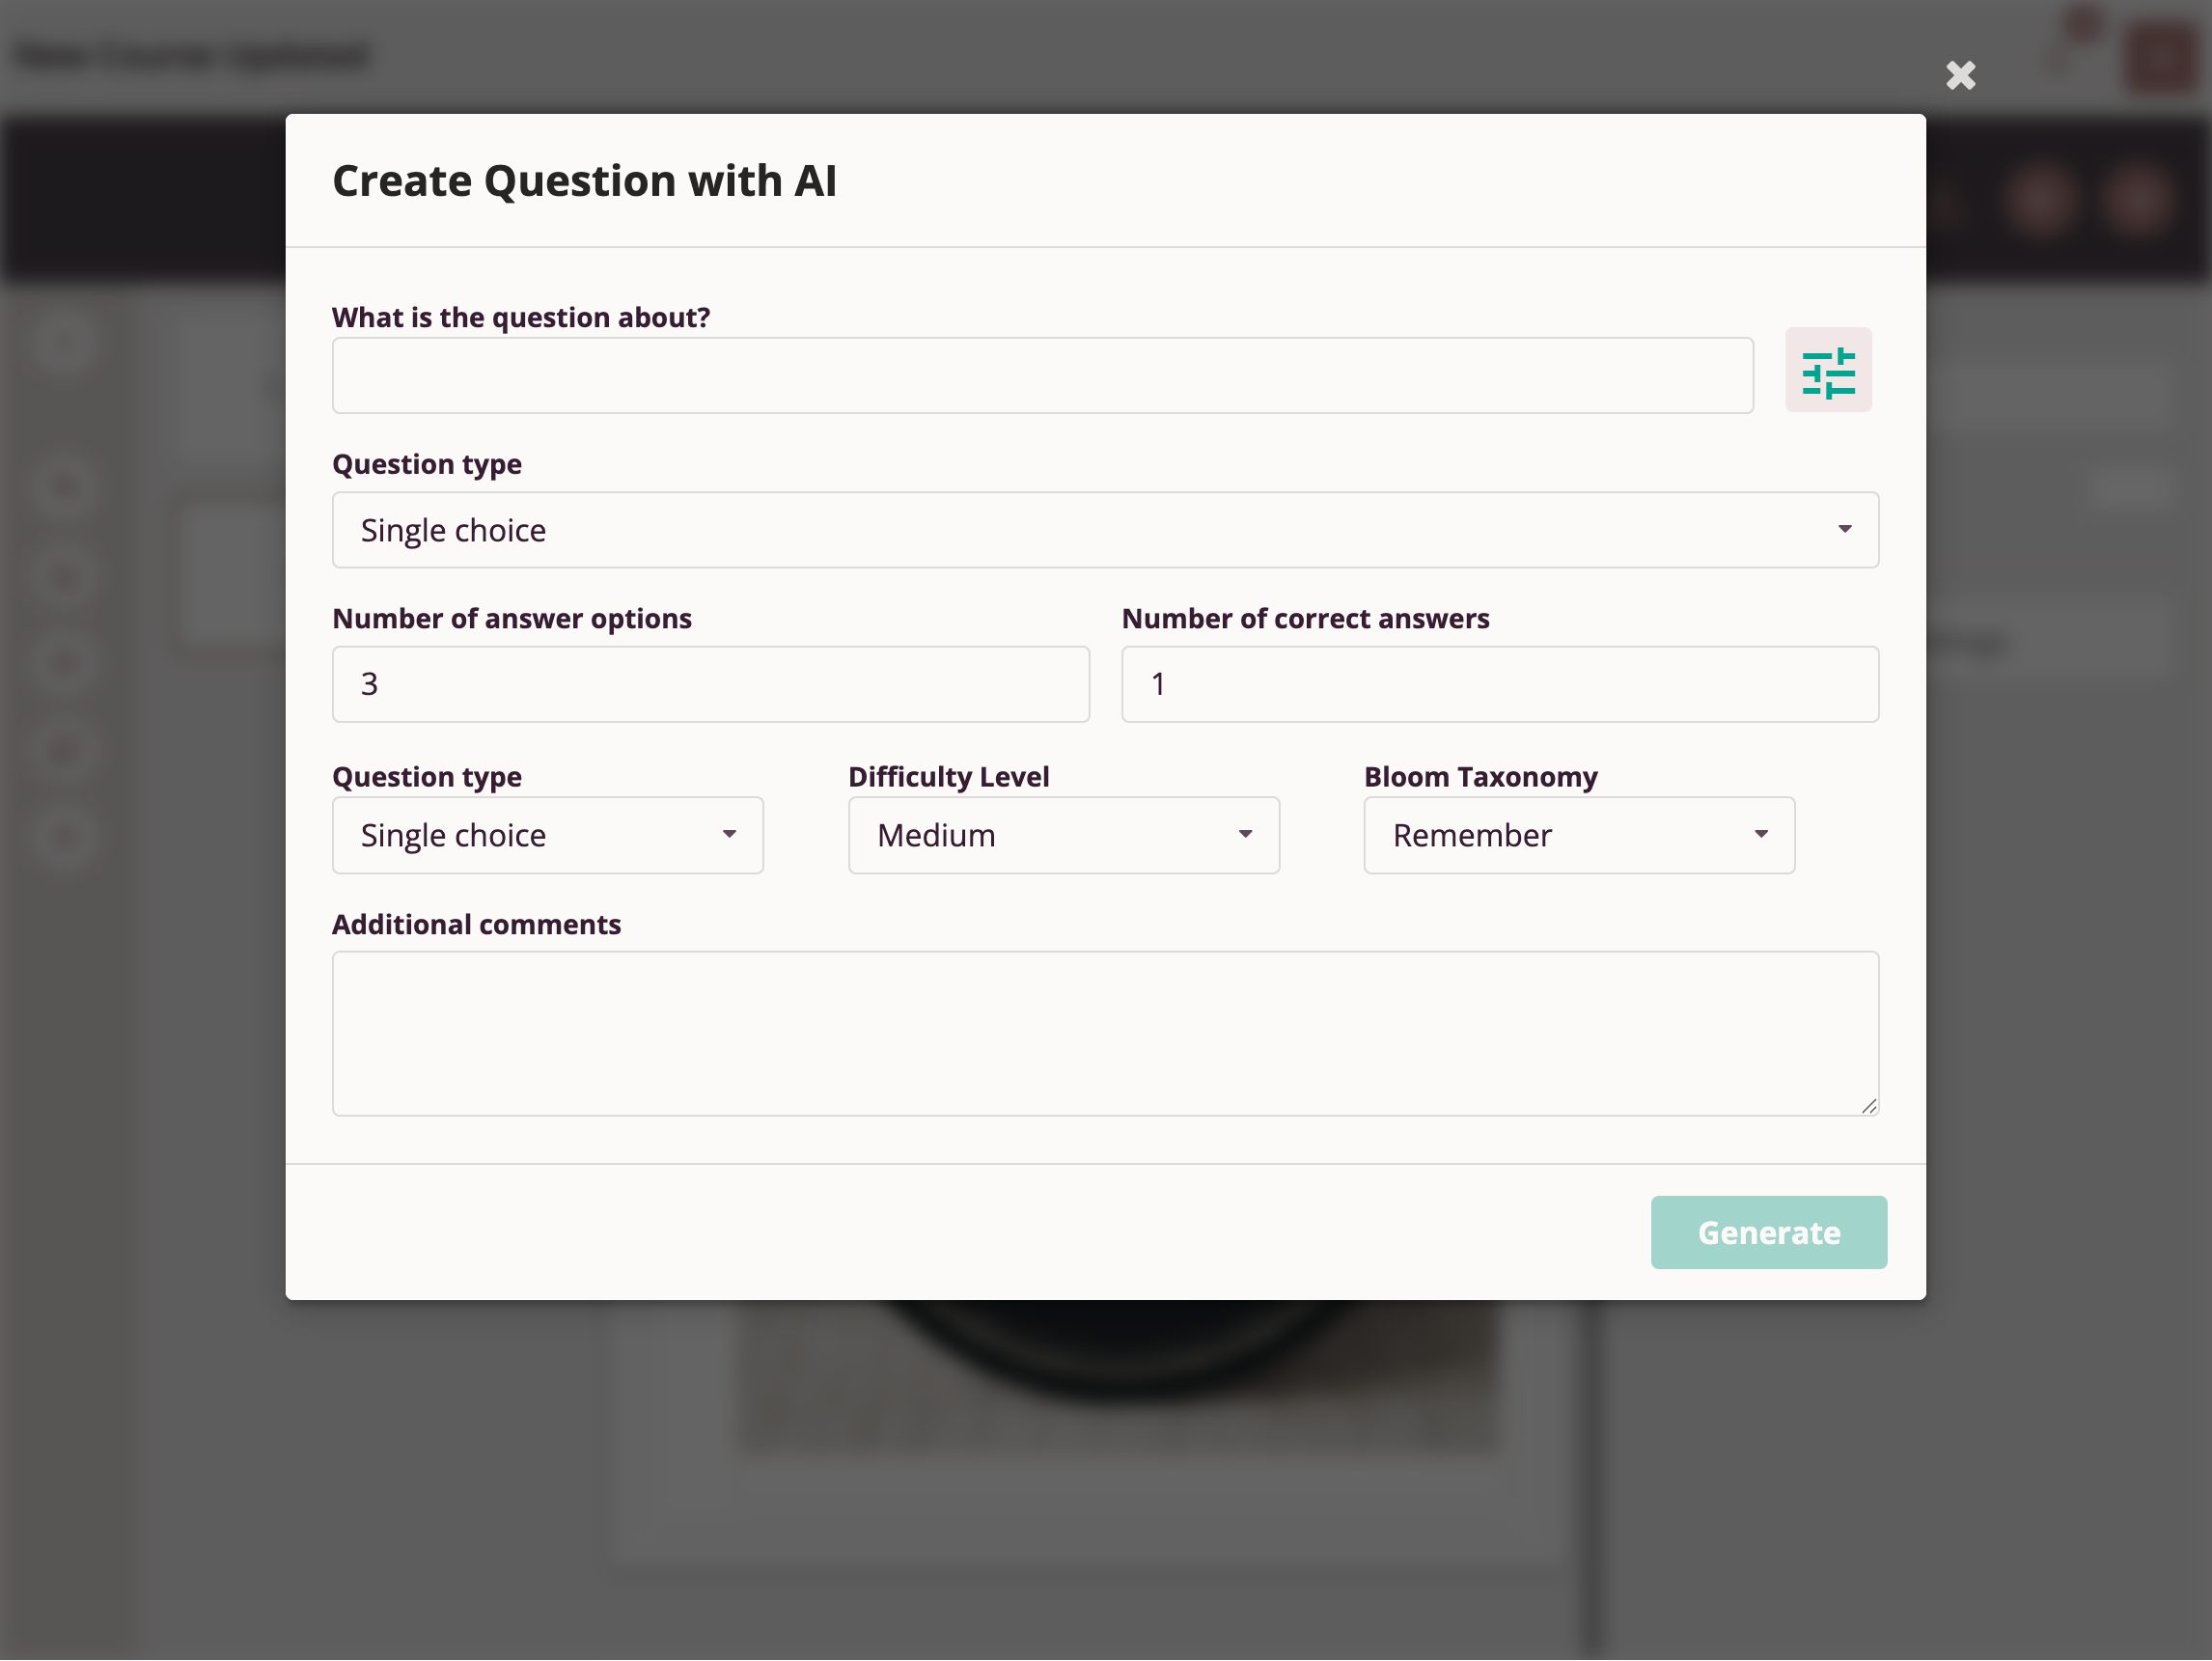
Advanced users can also provide clarifying comments for the AI to help generate questions that most precisely meet their goals.
To create a block of multiple AI-generated questions and add to a slide, select "AI Questions Block" from the "Quiz Questions" menu.
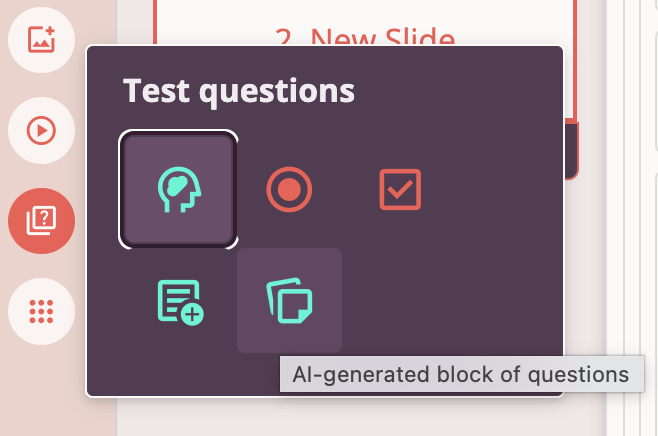
Creating a question block with AI requires specifying the topic, desired number of questions in the block, and adding clarifying comments for the AI to help generate questions that most precisely meet your goals.
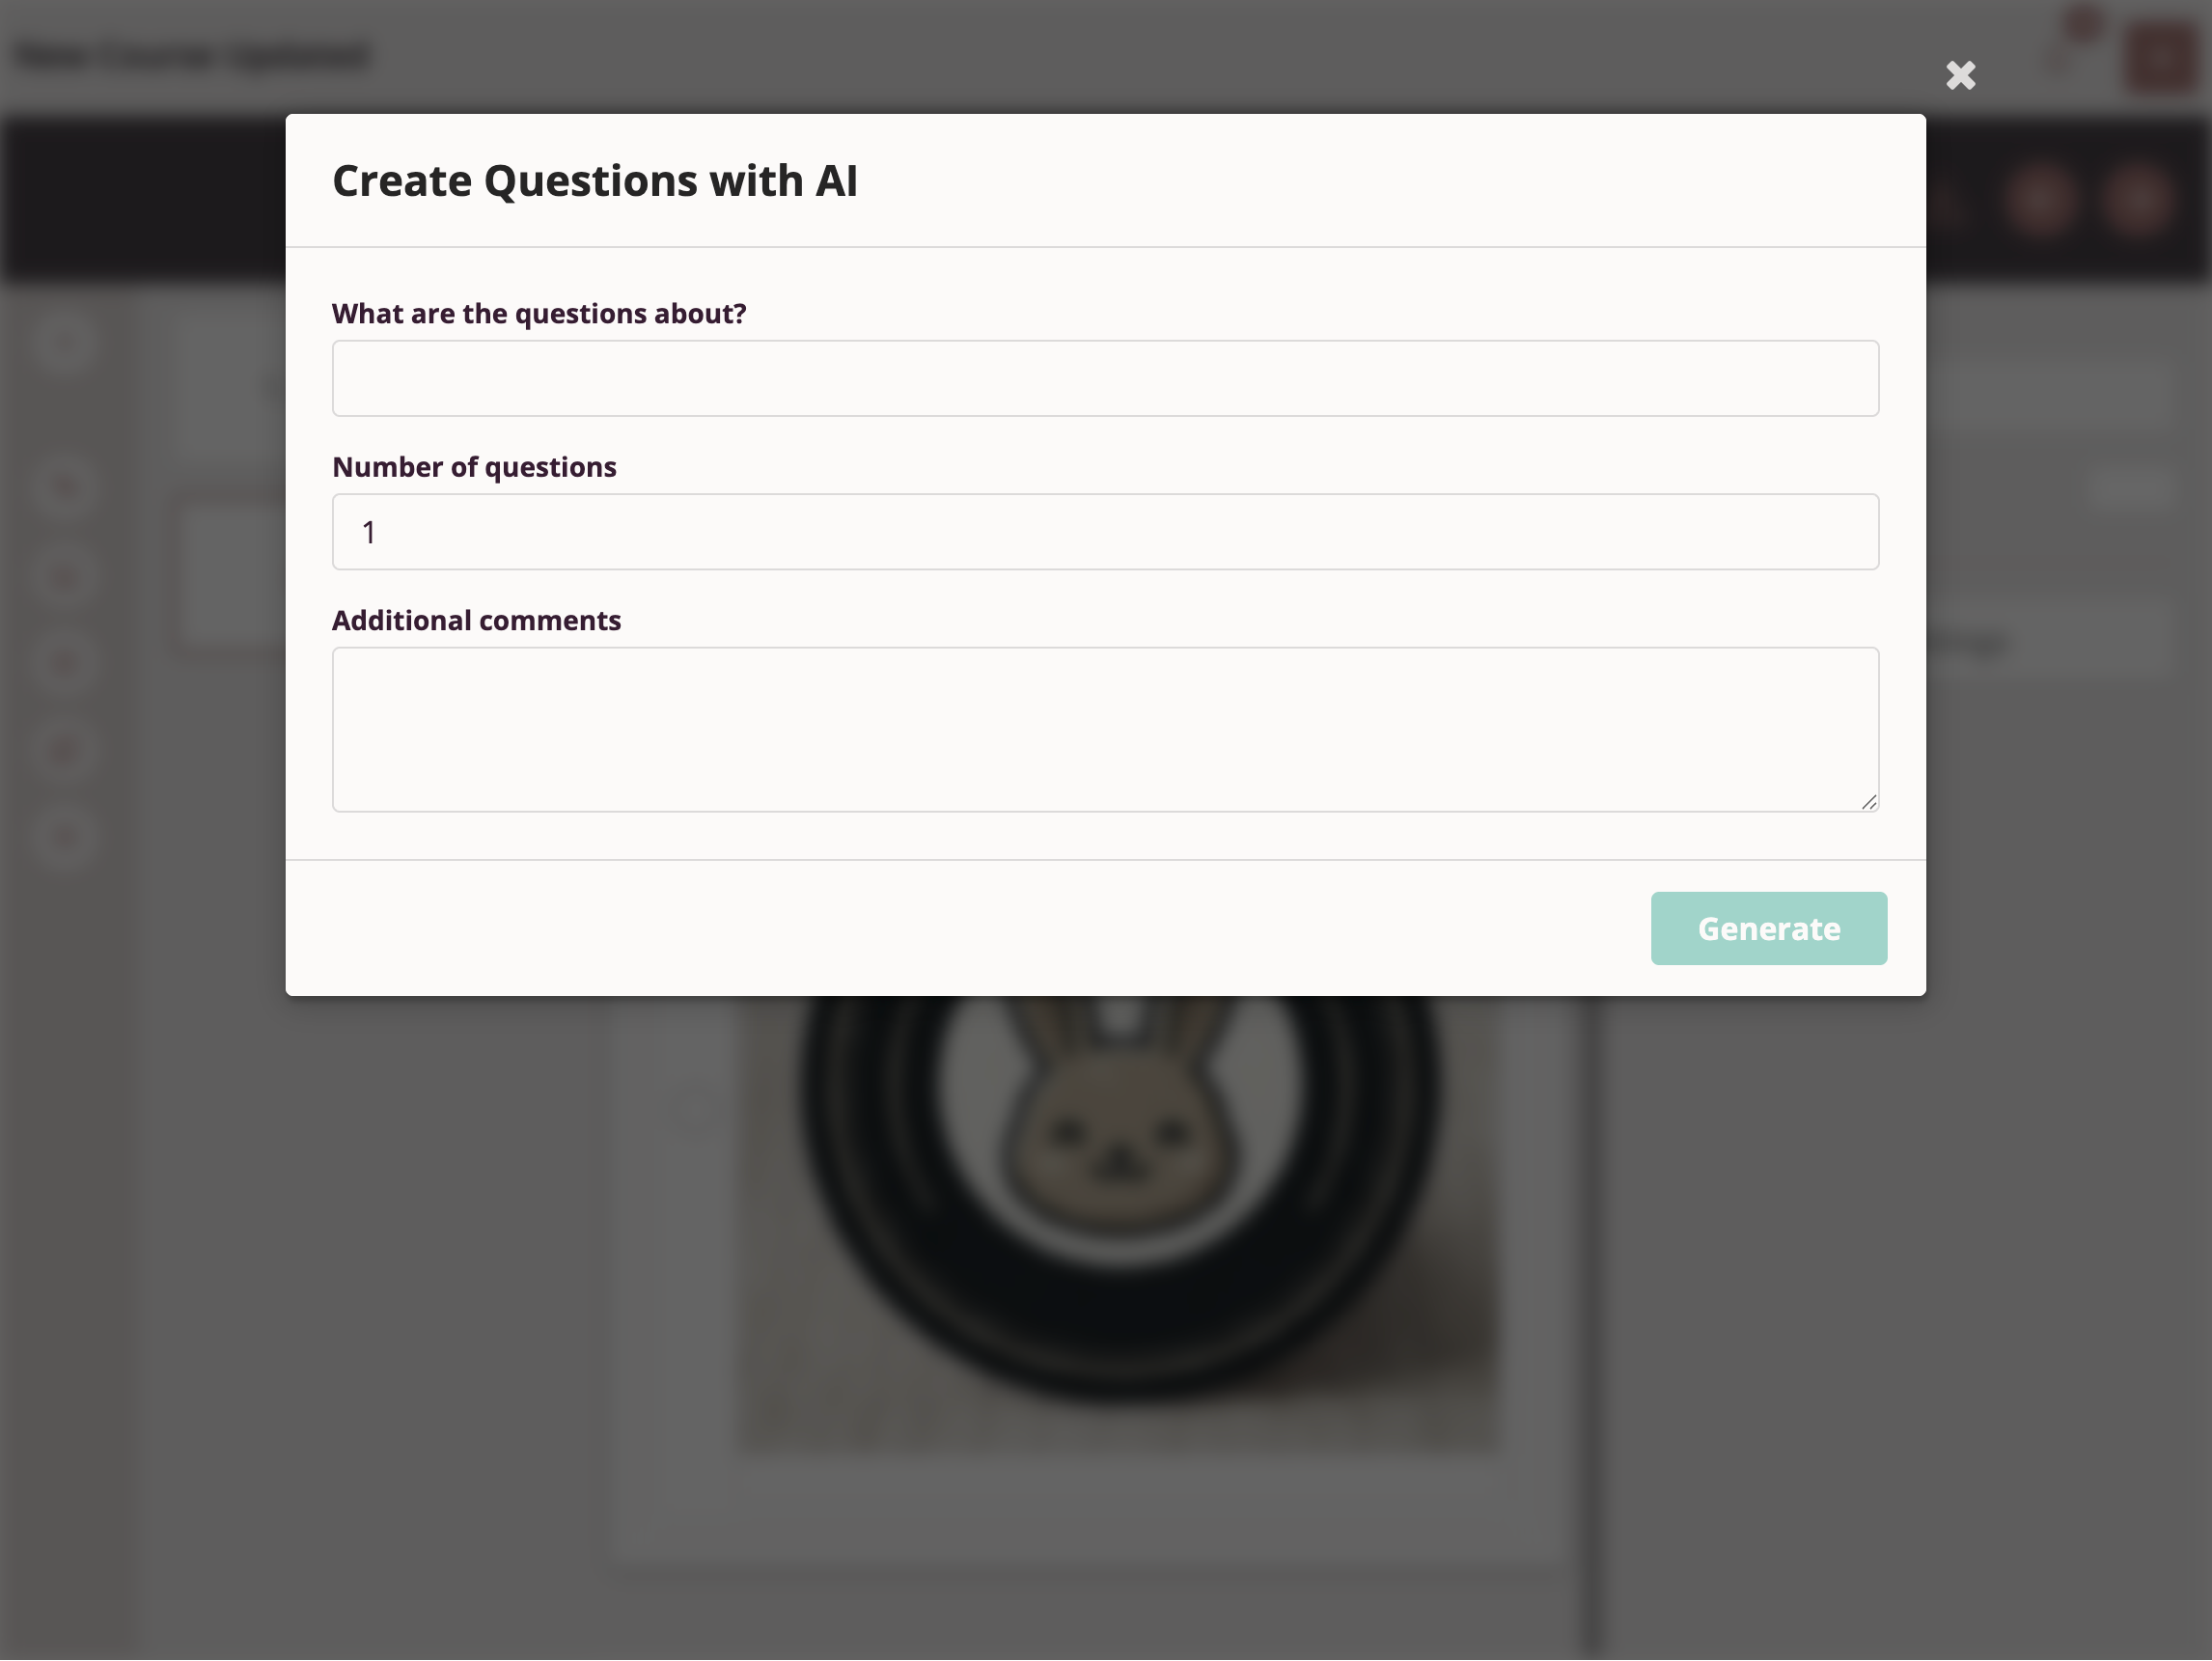
The neural network will create the specified number of single- and multiple-answer questions on the specified topic.
Course authors can edit AI-generated questions.
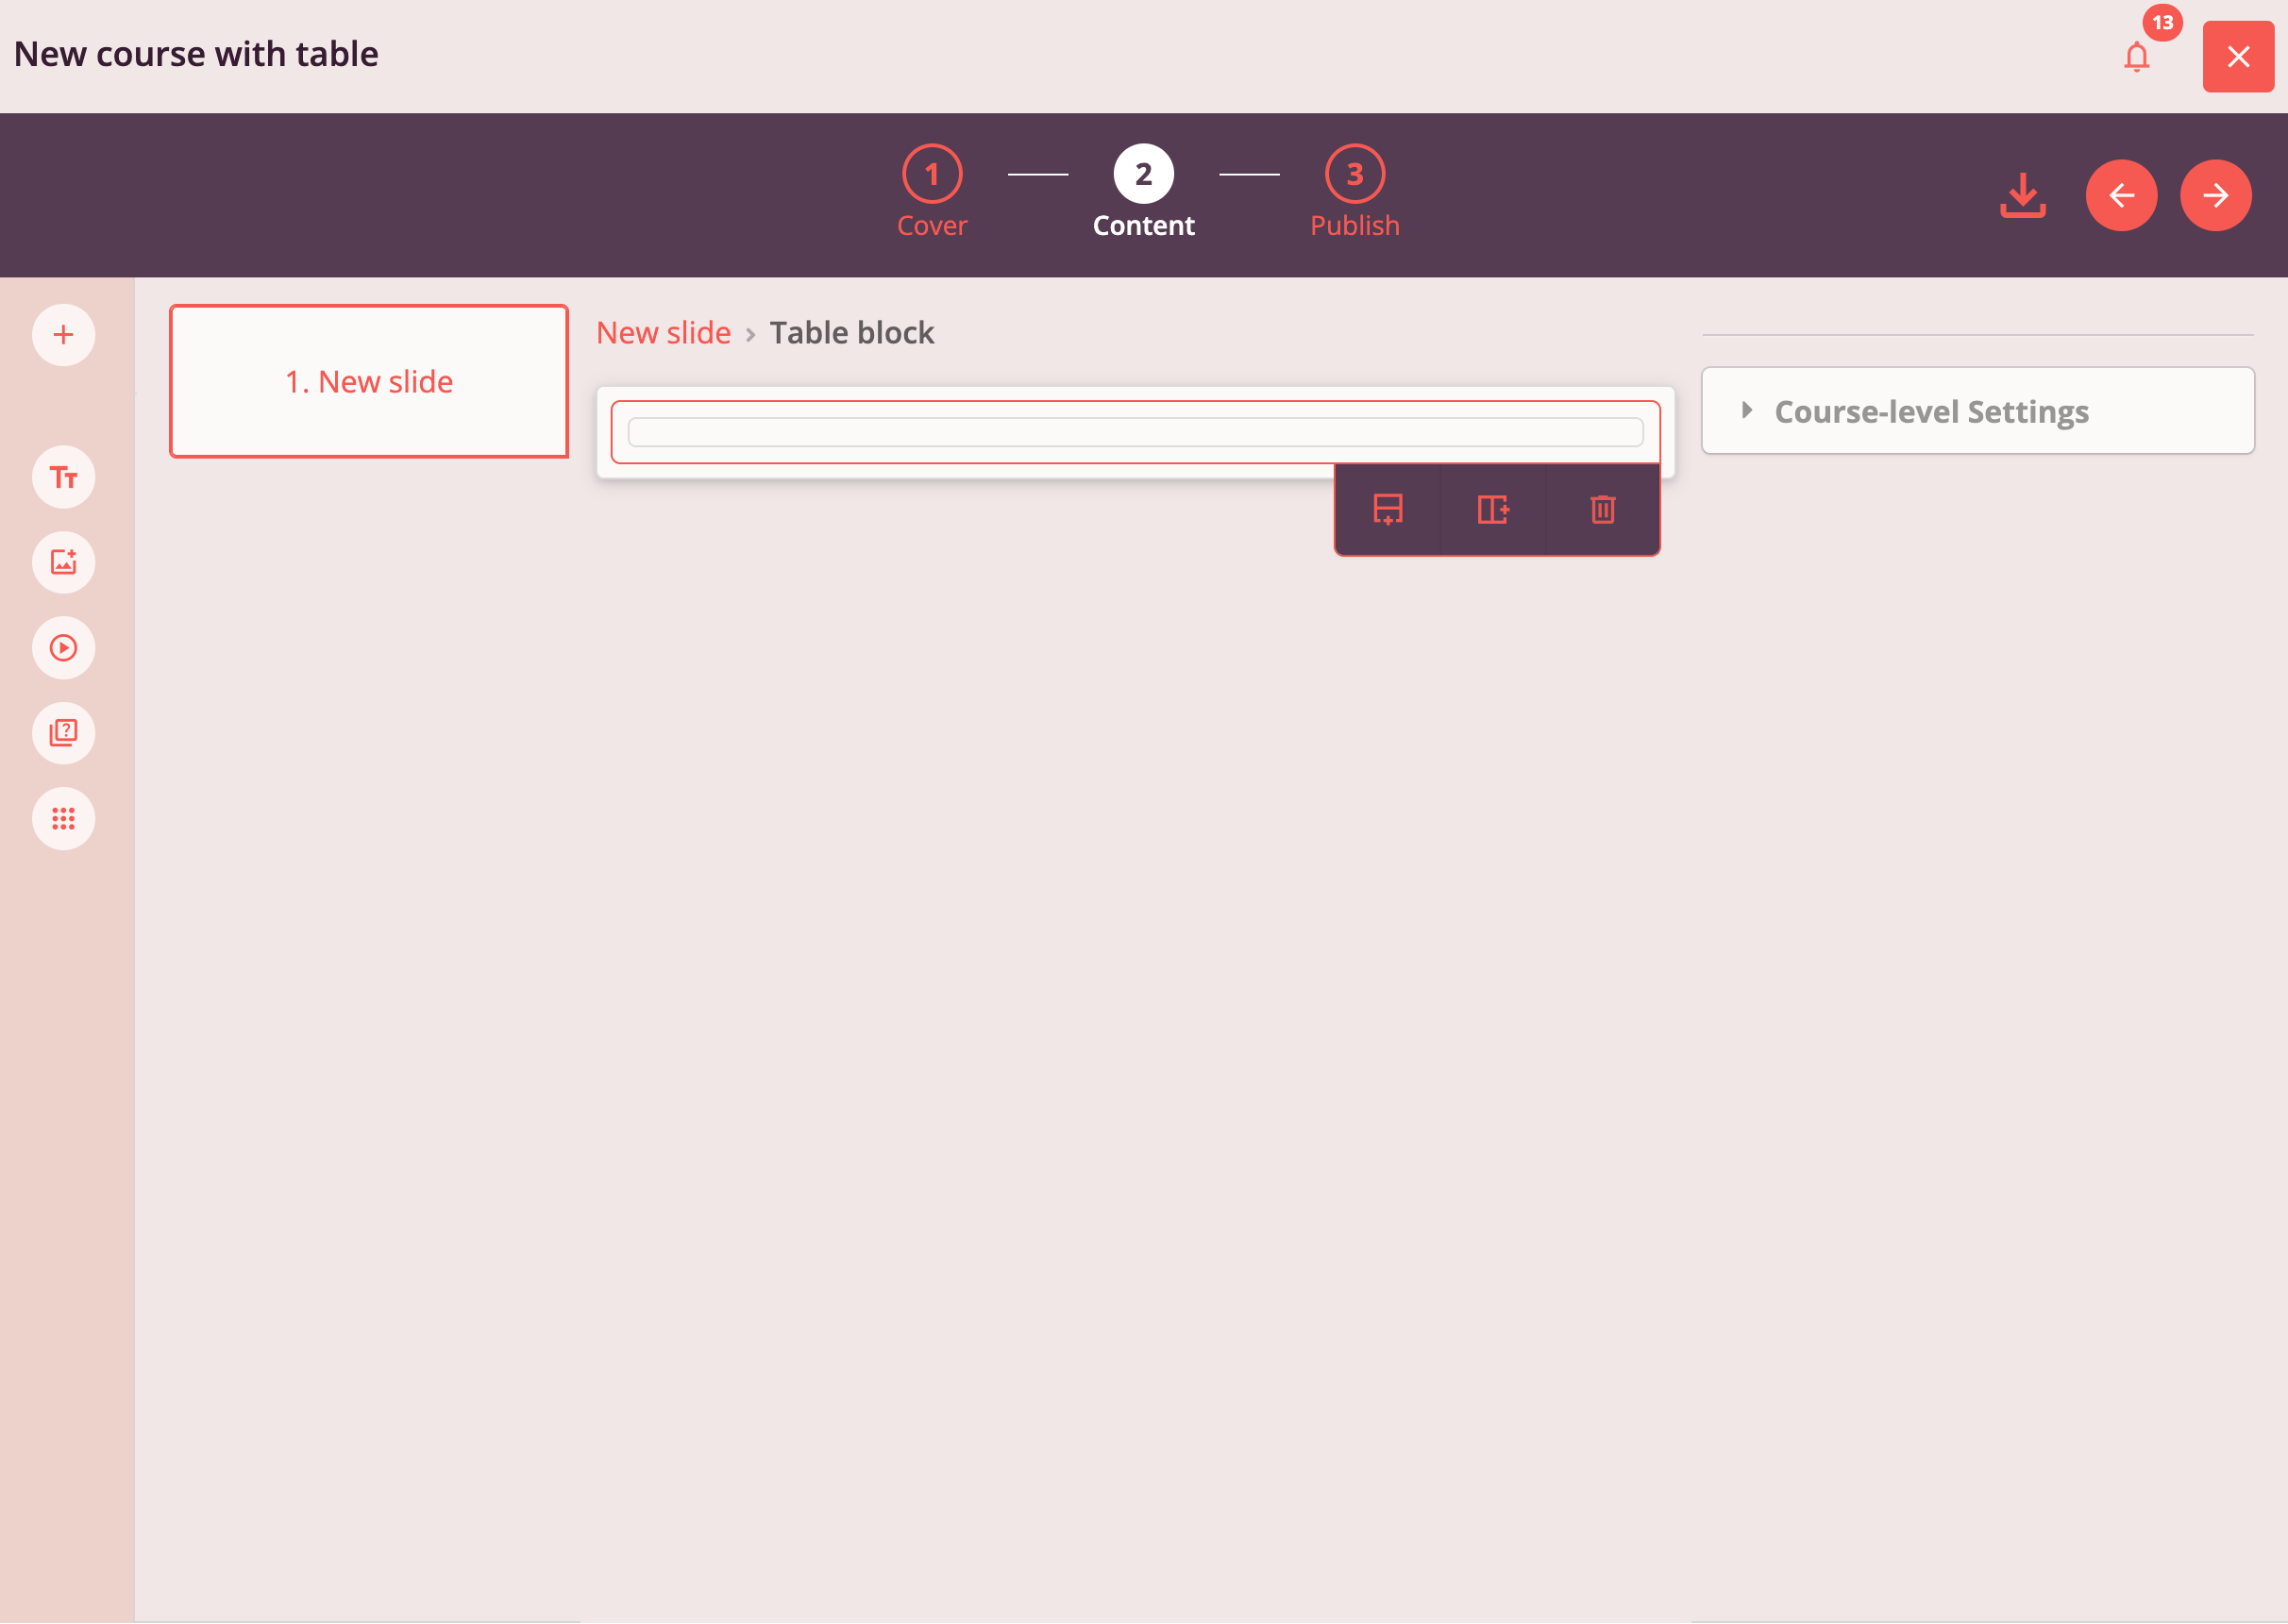
Adding and Editing Tables on a Slide
Tri-D provides authors the ability to add and edit tables on slides. Any content objects except tables can be inserted into table cells. This allows authors to use tables in Tri-D courses both for displaying tabular data and for formatting content on the page.
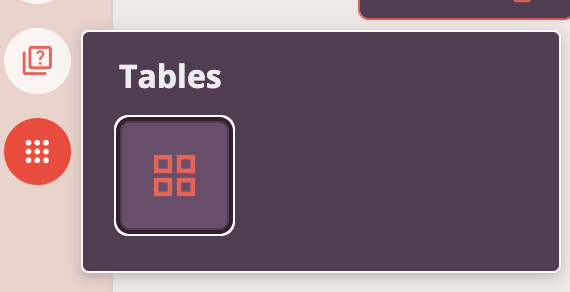
To add a table to a slide, select "Table" from the "Tables" menu.
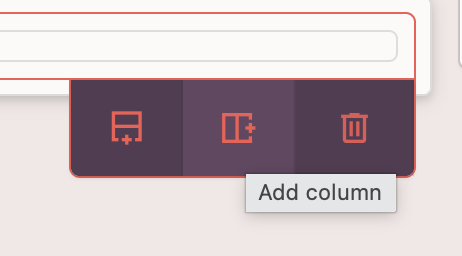
To add additional rows or columns to a table, select the "table" object in the workspace and use the "Add Row" or "Add Column" buttons in the context menu.
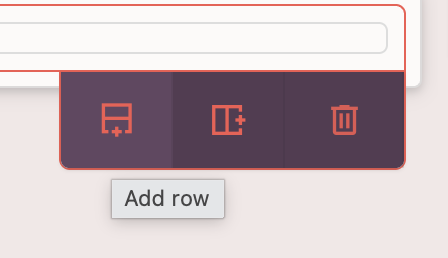
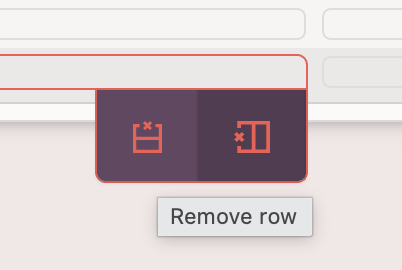
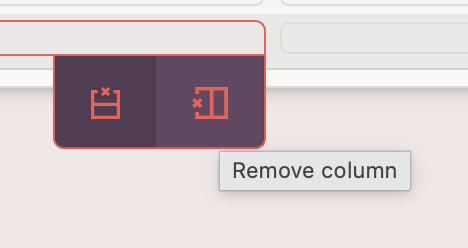
To delete an unnecessary row or column, select the "table cell" object in the workspace and use the "Delete Row" or "Delete Column" buttons in the context menu.
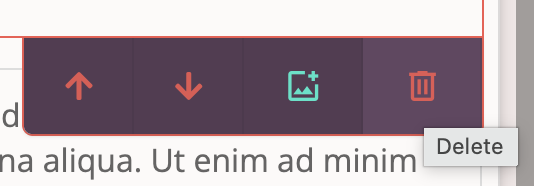
Moving and Deleting Objects on a Slide
Any content object can be moved up or down on a slide.
Select the desired object and use the "Move Up" or "Move Down" buttons in the context menu.
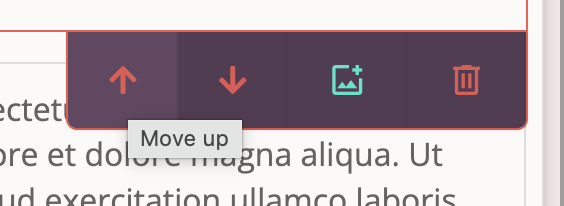
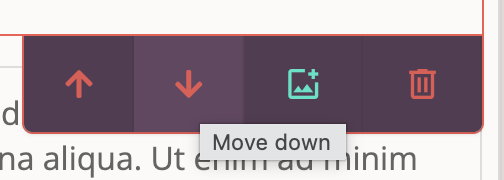
Any content object can be deleted from a slide. Select the desired object and use the "Delete" button in the context menu.
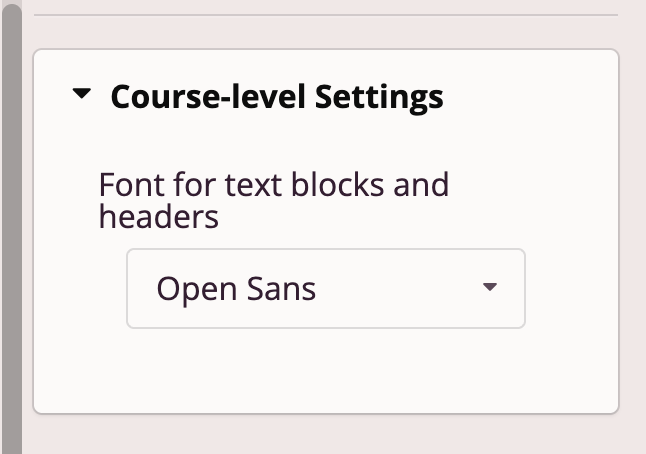
Setting Default Font for Text Objects Across the Entire Course
Course authors can define a default font for all text objects in the course. This font will be applied by default to each newly added text object, as well as to each previously added text object whose font is set to "as for the entire course".
Expand "Settings for Entire Course" in the content object settings menu and select the desired font. Changes apply immediately.
Step 3: Publication
On Step 3 of the Tri-D Course Editor, the course author can:
- Test the course
- Submit the course for publication
In test mode, the course is shown to the author in preview mode in a separate window, with correct answers displayed for quiz questions.

Creating a Course with AI Assistance
Tri-D provides the ability to use the ChatGPT neural network to create a draft of an entire course on a specified topic. This can be an excellent aid for solving the "blank page problem", as a source of inspiration for content authors, or for more comprehensive coverage of your course topic.

Create Course with AI
Click the "Course with AI" button in "Course Workshop" to begin creating such a course.
Always verify AI-generated content.
AI does not guarantee 100% factual accuracy but provides the most accurate result based on its training data and your request.
Key to creating quality AI-generated content is a well-formulated prompt and mandatory result verification.
AI Course Creation Settings
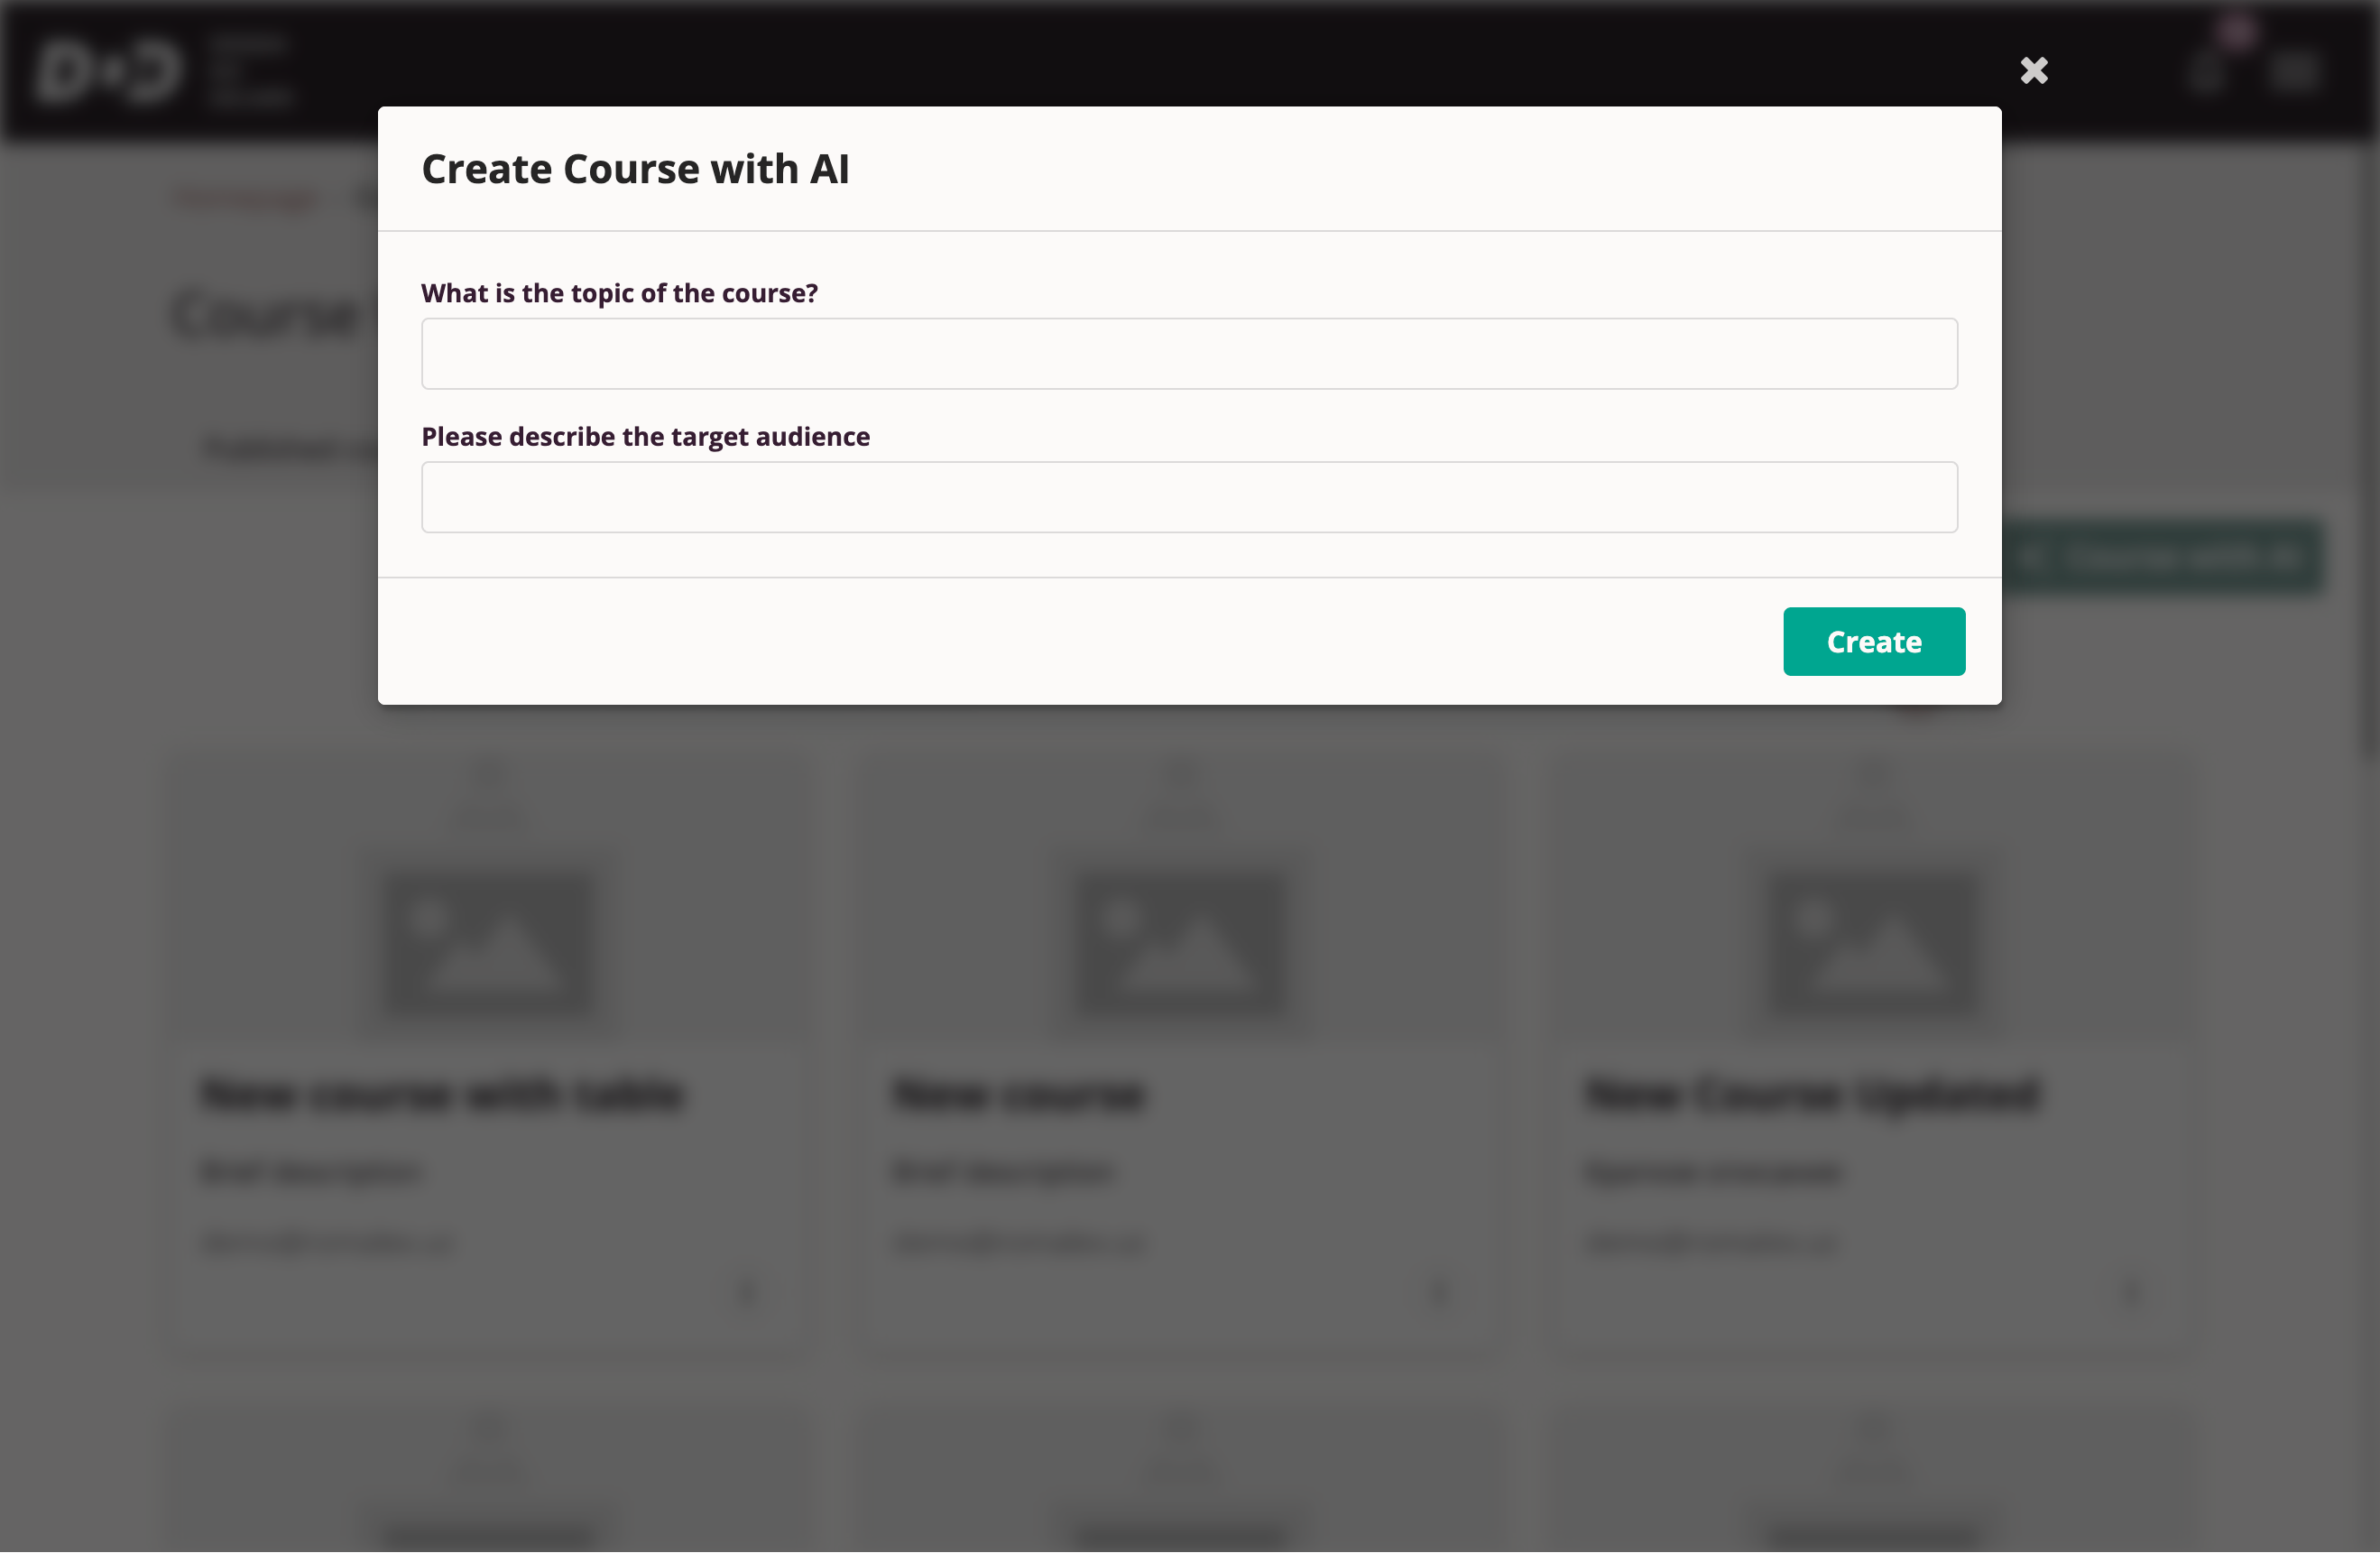
Fill in the fields "What topic is the course about?" and "Describe the target audience" and click "Create".
The creation process may take some time. The system will notify you when course creation begins and when the process is complete.
The AI-generated course draft will appear in the "Drafts" tab in "Course Workshop".
Course authors can edit this draft just like a manually created course.
Creating a Course from a DOCX Document
Tri-D provides the ability to convert content from a DOCX file into a Tri-D course draft. This can be a significant help for users who have accumulated educational materials or job instructions in Word document format.
For successful DOCX content conversion, ensure the imported document's content is structured using at least level 1 and level 2 headings. See: Adding a Heading in a Word Document.
Tri-D uses level 1 and level 2 headings to split content from the imported document into individual slides in the Tri-D course.
After each slide, the built-in artificial intelligence will add a set of quiz questions corresponding to that course slide.
Click "Import Course", select the desired DOCX file, and upload.

Tri-D will automatically analyze the file content and prompt the author to verify the document's split into future course slides.
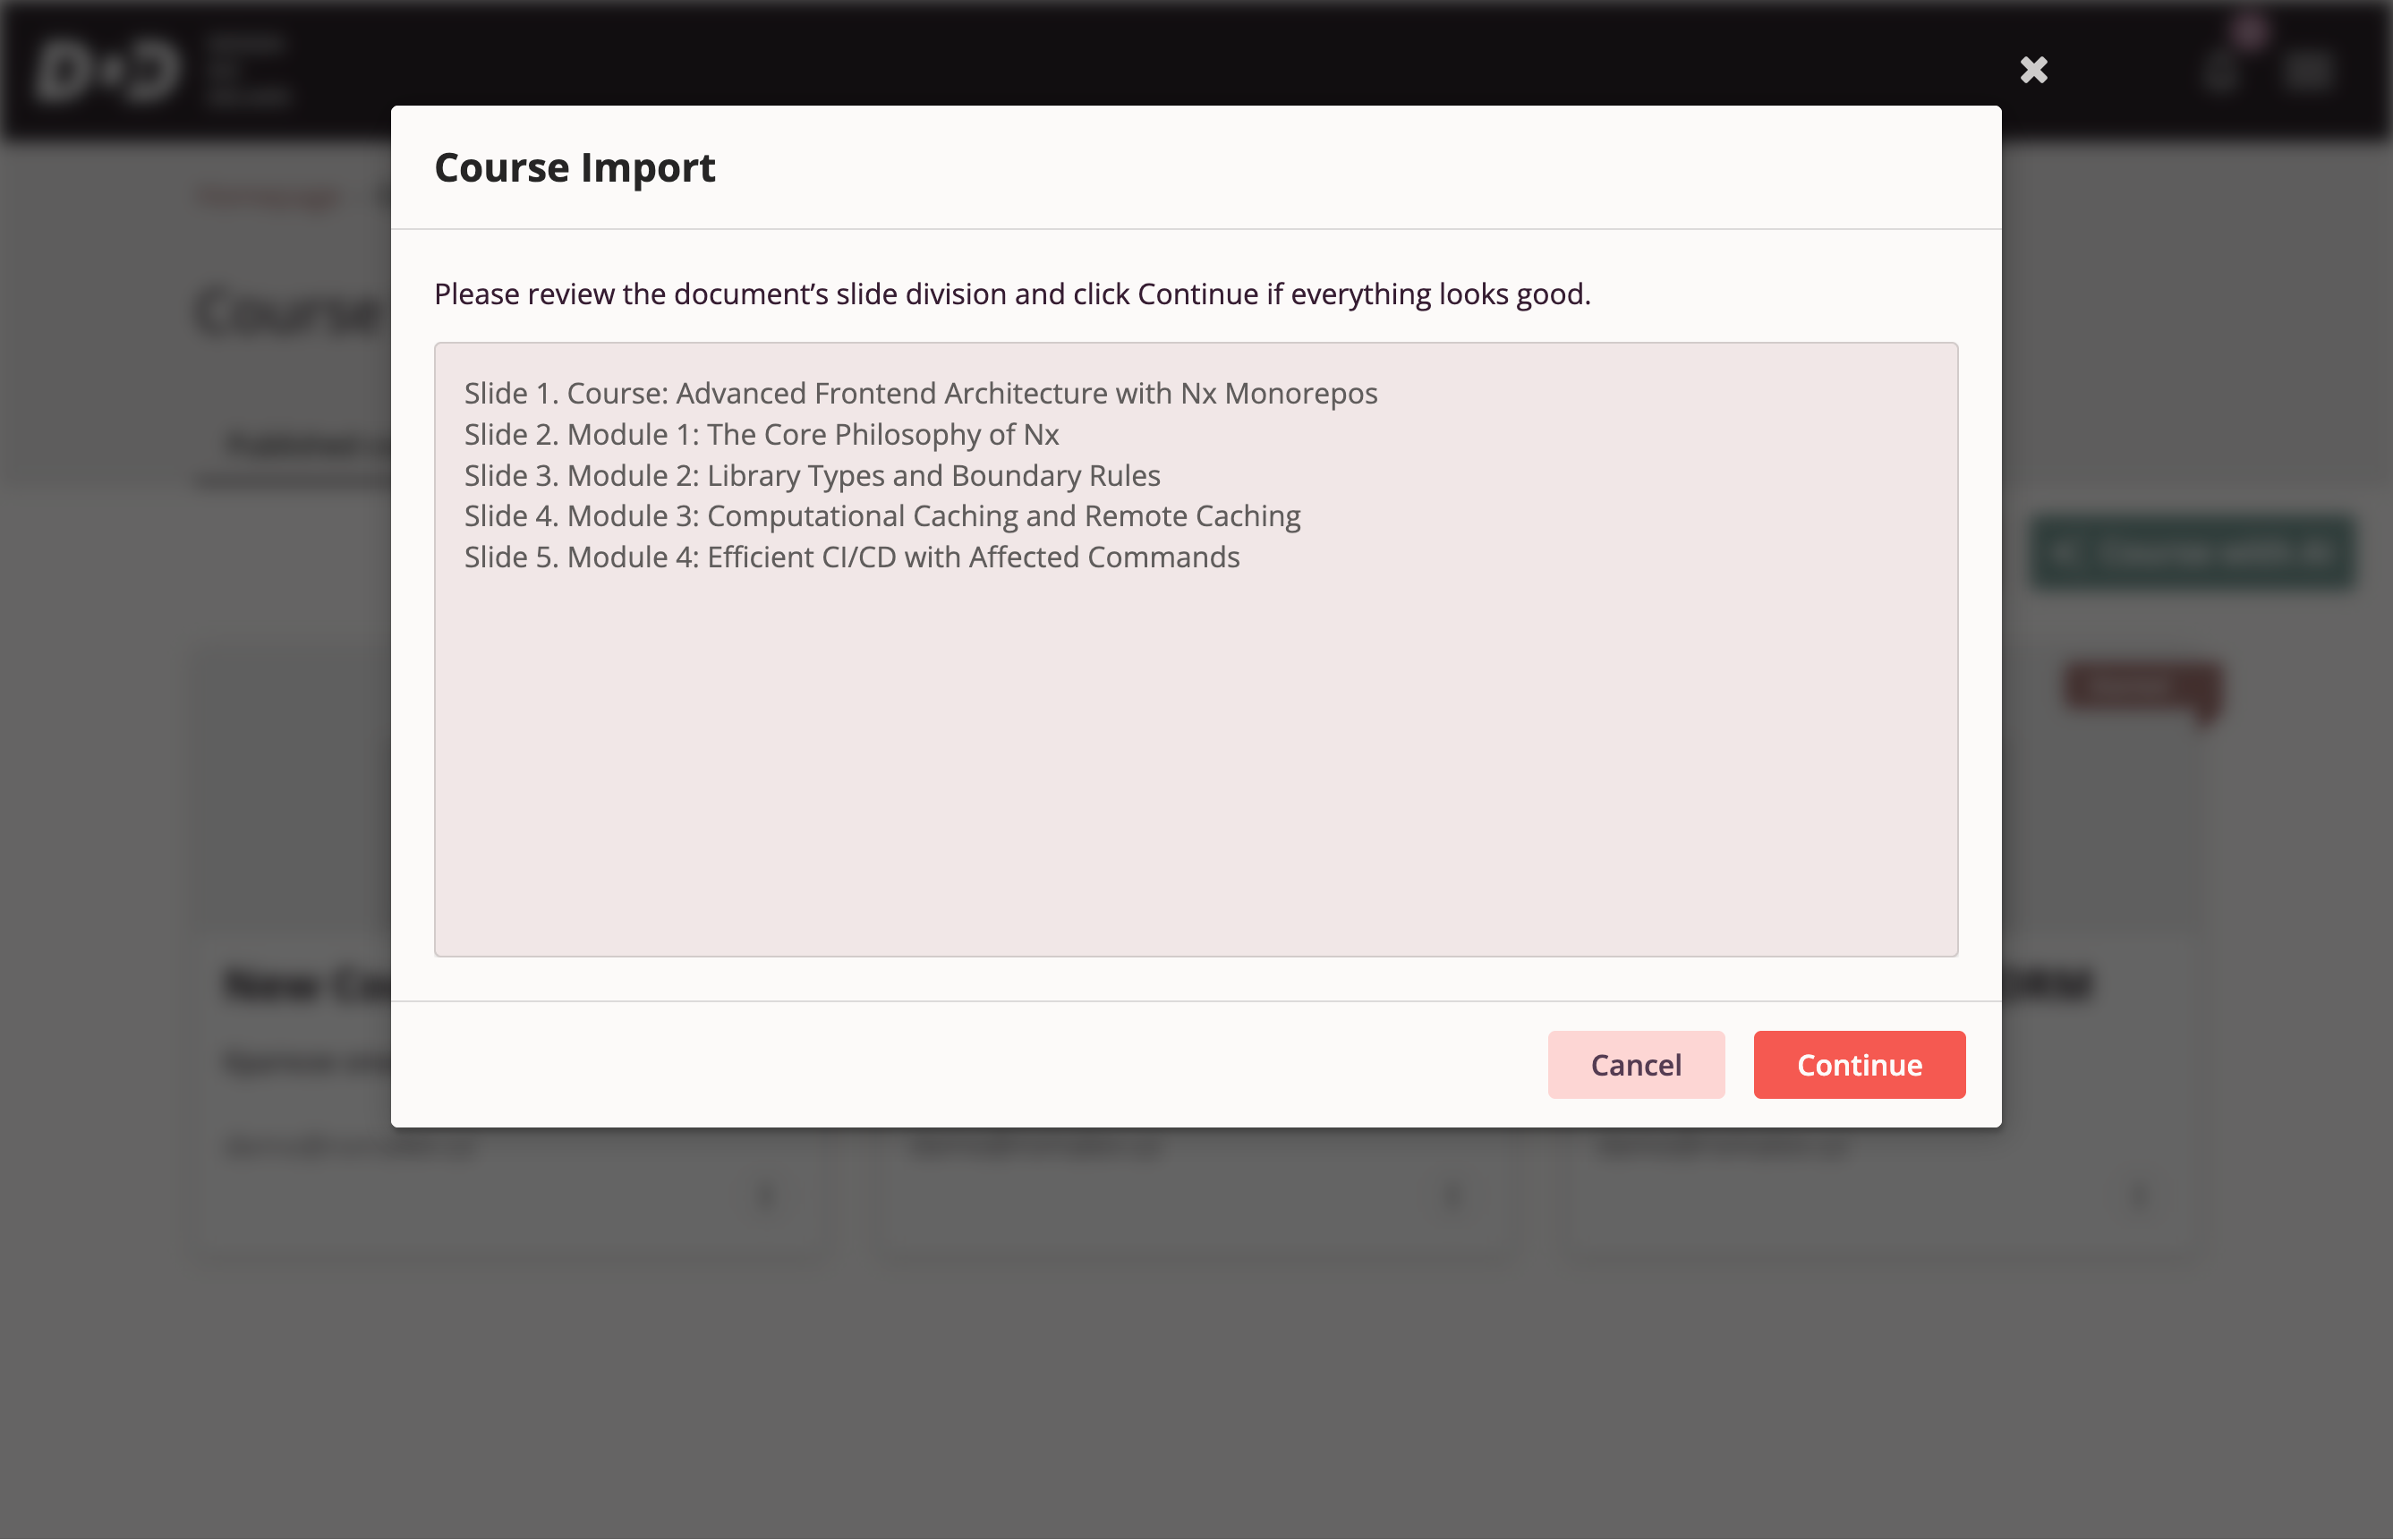
Click "Continue" if the slide split meets your expectations. If not, click "Cancel" and adjust the DOCX document.
After clicking "Continue", the system will begin converting the document into a Tri-D course.
The creation process may take some time. The system will notify you when course creation begins and when the process is complete.
The AI-generated course draft will appear in the "Drafts" tab in "Course Workshop".
Importing a SCORM Course
Tri-D provides the ability to import a SCORM 1.2 package and create a Tri-D course from it.
Click "Import Course", select the desired SCORM 1.2 package file, and upload.
The import process may take some time. The system will notify you when course creation begins and when the process is complete.
The course draft created from the SCORM package will appear in the "Drafts" tab in "Course Workshop".
In the course draft from a SCORM package, you can:
- Edit the cover, title, description, and author of the course
- Test the course before publication
- Export a previously imported SCORM course — it will be exported exactly as it was imported
Importing a Course from a ZIP Archive
Similarly to SCORM course import, users can import a Tri-D course previously exported in ZIP archive format.
To import a Tri-D course from a ZIP archive:
- Click "Import Course" on the "Course Workshop" page.
- In the opened File Explorer window, select the folder and ZIP file for import and click "Open".
- After the file upload completes, an information window will confirm course creation has started.
- Wait a moment, then go to the "Drafts" tab and refresh the page. The imported course will appear at the top of the drafts list.
Publishing a Course
Publishing a course in Tri-D means publishing it on the Tri-D platform.
Upon publication, the author can configure course availability and assignment.
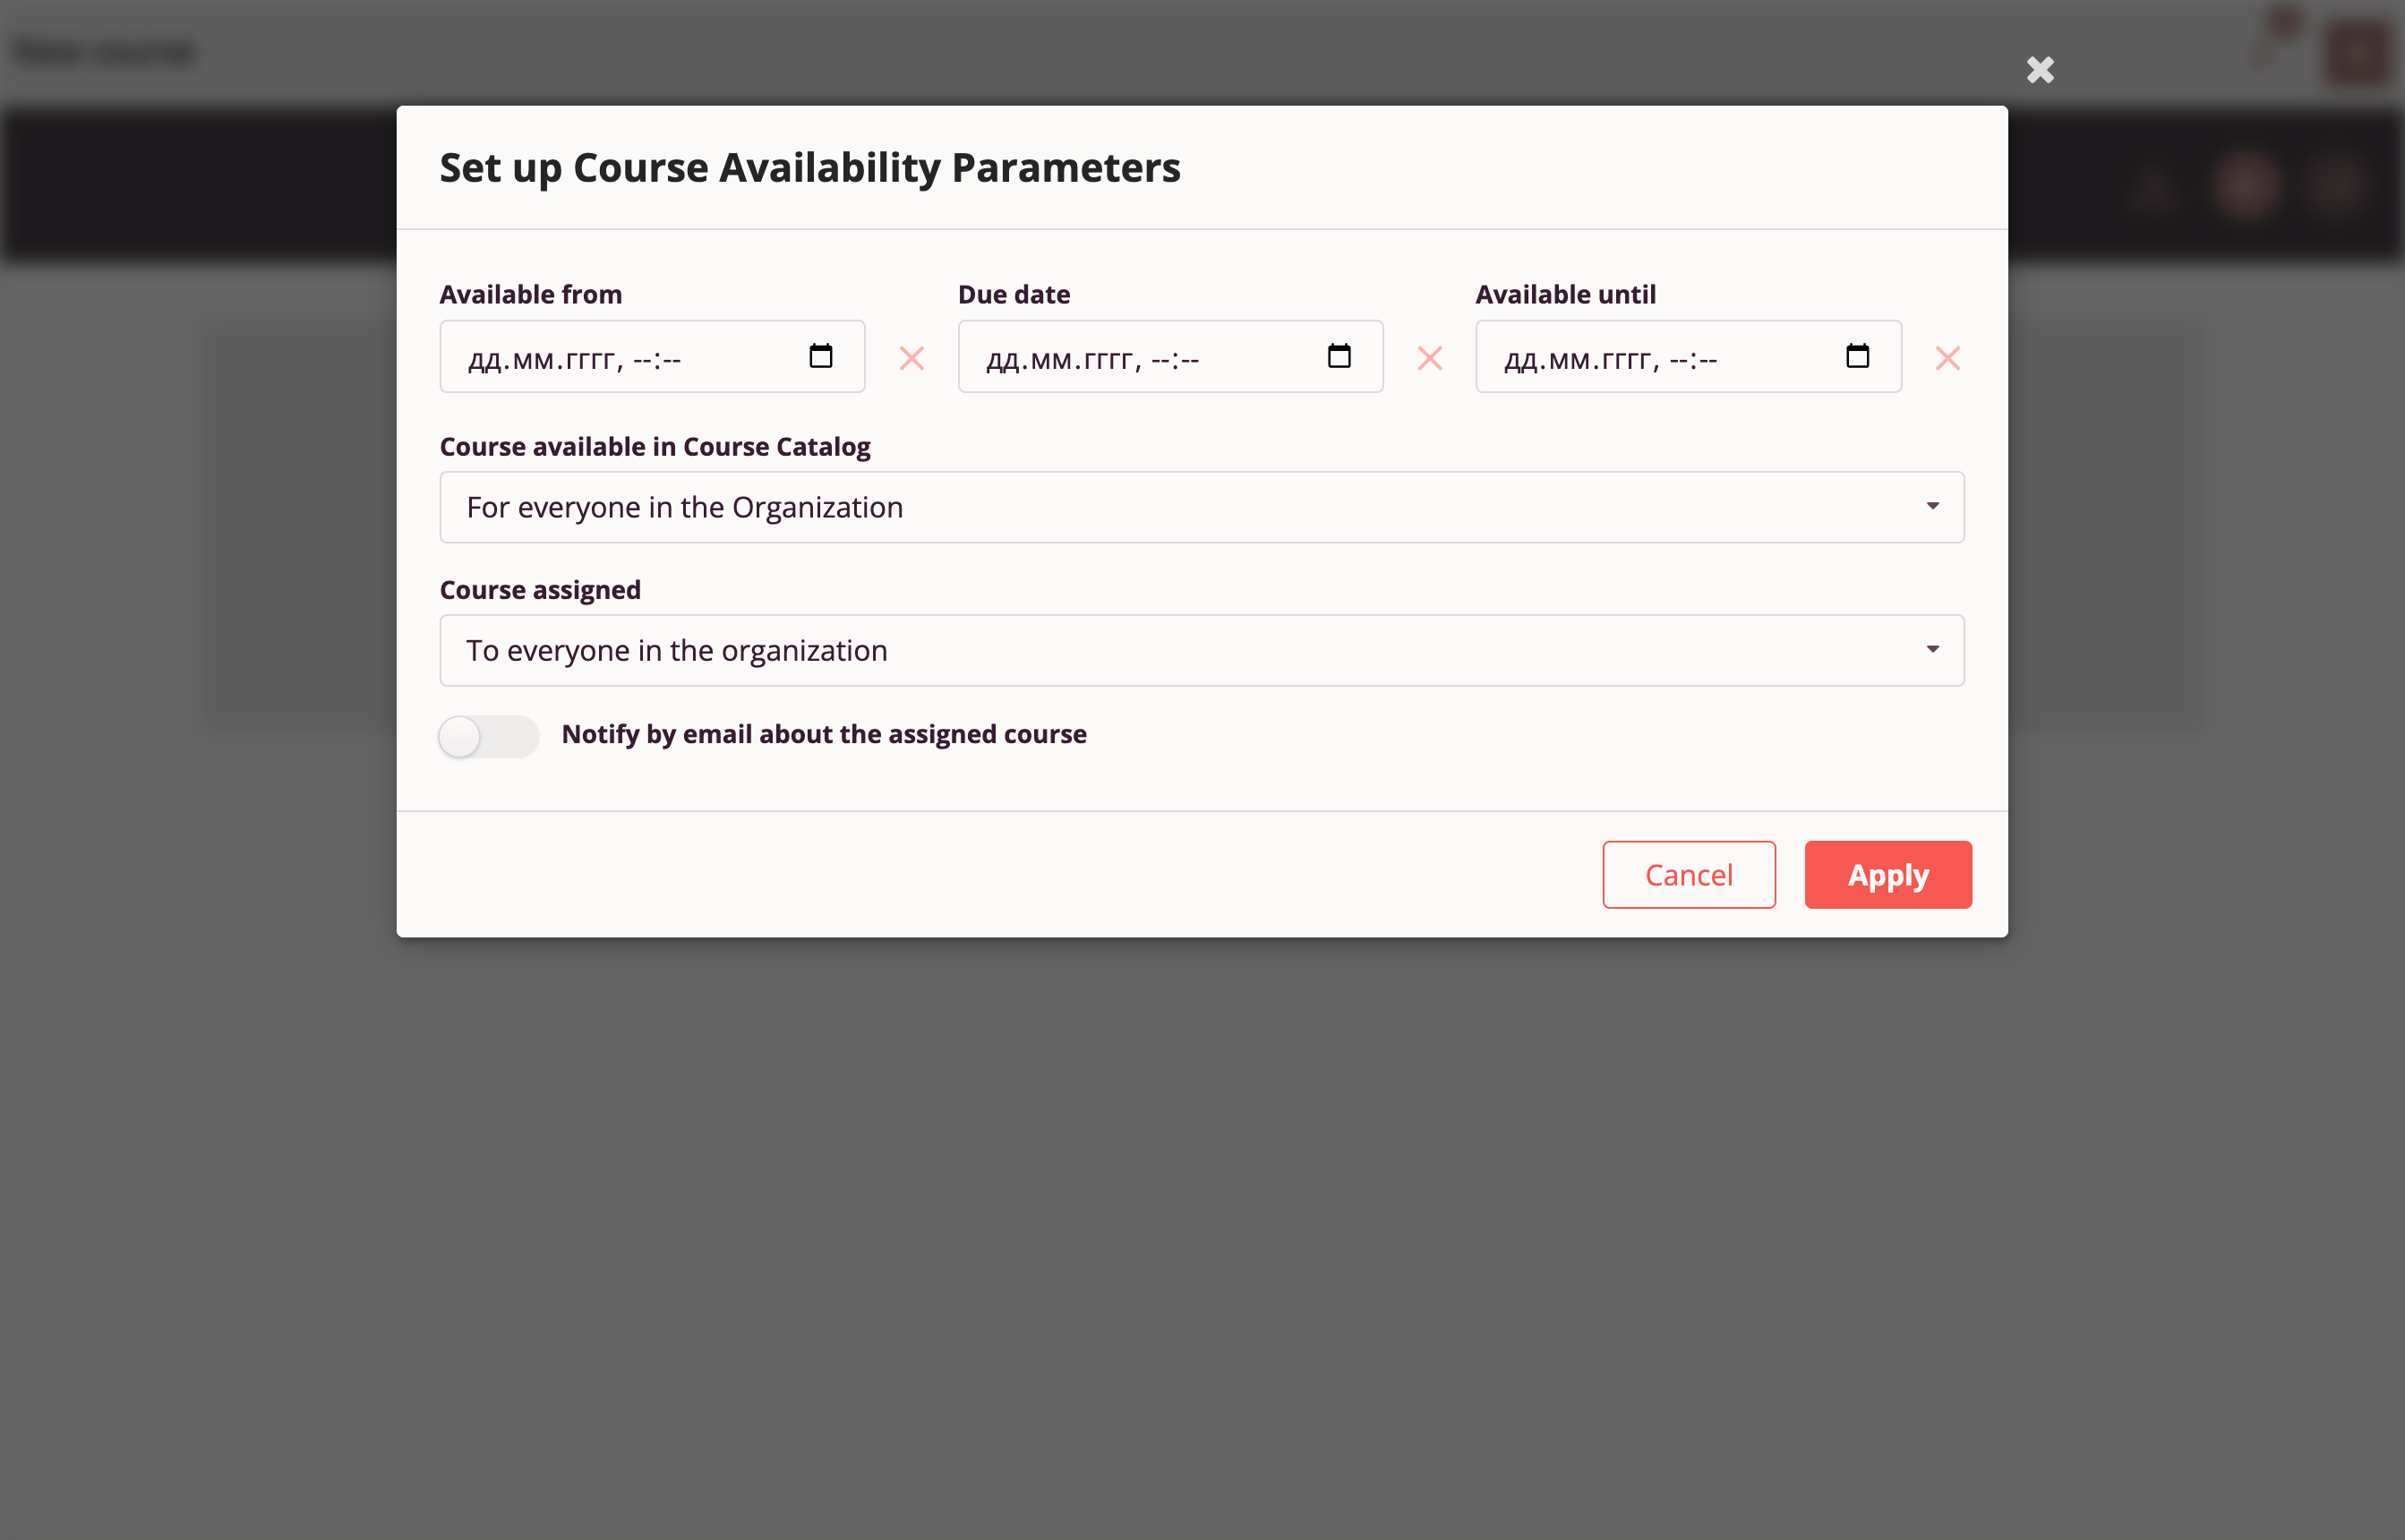
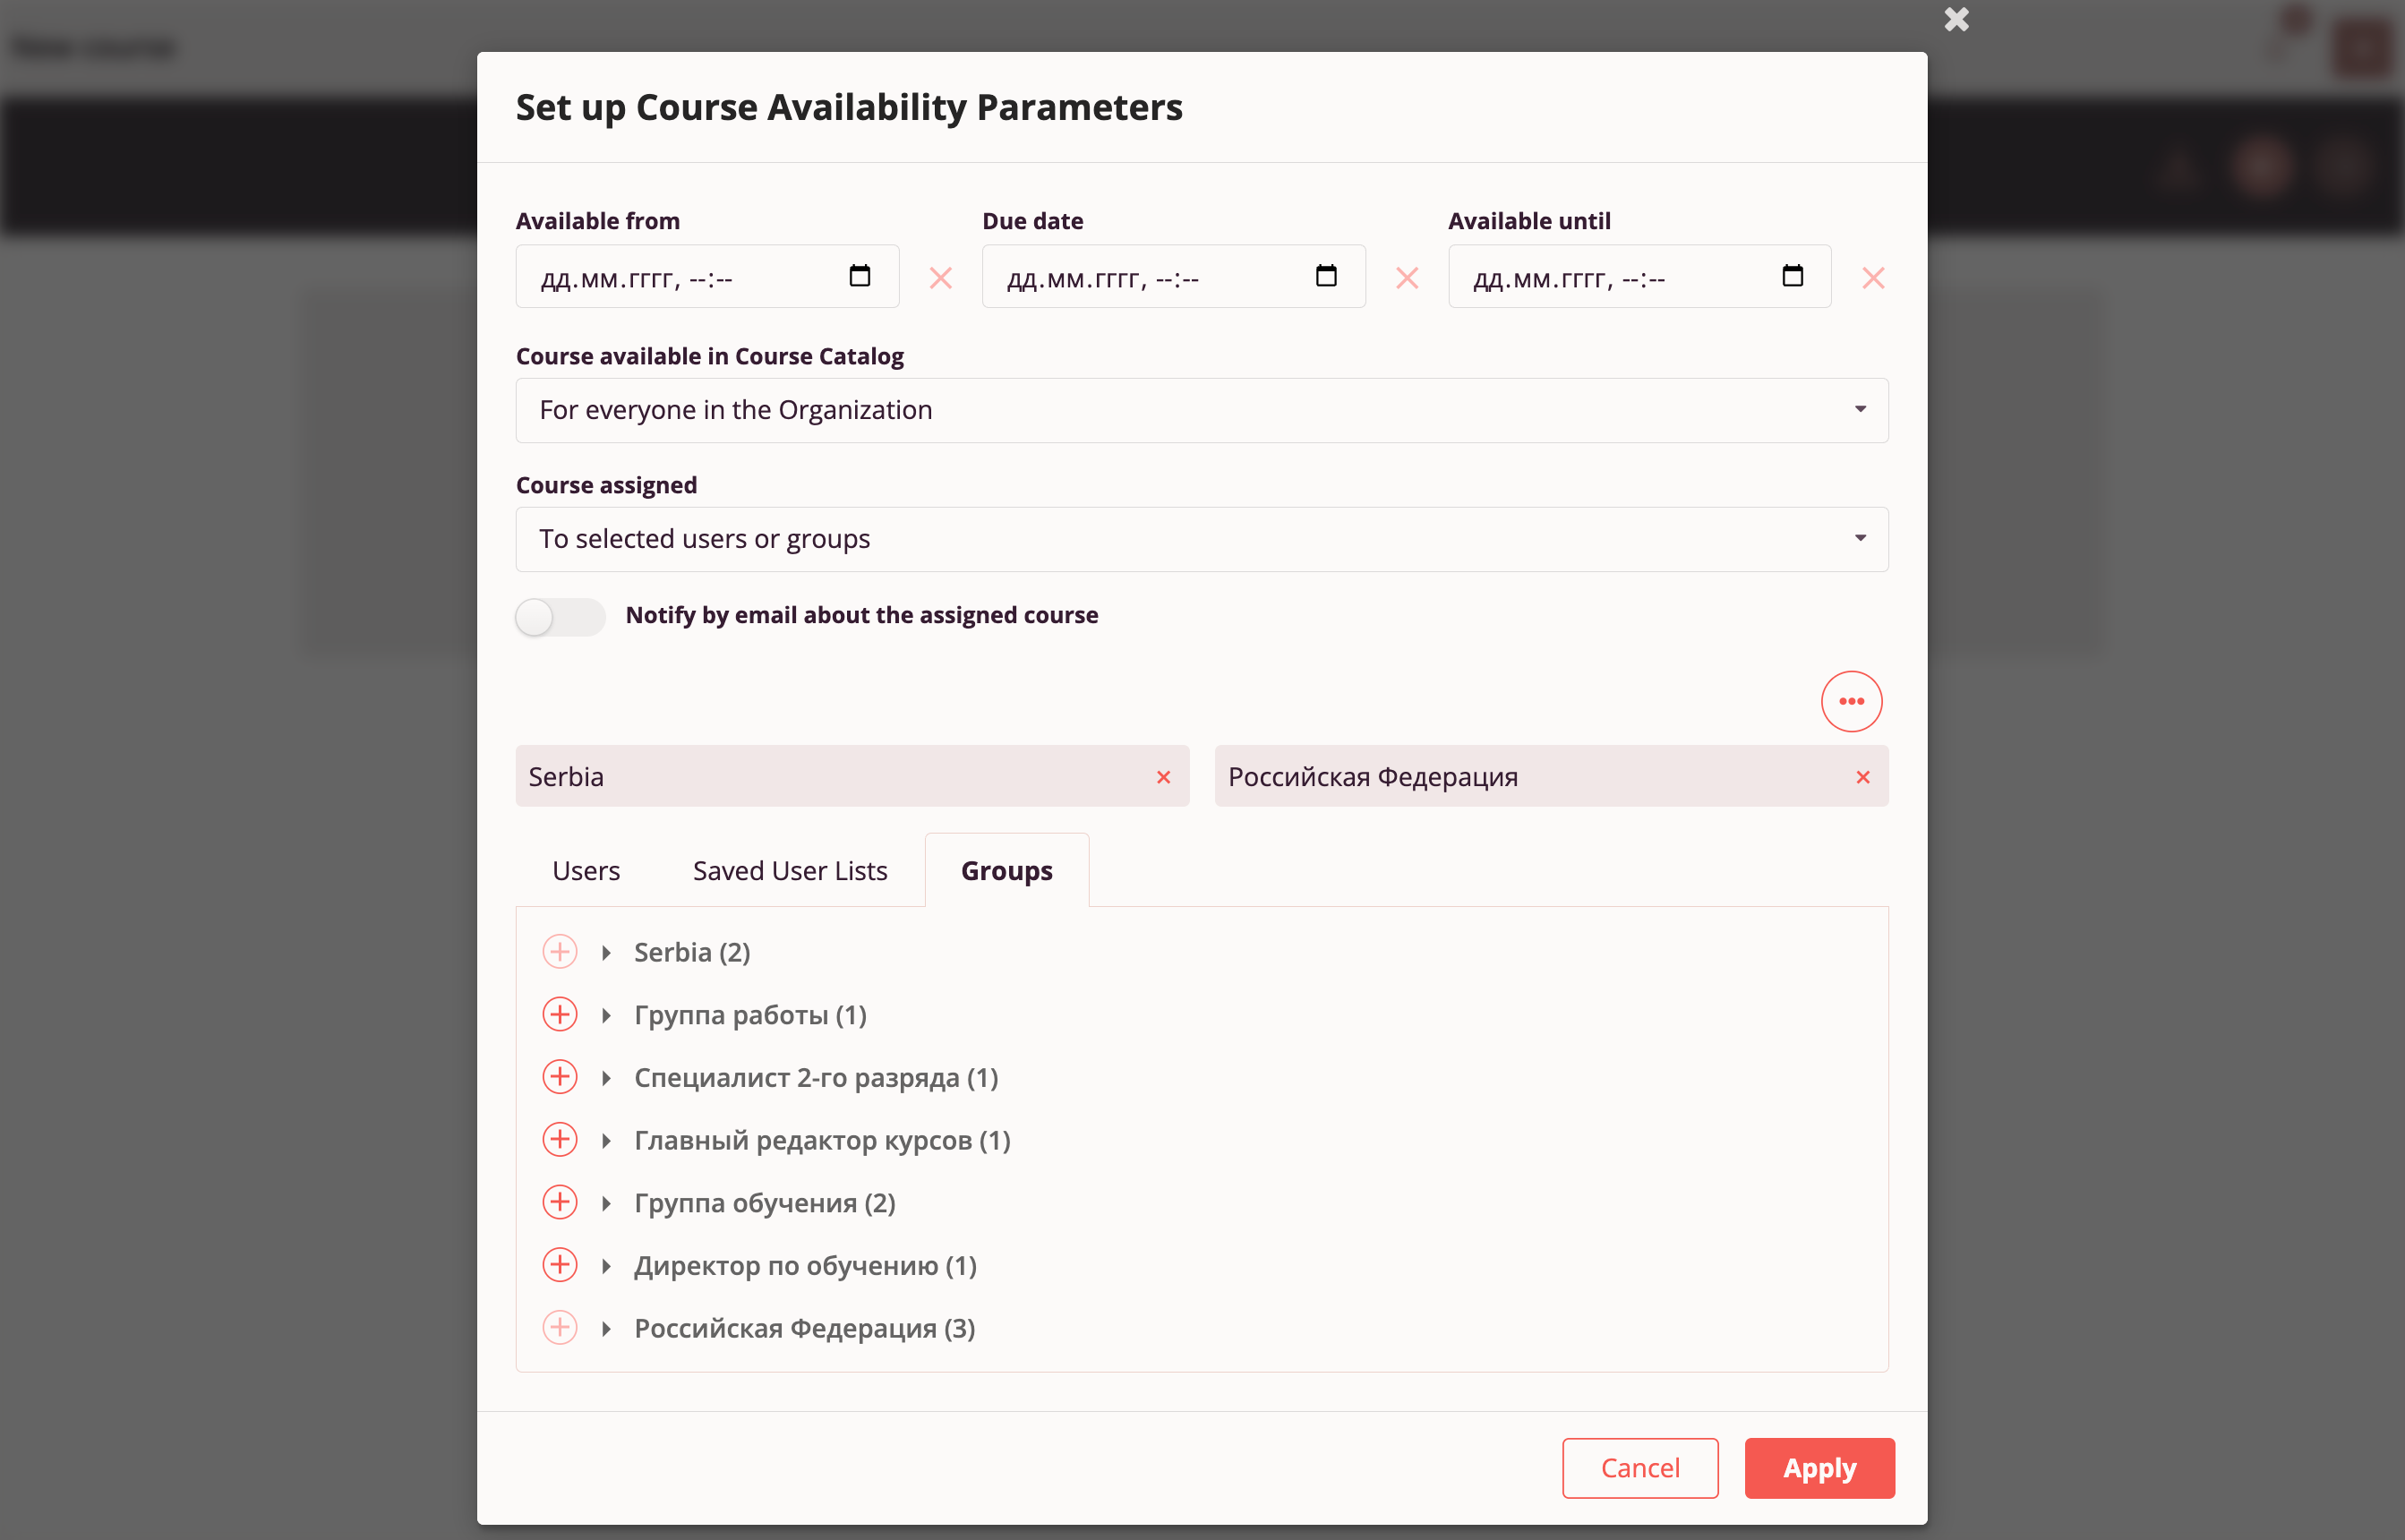
Course Availability Settings
The "Course Availability" parameter controls course visibility in the "Course Catalog":
- Everyone — Course is available to all Tri-D users in your organization and outside your organization, as well as via direct link. This option is available only for organizations with permitted external user access to courses.
- Everyone in my organization — Course is available to all Tri-D users in your organization, as well as via direct link to any authorized Tri-D employee in your organization. Users outside your organization cannot access this course.
- Only to those assigned — Course is available only to specific employees listed in the assignment list. This option is available only if the course is assigned to specific employees or groups.
Course Assignment Settings
The "Course Assignment" parameter controls course display in the assigned courses list on the "Home Page":
- Not assigned to anyone — This course does not appear in the assigned courses list.
- Everyone in my organization — This course will appear in the assigned list for every employee in your organization.
- Specific employees or groups — This course will appear in the assigned list only for employees specified in the assignment list.
Assigning a Course to Specific Employees
Assigning a Course to Specific Employees

Find the desired employee by keyword (minimum 3 characters) in the employee's first name, last name, or email.

Click "+" "Add" next to the desired employee from the search results, and the user will be added to the assignment list.
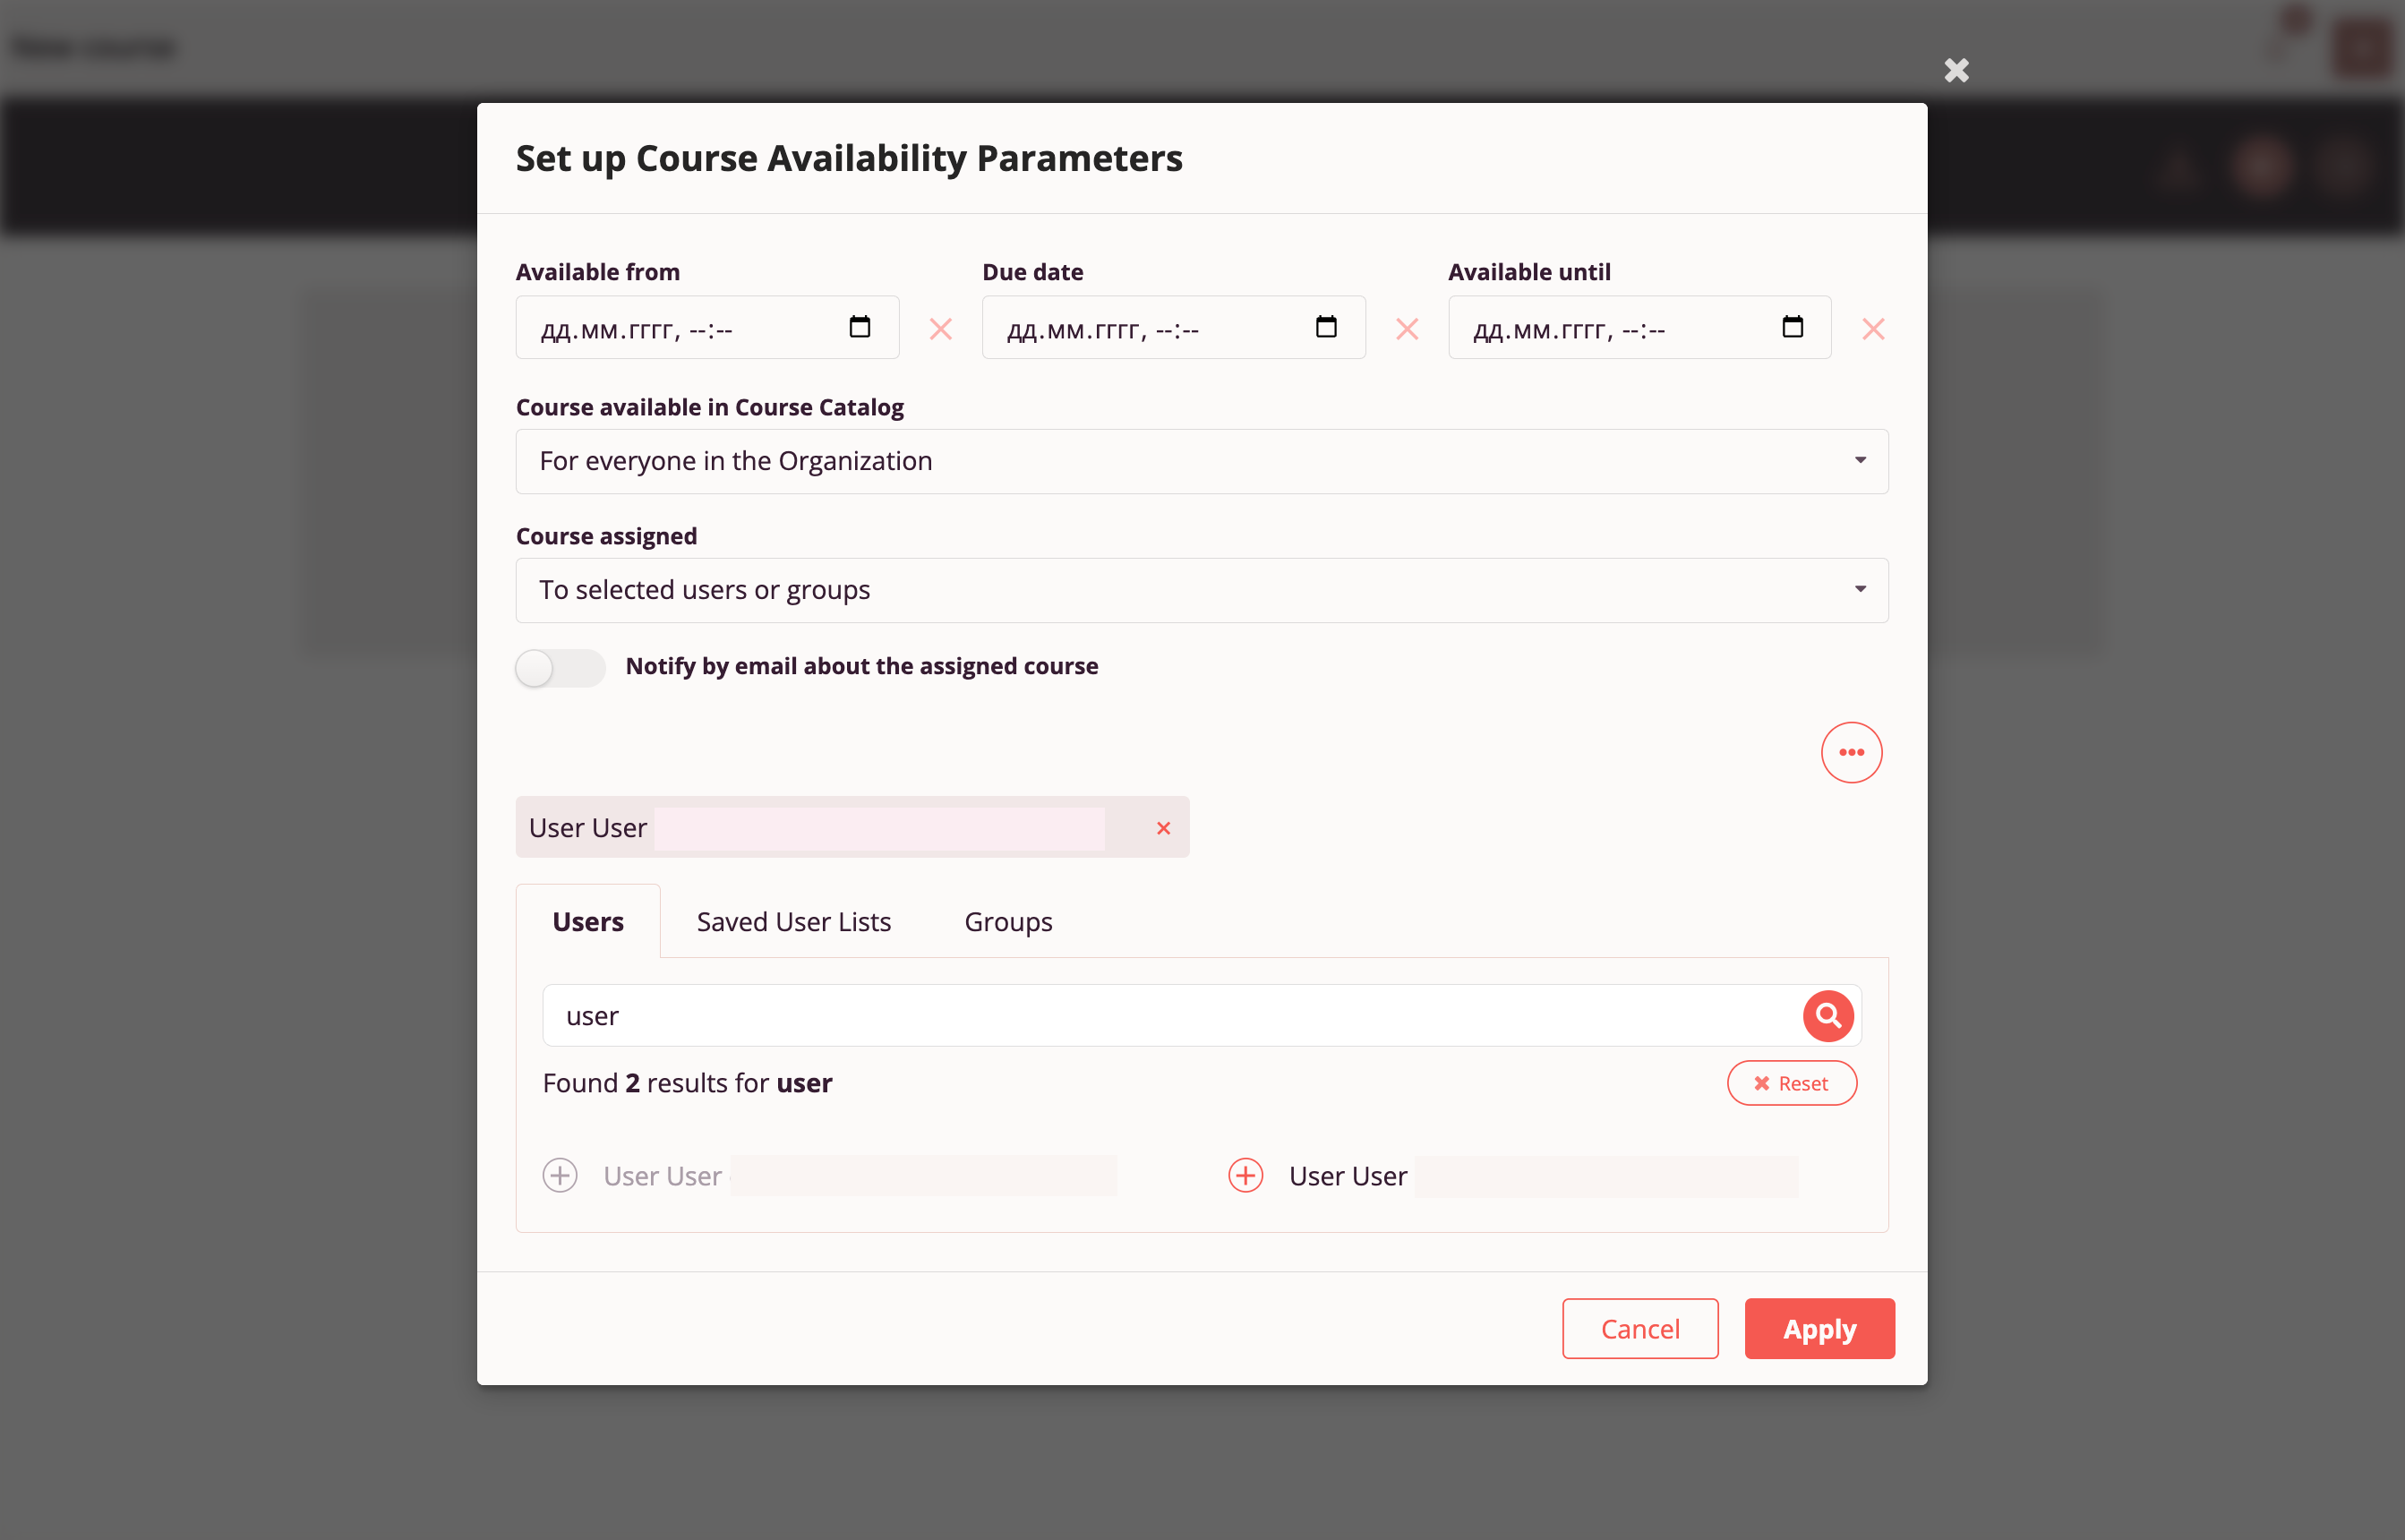
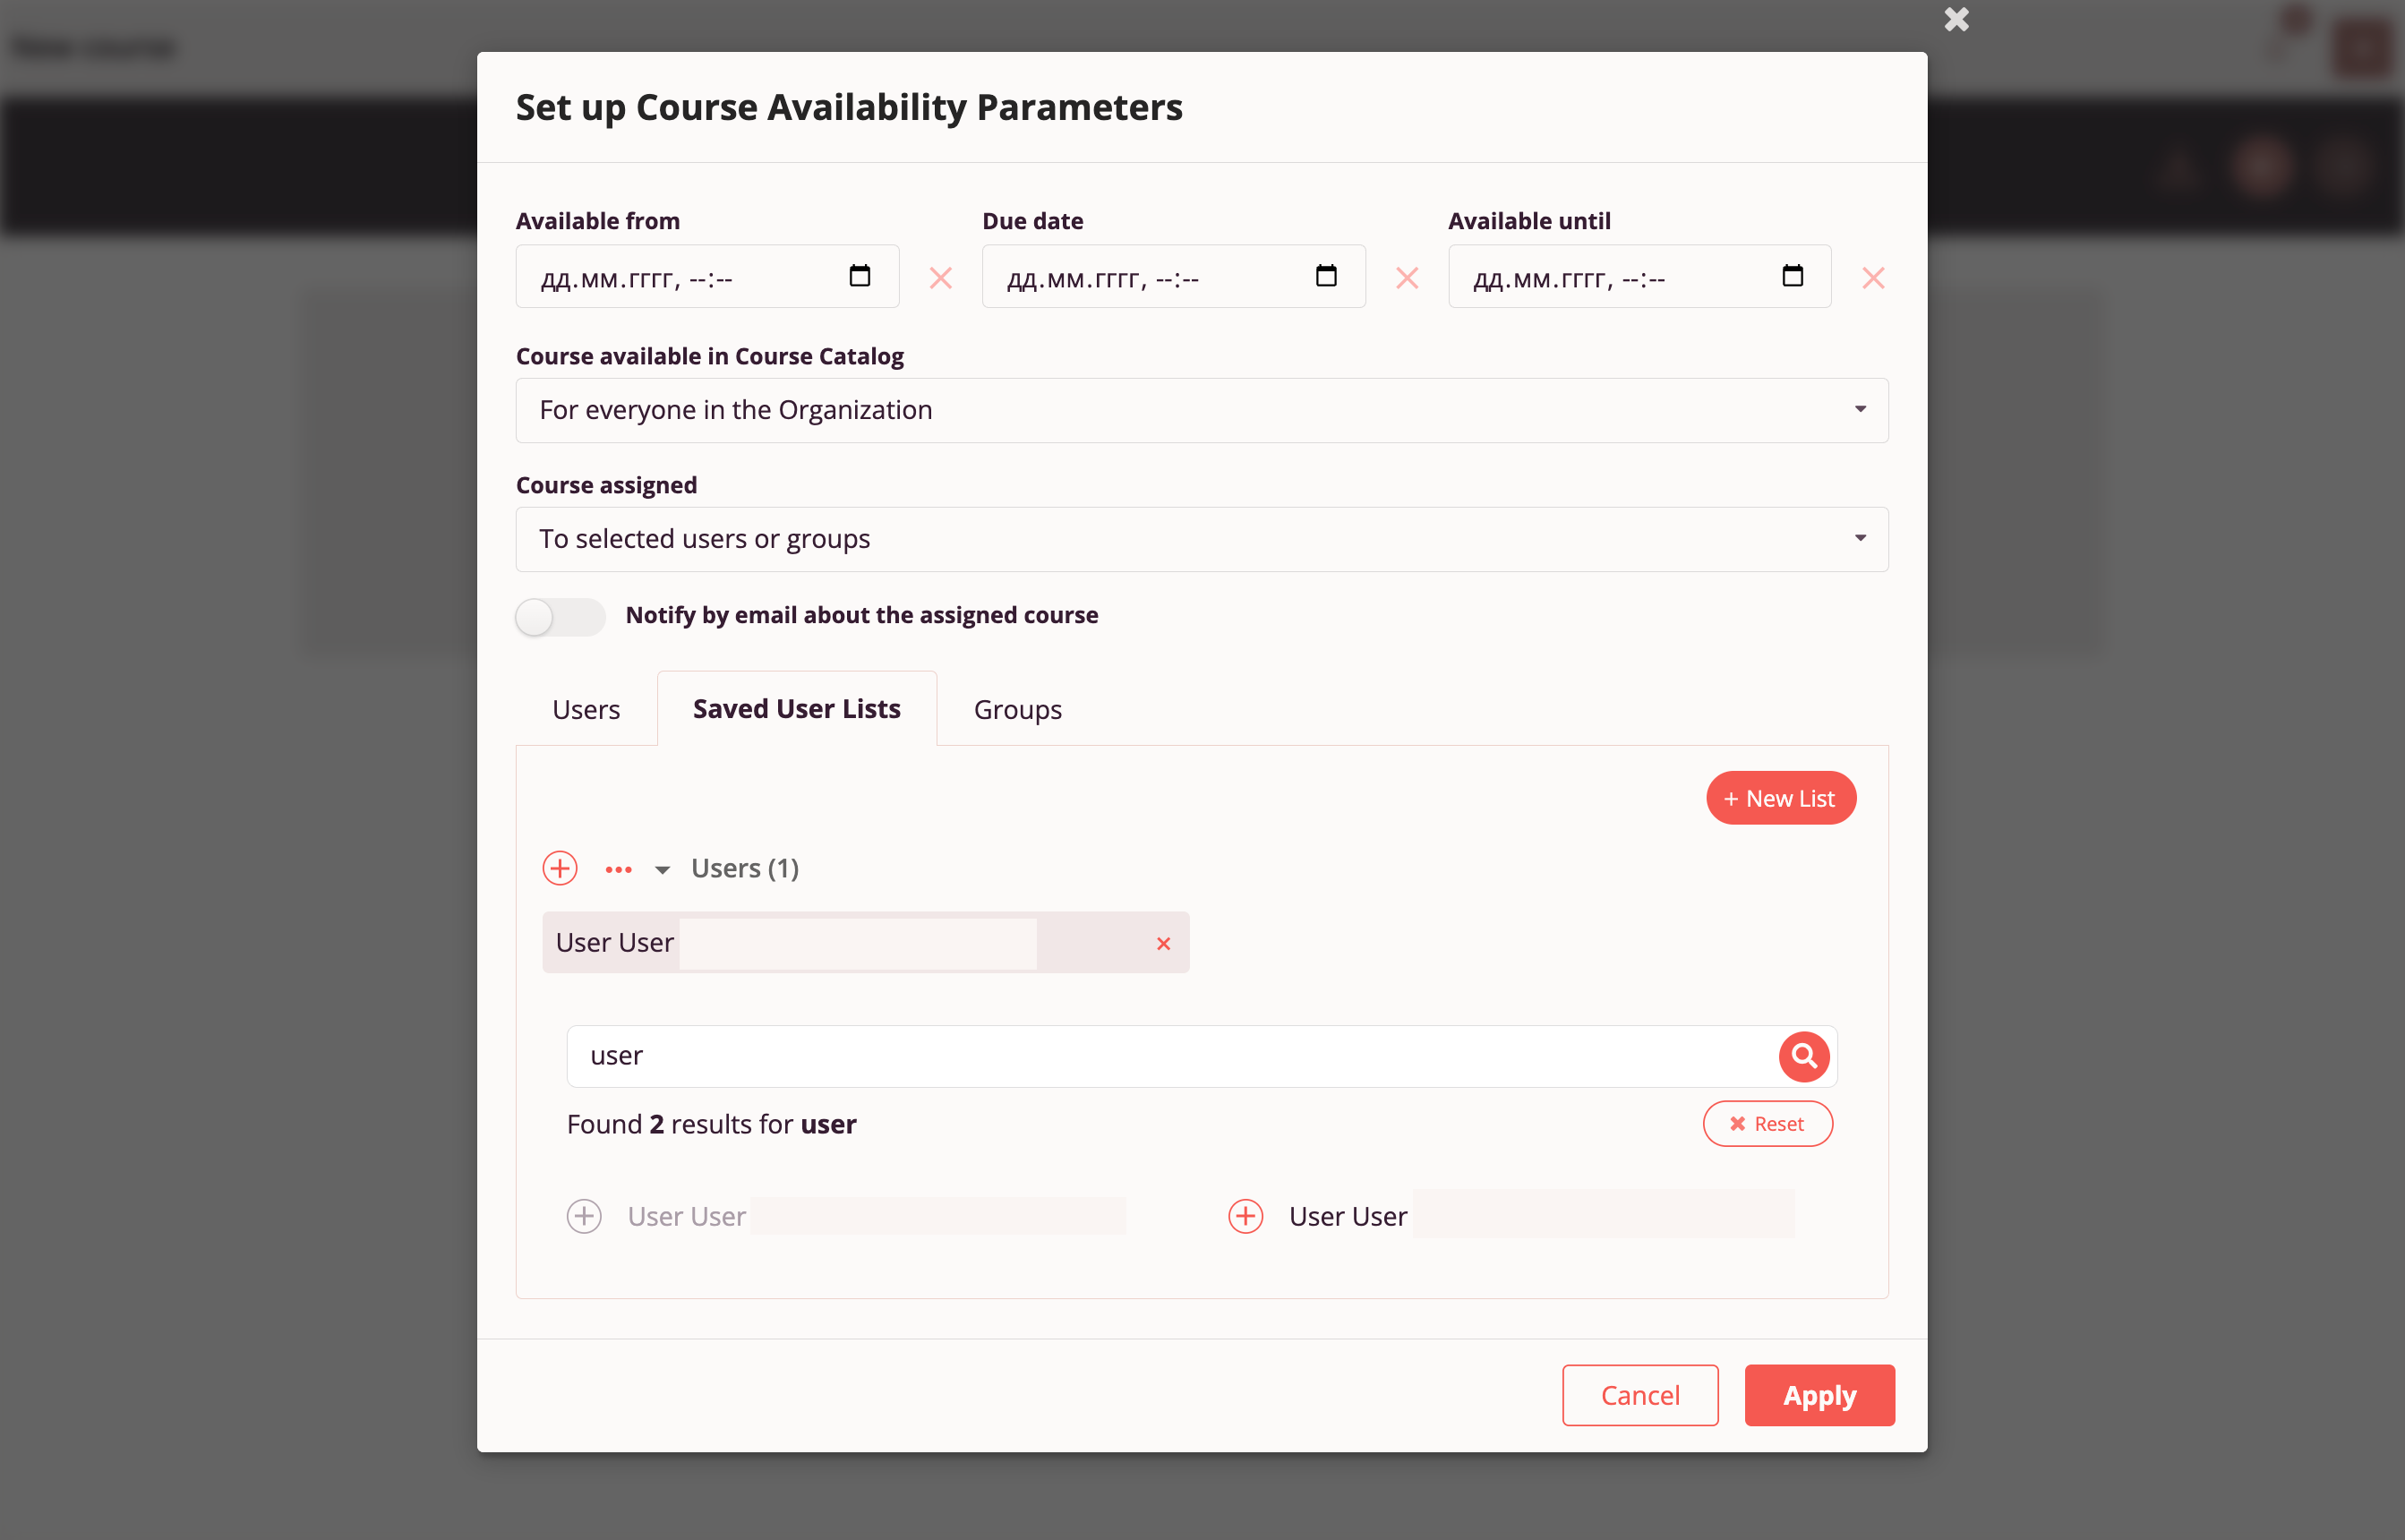
Course Assignment — Employee List Search
Click "+" "Add" next to the desired employee list, and users from that list will be added to the assignment list.
Course authors can also assign a course to a global employee group, which is formed and maintained at the organization level. The course will appear in the assignment list for every employee who is part of the group, even if the employee is added to the global group in the future.
Click "+" "Add" next to the desired group, and that group will be added to the assignment list.
Operations with Drafts and Published Courses
"Course Workshop" includes three lists:
- Published Courses
- Drafts
- Deleted
Published Course Operations
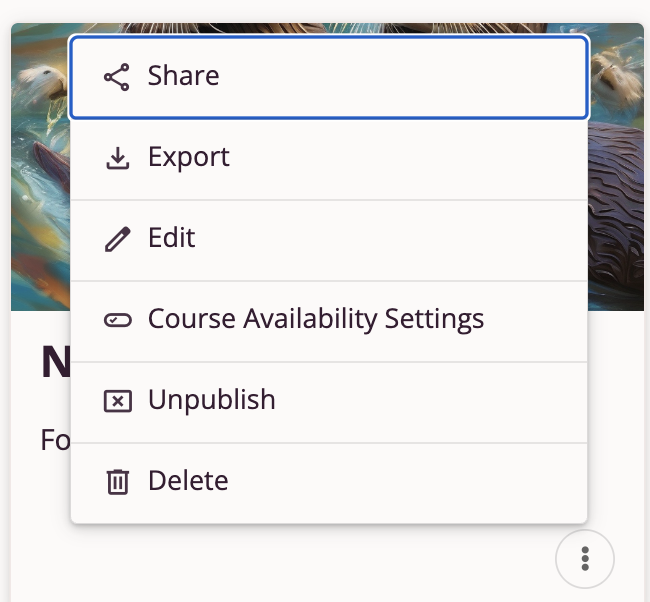
- Share — Allows copying a direct link to the course and sharing with others. Available only for publicly available courses accessible to Everyone or Everyone in my organization.
- Export — Saves a ZIP package with this course to the user's device.
- Edit — Opens the draft of this course in the "Course Editor" with the ability to edit the course and then publish the corrected version.
- Configure Display Settings — Opens the "Configure Display Settings" page with the ability to change availability or assignment parameters.
- Unpublish — Removes this course from publication; the draft remains available for editing.
- Delete — Removes this course from publication and moves the draft to "Deleted".
Draft Course Operations
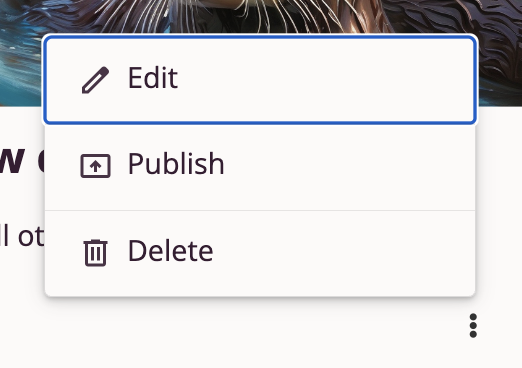
- Edit — Opens this course draft in the Course Editor. Allows continuing course editing.
- Publish — Opens this course draft in the Course Editor on Step 3 "Publication". Allows testing and publishing the course.
- Delete — Moves the draft to "Deleted".
Course authors can also save a ZIP package with this course draft to their device in the Course Editor.

Deleted Course Operations
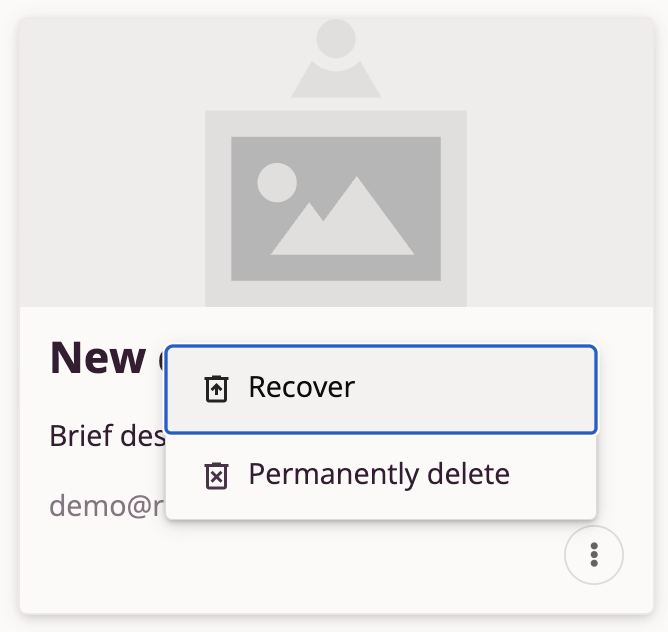
- Restore — Restores this course and moves it to the Drafts list.
- Delete Permanently — Deletes this course without the possibility of restoration.
Organization and Employees
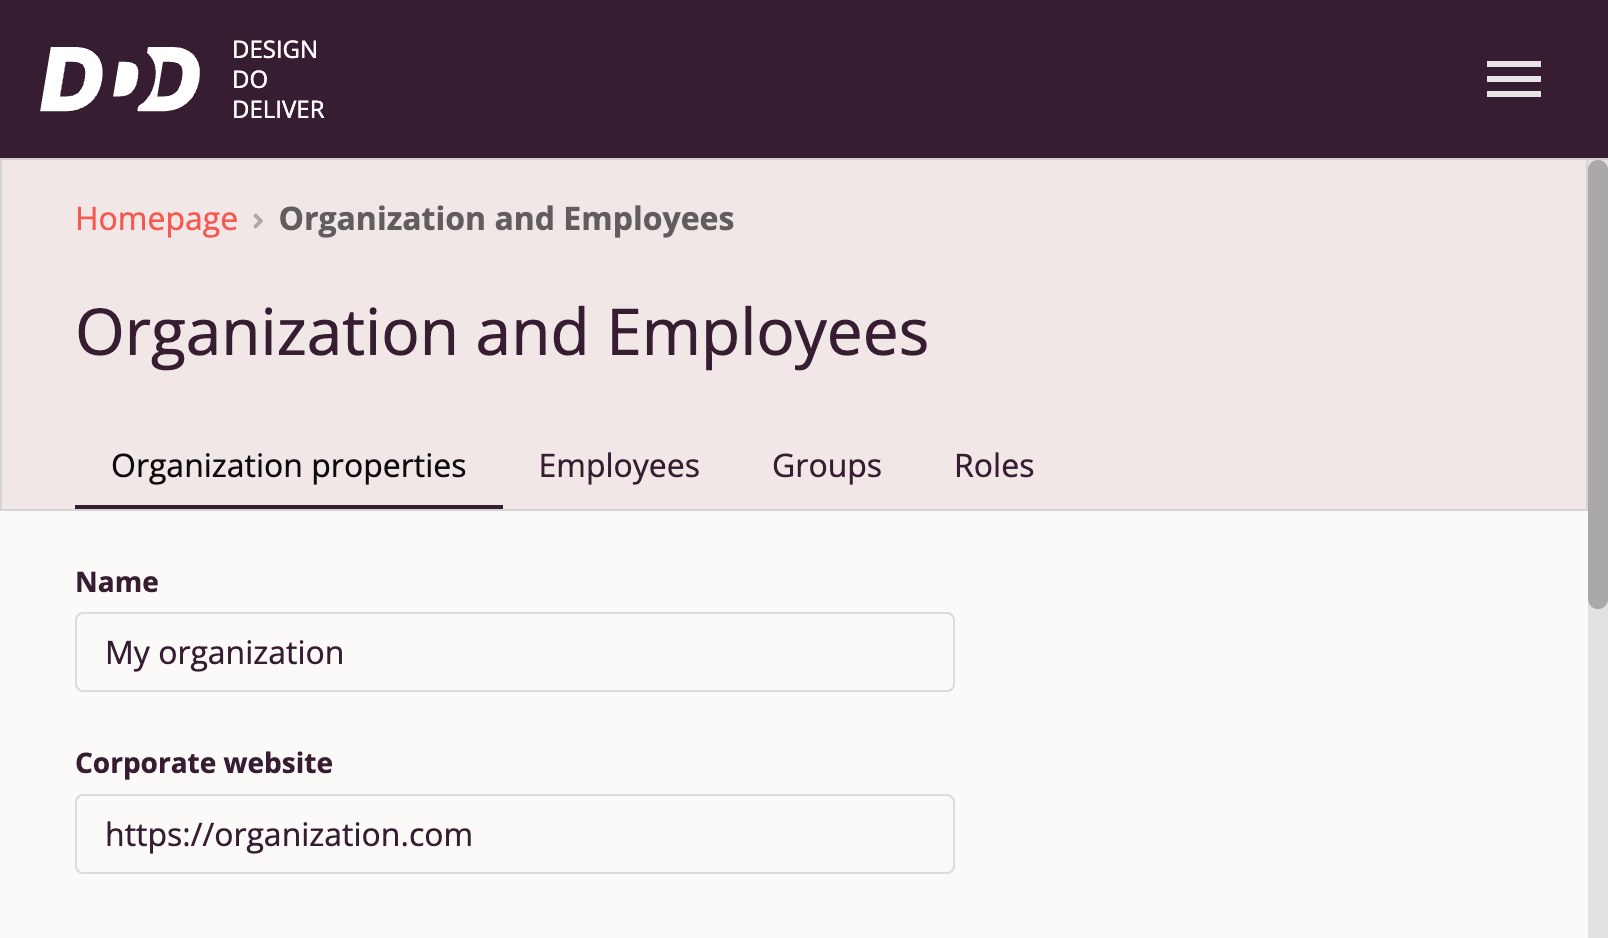
Configuring Organization Settings in the Tri-D System
Organization settings configuration is available only to organization employees with the "Organization Administrator" role.
Organization Administrators can edit the organization name, logo file, corporate website link, access policies for courses created by organization employees and outside the organization, and configure the interface for their organization's space.
Default Organization Properties
An employee with the "Administrator" role can access their organization's settings by selecting "Organization and Employees" in the Main Menu.
If organization settings have not yet been configured, they are displayed on the "Organization Properties" tab by default.
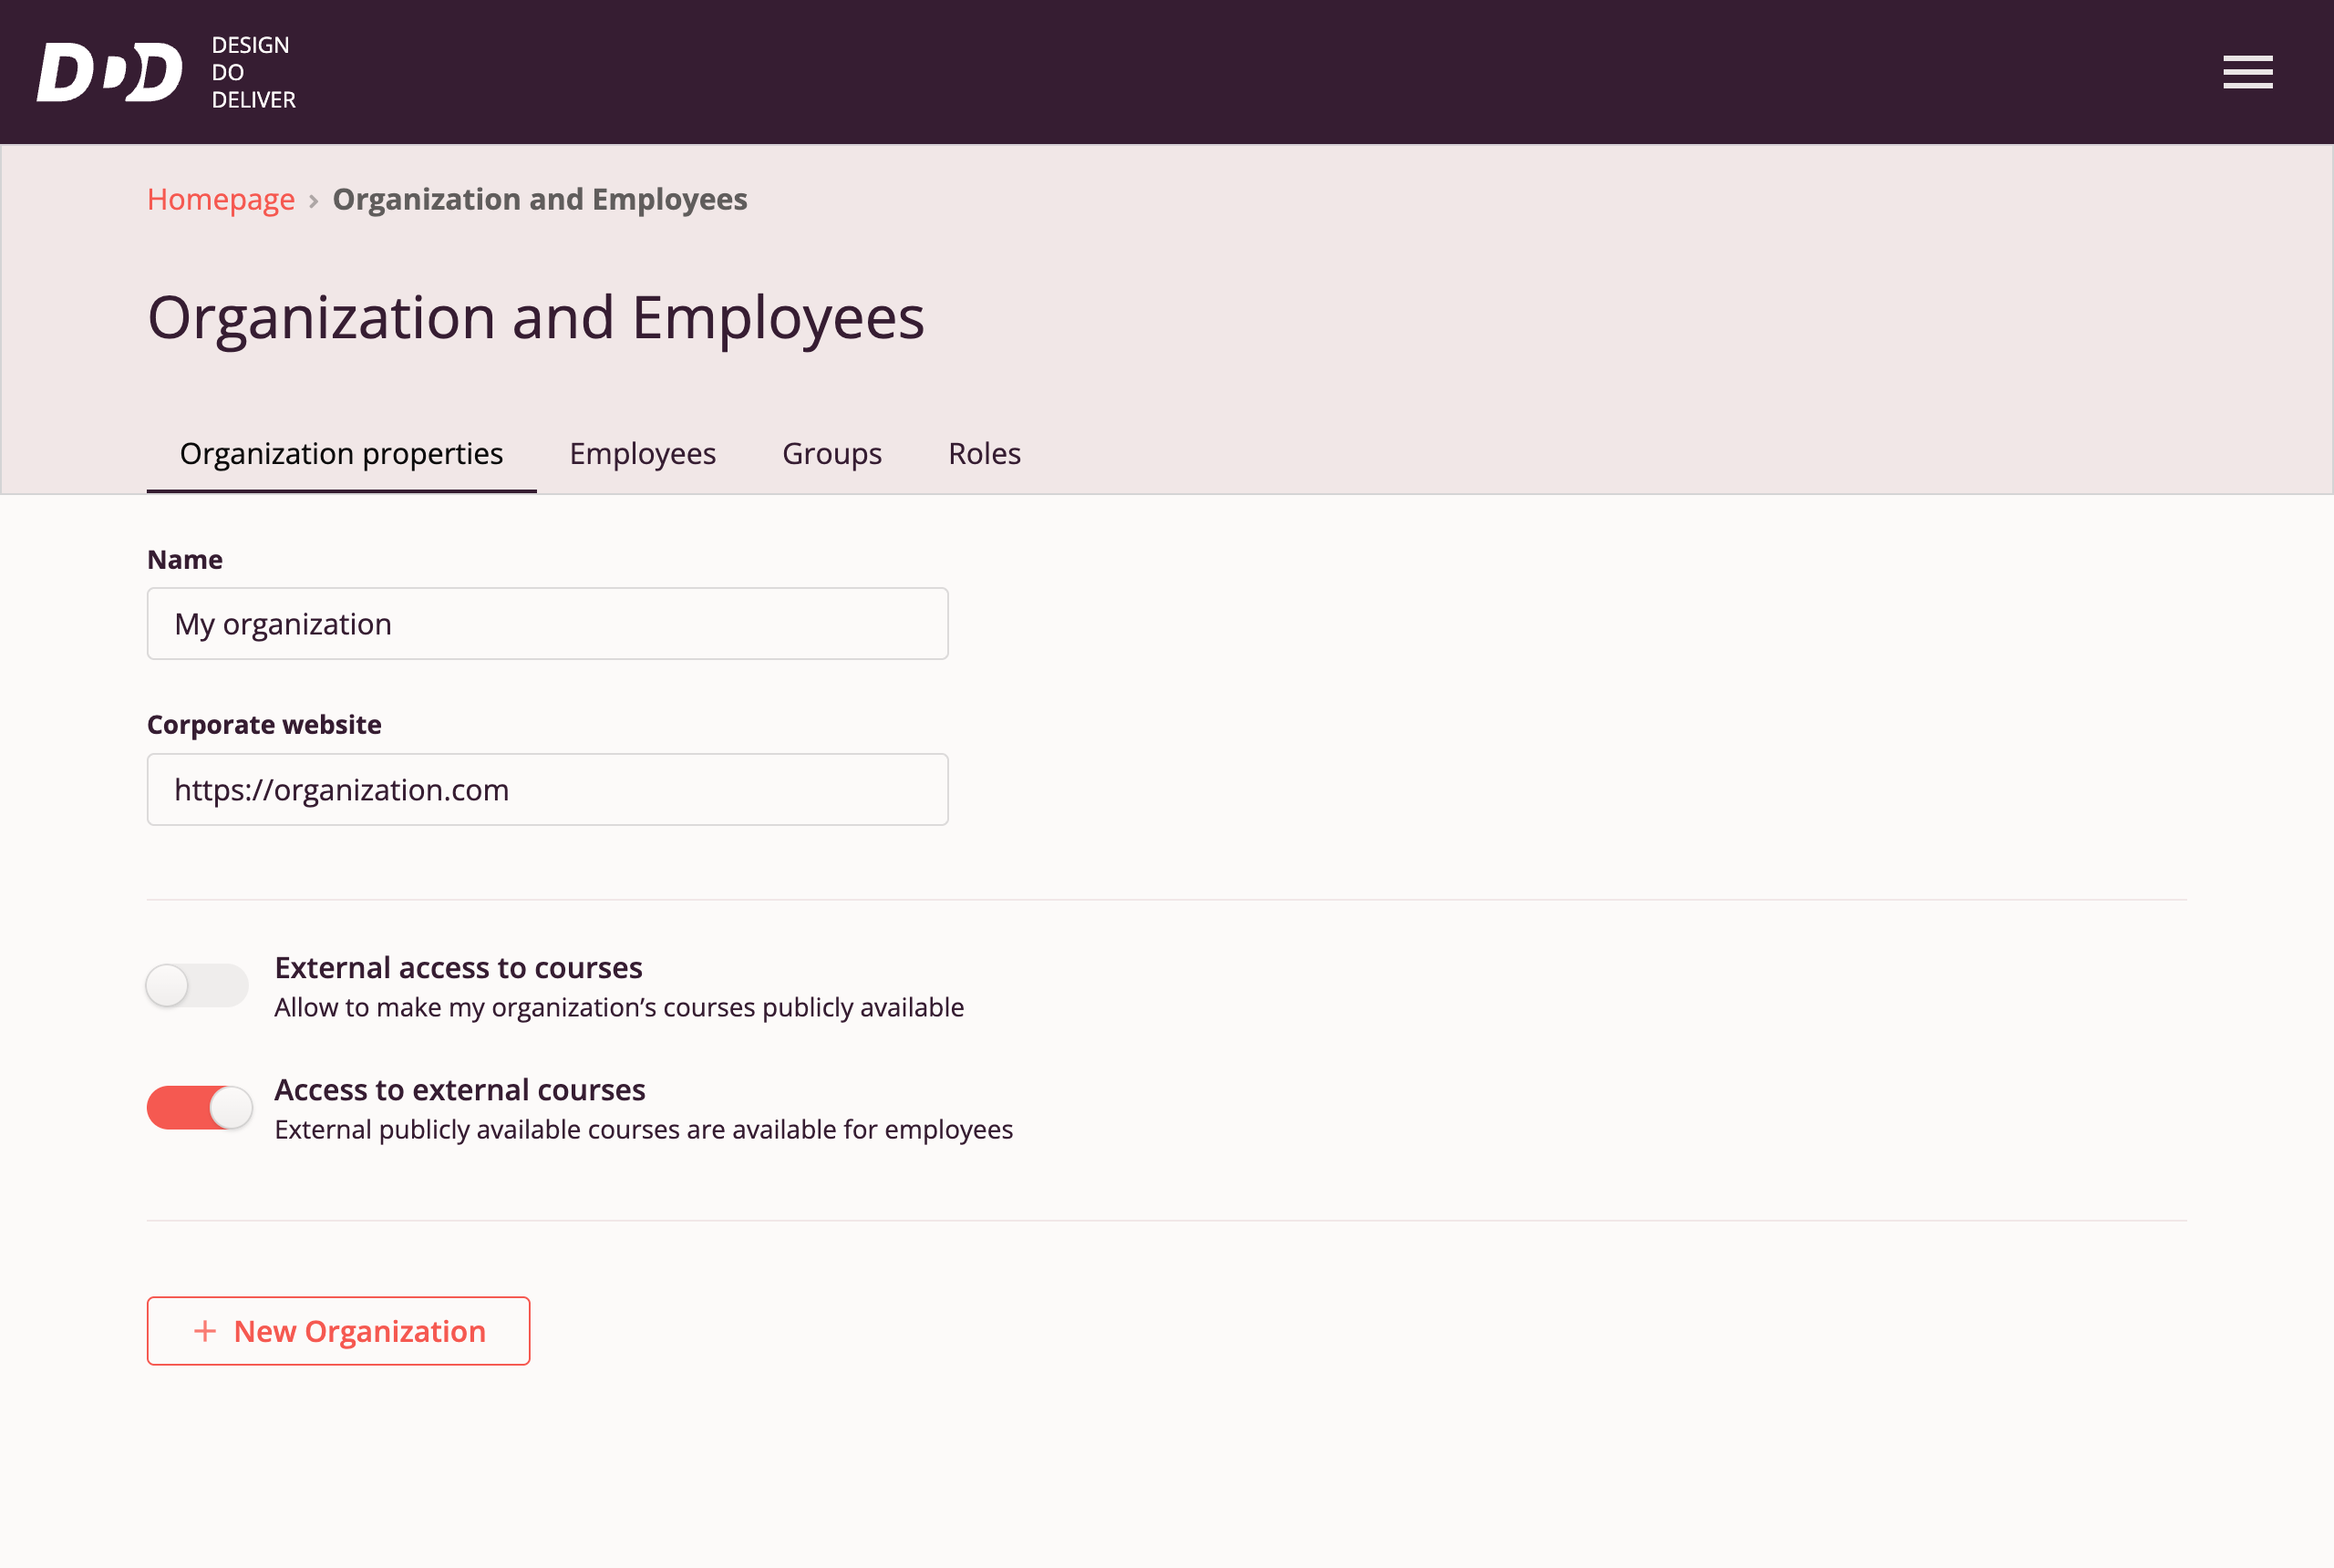
Organization Name and Website
Administrators can add or edit the organization name in the "Name" field.
You can also add the organization's corporate website address.
The system automatically saves edited data.
Configuring Organization Policies
On the "Organization Properties" tab, you can configure course access policies for your organization.
The system allows granting external users access to courses created in your organization.
By default, "External user access to courses" in your organization is prohibited (toggle switched left). Employees of other organizations do not have access to courses created in your organization.
You can change the policy to "allowed" — then when publishing courses, Authors in your organization will have the ability to grant course access to "Everyone".
In this case, courses will be available not only to employees of your organization but also to employees of other organizations in Tri-D in the "Course Catalog" section, and unauthorized users will be able to take the course via direct link.
Important: If you change "External user access to courses" from "allowed" to "prohibited", previously published courses with "Everyone" access will remain available to everyone until the course-level access is changed from "Everyone" to another value ("Everyone in my organization" or "Only to those assigned").
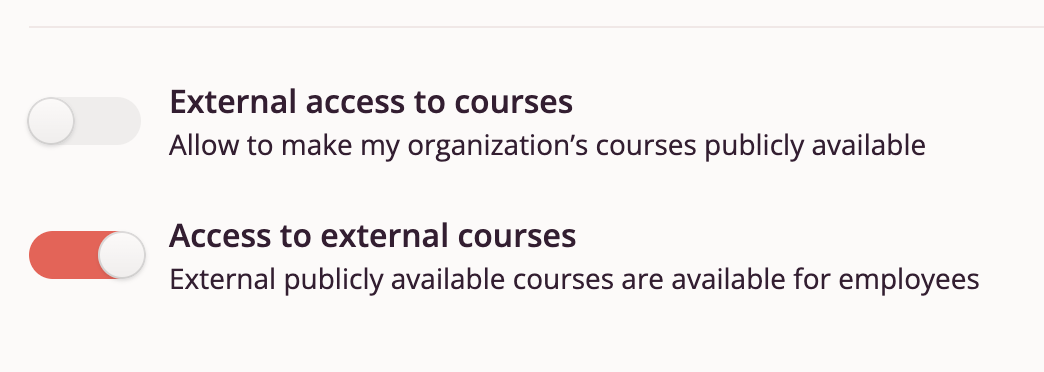
Organization Employees' Access to External Courses
By default, "Access to external courses" is allowed.
In the "Course Catalog", employees of your organization have access to courses shared by other organizations.
When taking an external course, progress is displayed on the course card in the Catalog, and upon completion, the course is saved on the employee's Home Page under the "Completed Courses" tab.
If you do not want external courses to appear in the Course Catalog, switch the toggle to "prohibited" — in this case, authorized employees will not see external courses in the Course Catalog or via direct link. Also, completed external courses will not appear on the "Completed Courses" tab.
Creating a New Organization
Tri-D provides the ability to create new organizations on the platform in order to separate the content and users of one organization from the content and users of other organizations.
A "New Organization" can be added by the Administrator of the current organization on the "Organization Properties" tab.
Adding and Editing Employee Data
Organization Employees
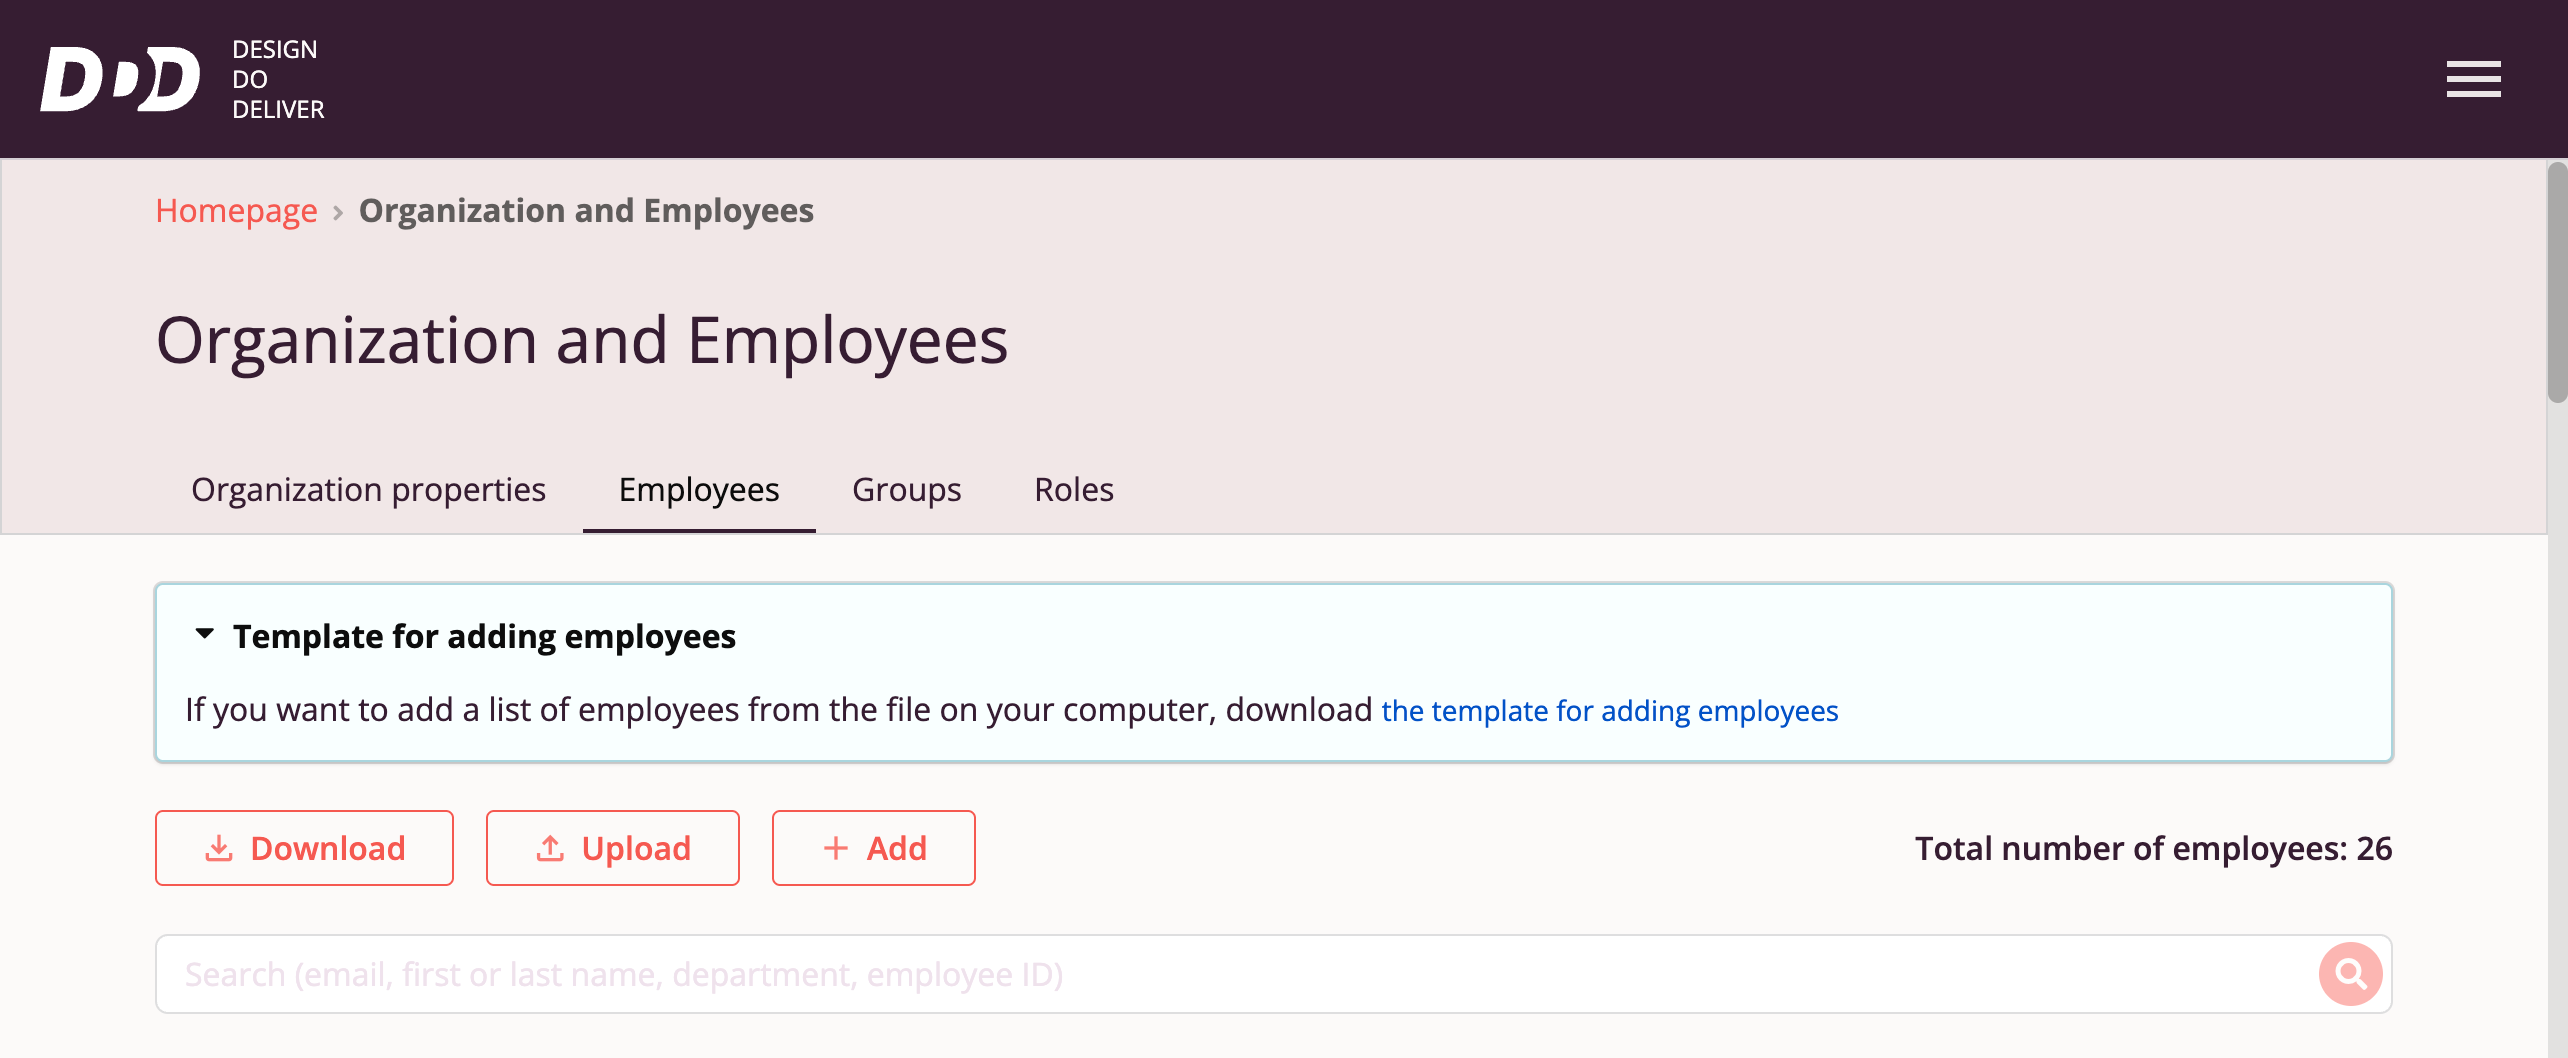
The current list of employees is available to the "Organization Administrator" and "Manager" on the "Employees" tab.
Users can:
- Export the employee list to a file
- Upload employee data via file
- Add employees individually
A template file for uploading employees is also available.
Adding an Employee to the Organization Manually
To begin corporate training on the Tri-D platform, employee accounts must be created.
On the "Employees" tab, there is a "+ Add Employee" button.
In the employee data form, the user fills in mandatory fields: "Email", "First Name", and "Last Name". Other fields are optional and can be filled in later manually or via employee data file upload.
By default, employees are added with the "Employee" role with course access. If needed, a different role can be selected for the employee in the "Role" field.
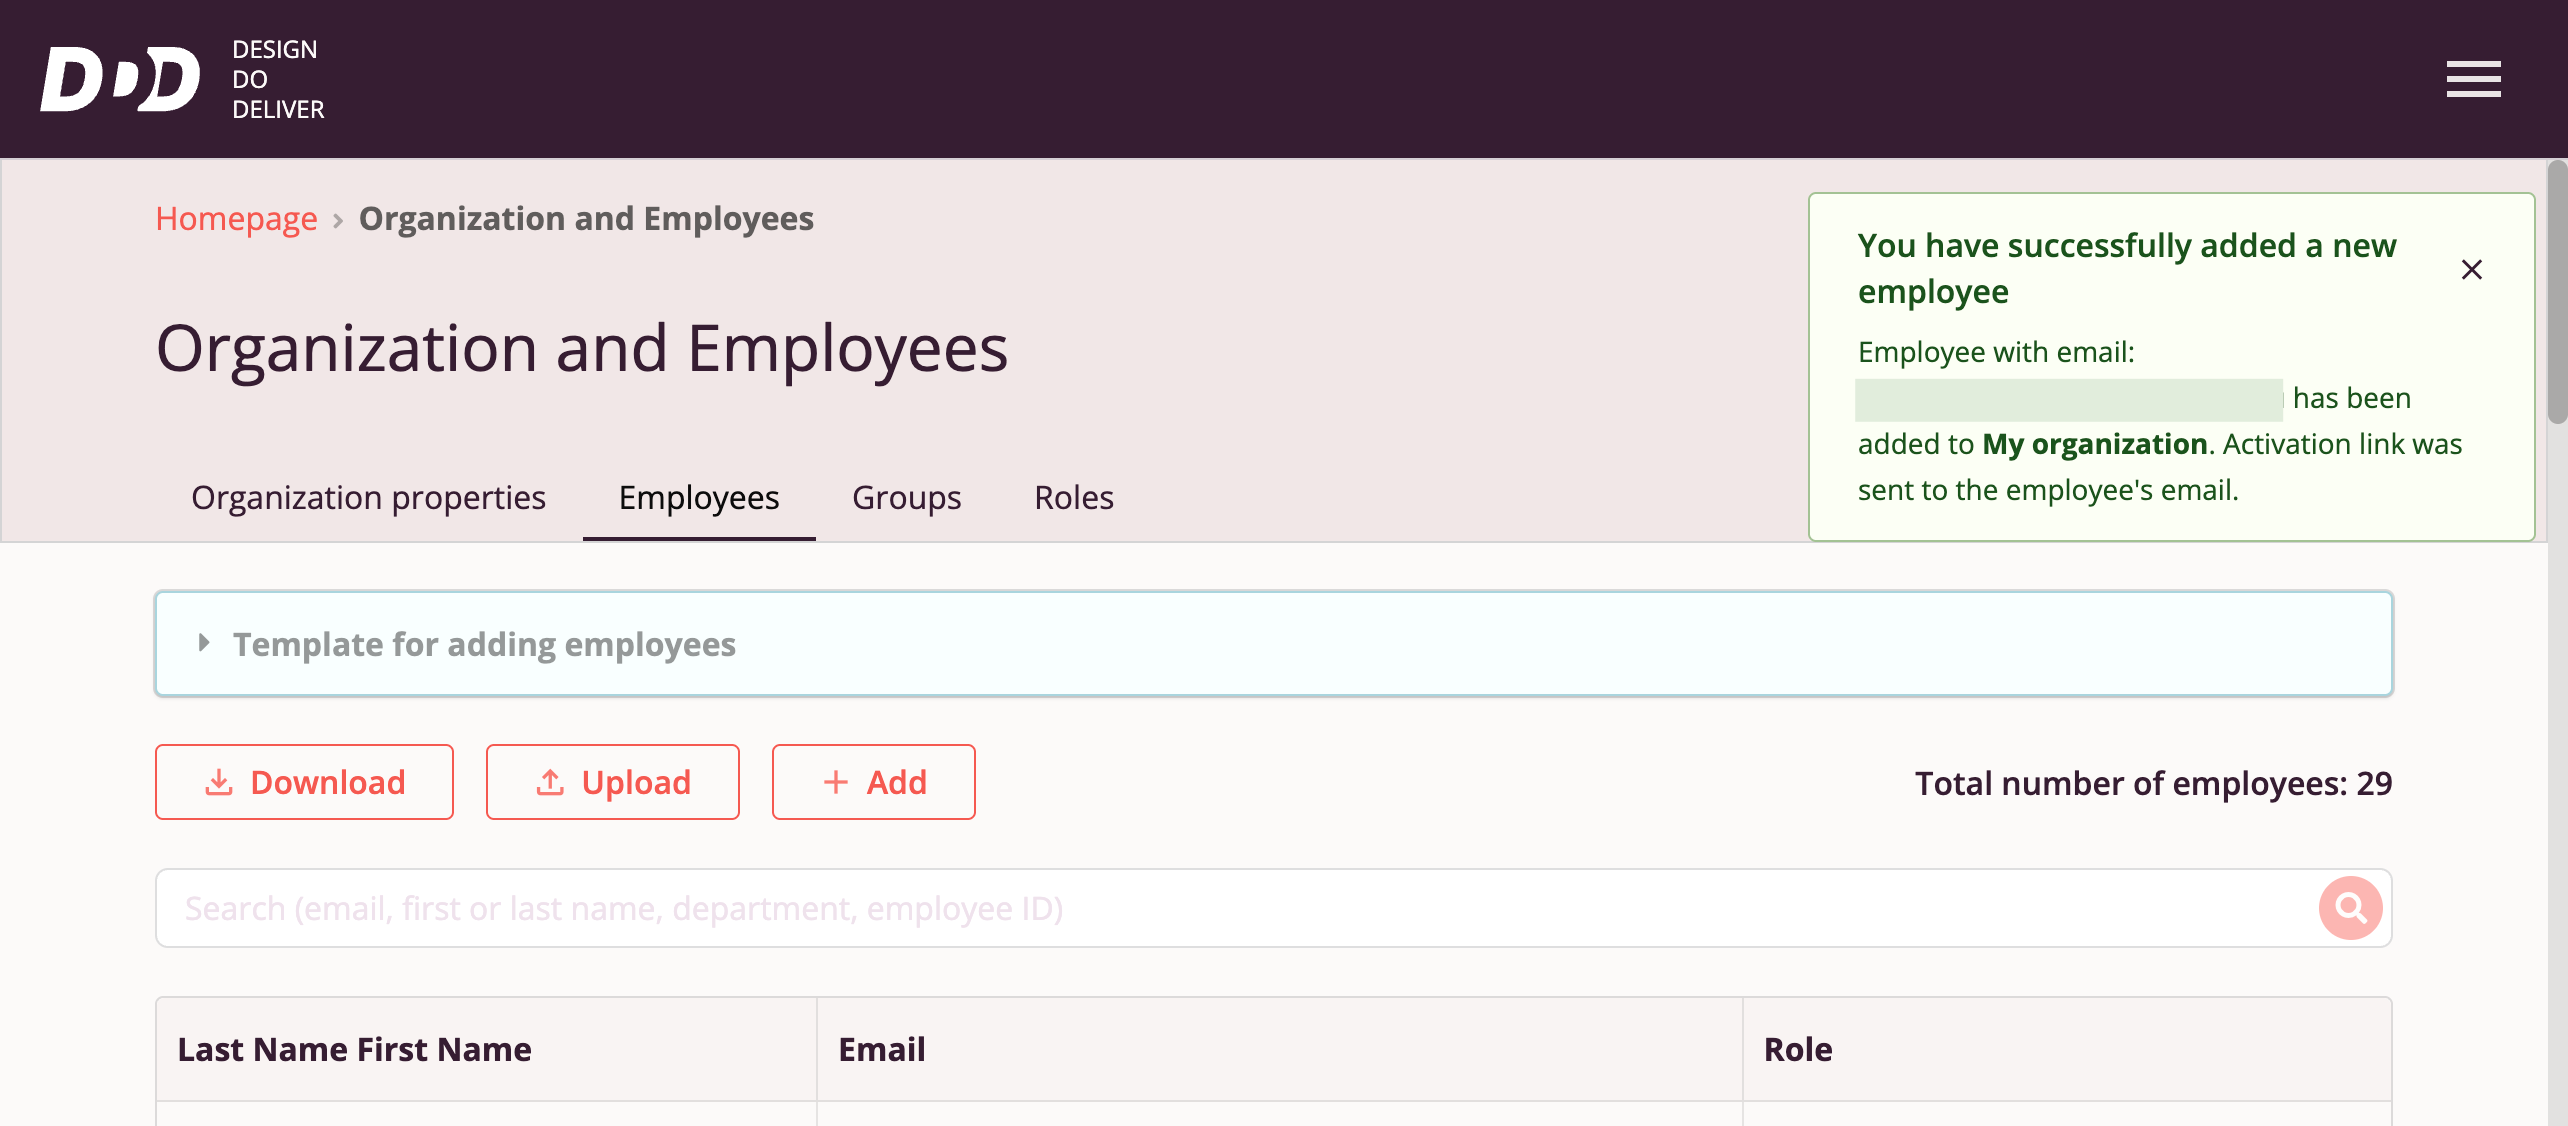
An invitation link is sent to the added employee's specified email so they can confirm and complete registration in the organization.
Inactive Employee Status
Employees who have not completed registration in Tri-D have an inactive status. An icon with the message "Employee has not yet confirmed registration" is displayed next to the first and last name of such an employee.

When the employee follows the invitation link and confirms registration in the organization, their status changes to "active", and the icon is no longer displayed.
Employee of Multiple Organizations
The system allows adding an employee to multiple organizations; however, at any given time, an employee can be in the space of only one organization, with the ability to switch between organizations.
If an employee's email was previously added to the system in another organization's space, then when adding the employee to the current organization, their first and last name will be hidden in the employee list until the employee follows the invitation link to the current organization.
Adding Employees via File
Tri-D provides the ability to add and edit employee data not only manually but also via file.
To upload employee data via file:
- Download the "Employee Addition Template" on the "Employees" tab
- Fill in mandatory fields (Corporate email, First Name, Last Name) and optional fields (Department, Patronymic, Position, Employee ID, Hire Date, Country, Team)
- Click "Upload" to add the file with employee data (new and existing)
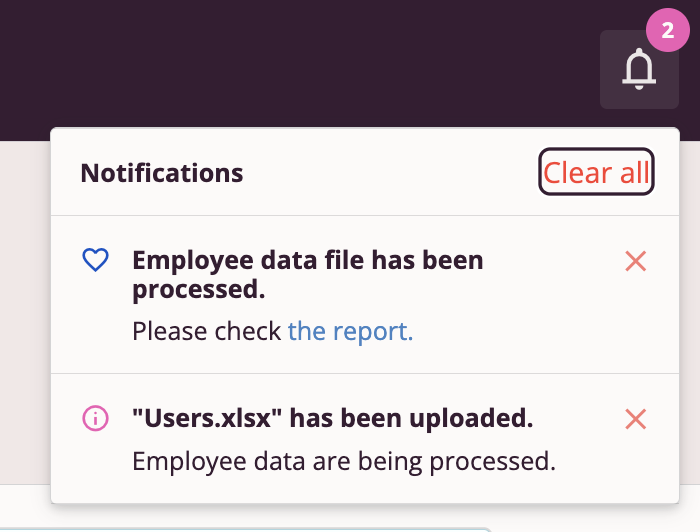
After uploading the employee data file, the file processing report can be downloaded from the message in the Notification Center.
If the Corporate email in the file is not registered in the system, a new account is created for it, and an invitation link is sent to the employee, as with manual employee addition.
If the Corporate email in the file exists in the system, employee data is updated from the file (empty cells in the file do not change previously saved employee data).
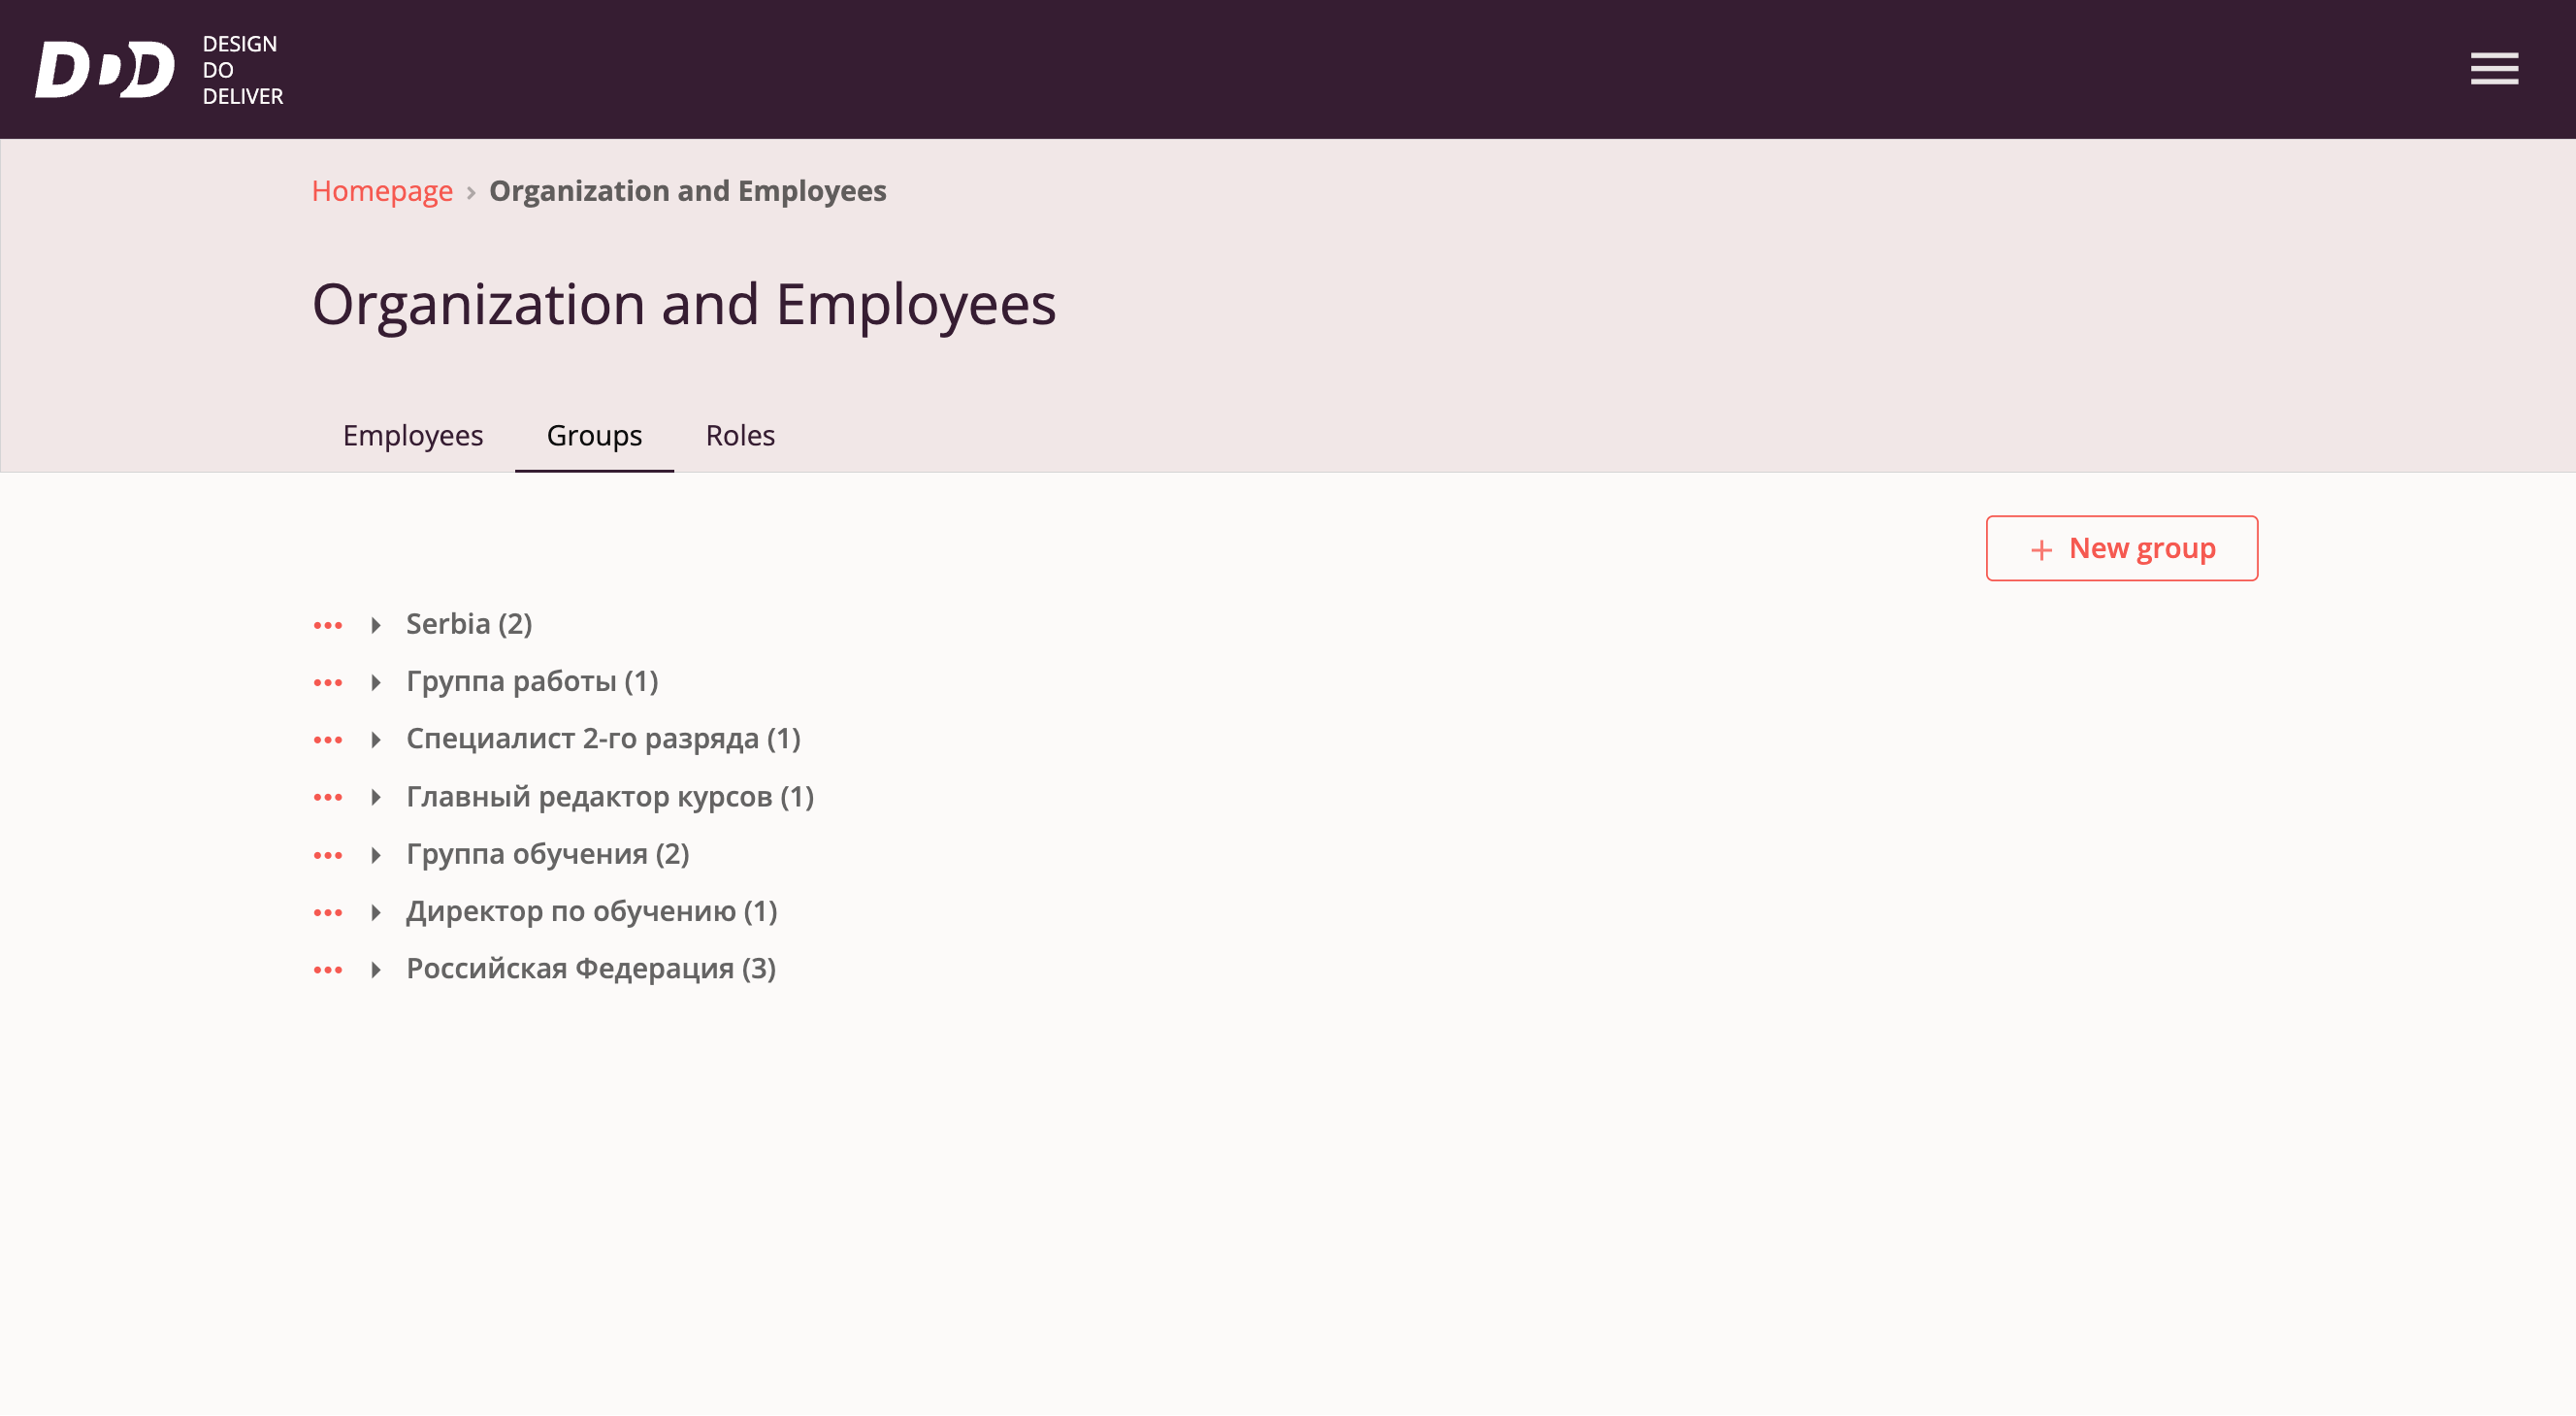
Grouping Organization Employees
Tri-D system users with roles "Organization Administrator" or "Manager" can group organization employees for convenient course assignment and learning results tracking.
This is done via the "Groups" tab in the "Organization and Employees" interface:
Group Management
Available actions when working with groups:
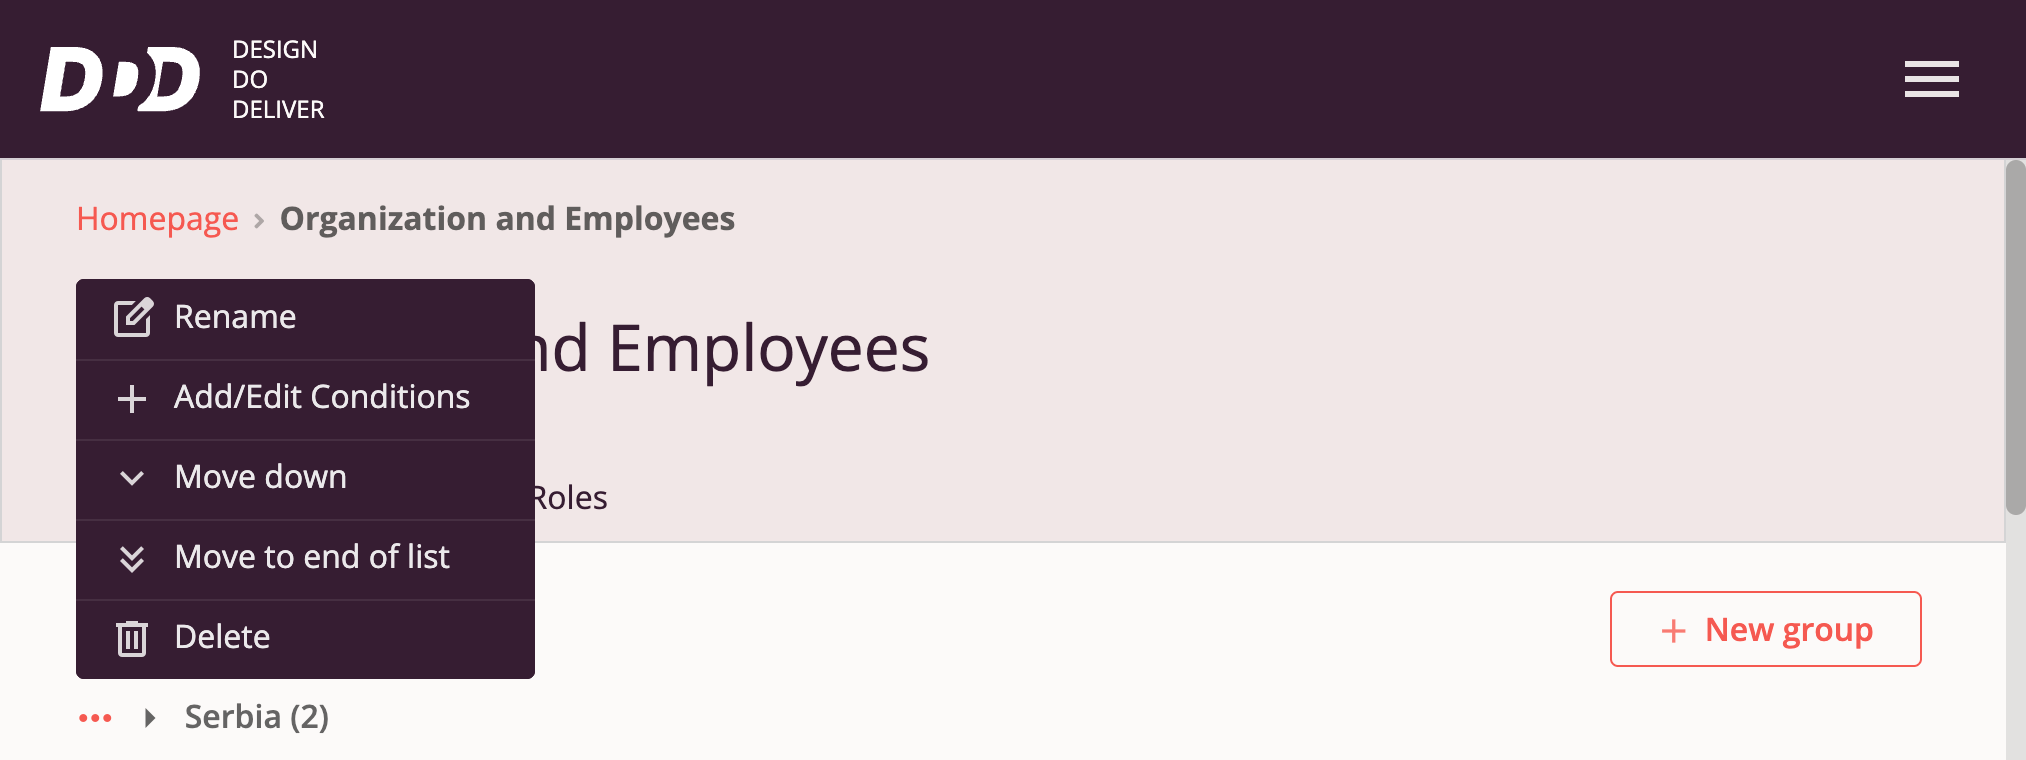
- Add new group — Click the "+ New Group" button
- Rename group — Select "Rename" in the context menu
- Edit group content — Select "Add/Change Conditions" in the context menu
- Move group to top of all groups list — Select "Move to Top" in the context menu
- Move group up one position in list — Select "Move Up" in the context menu
- Move group down one position in list — Select "Move Down" in the context menu
- Move group to bottom of all groups list — Select "Move to Bottom" in the context menu
- Delete existing group — Select "Delete" in the context menu
Editing Group Content
Users can change conditions for each group as needed — organization employees will be added to the corresponding group based on selected conditions.
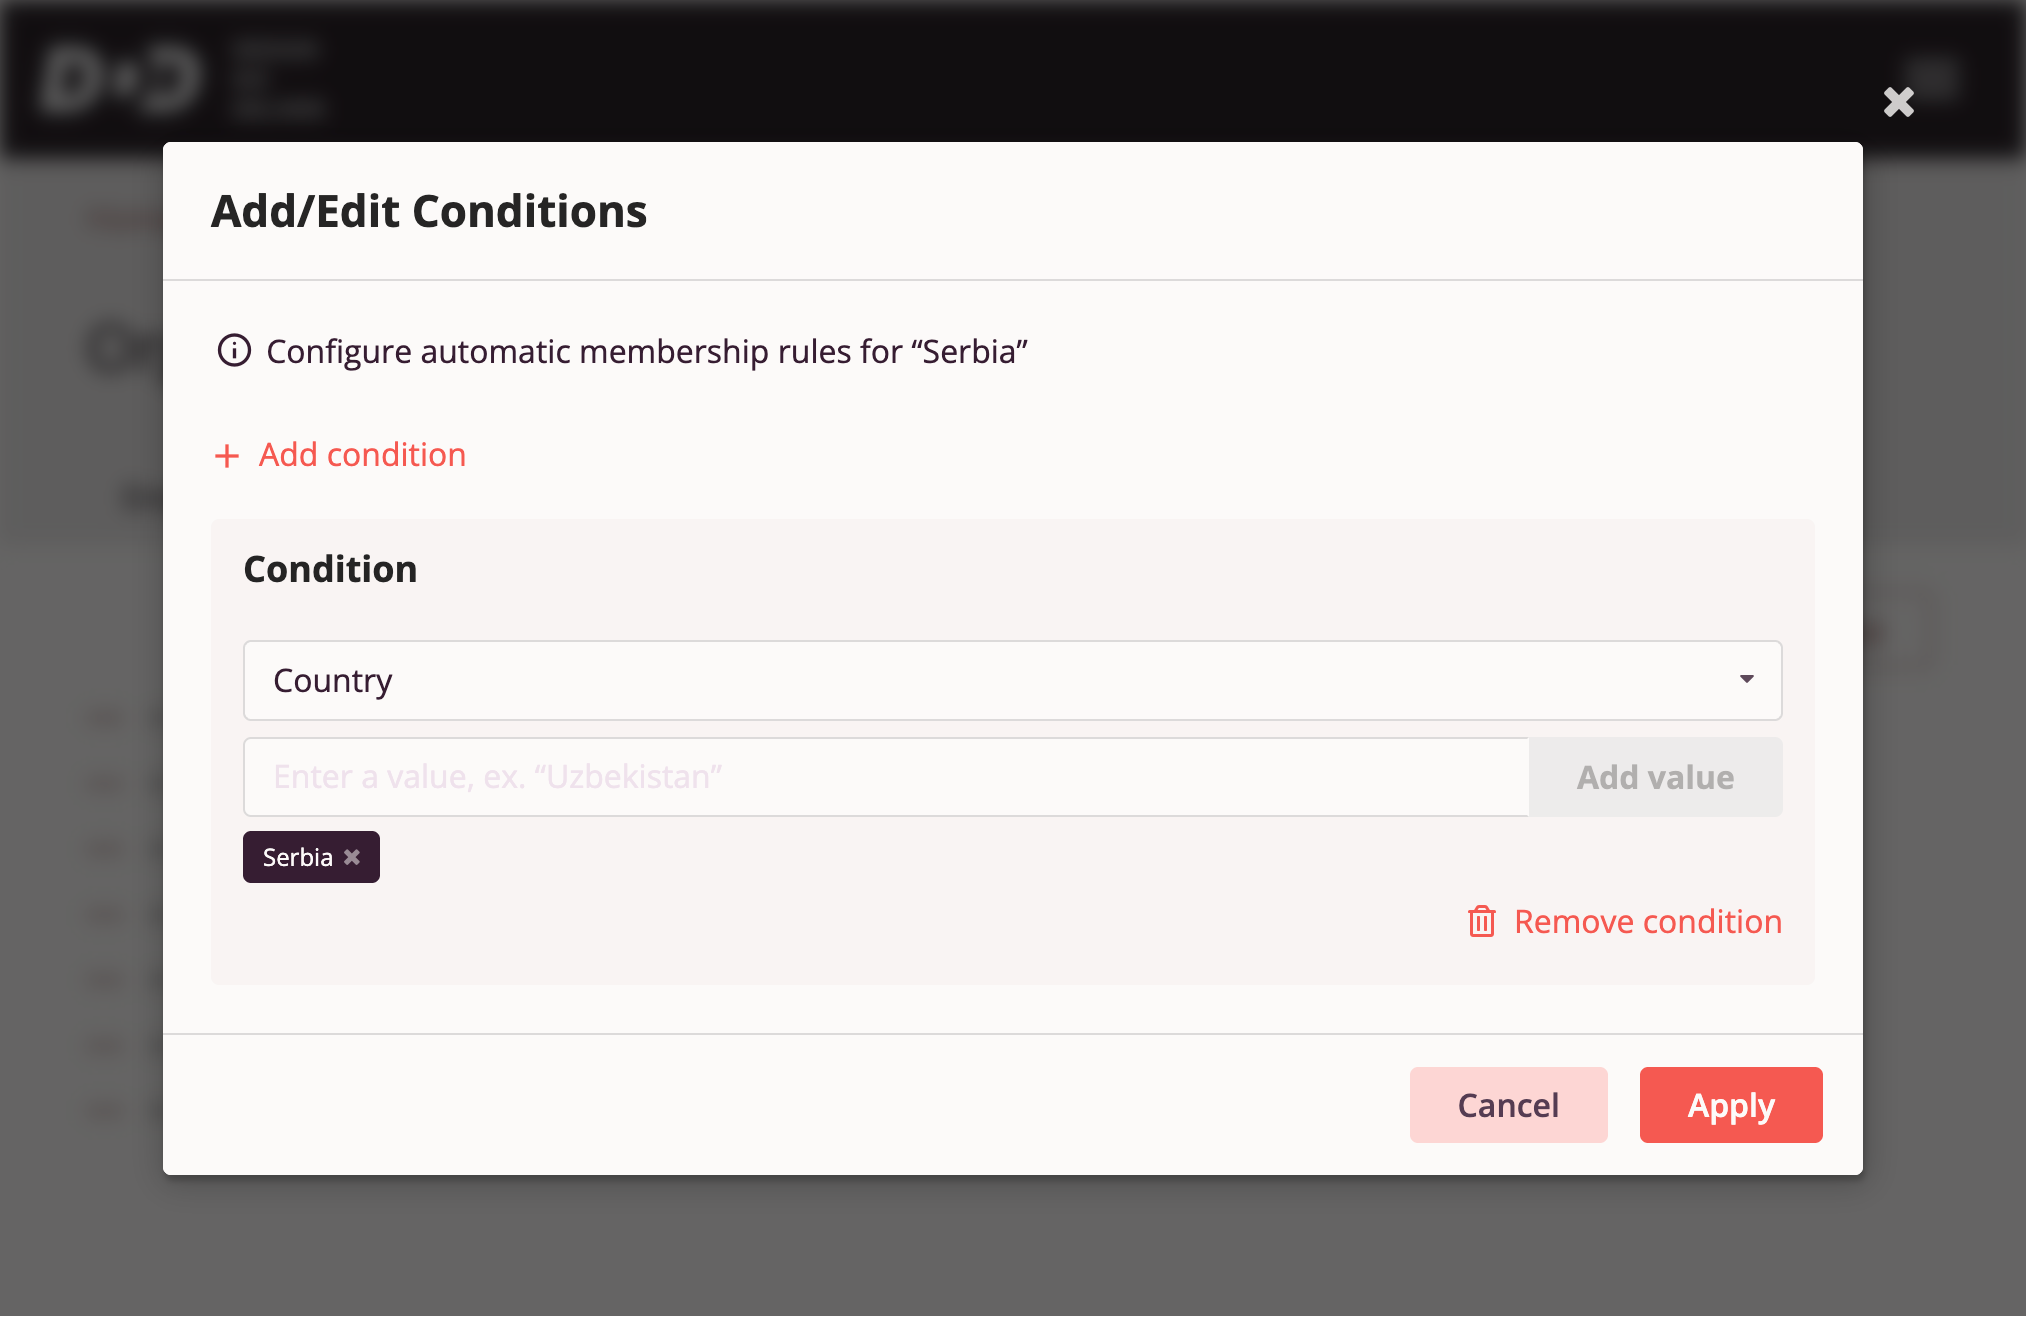
When editing a group, users can filter by the following parameters:
- Country
- Department
- Position
- Team
Note that an employee can belong to multiple groups simultaneously.
Managing Permissions and Roles in the Organization
Employees and Their Roles in the Organization
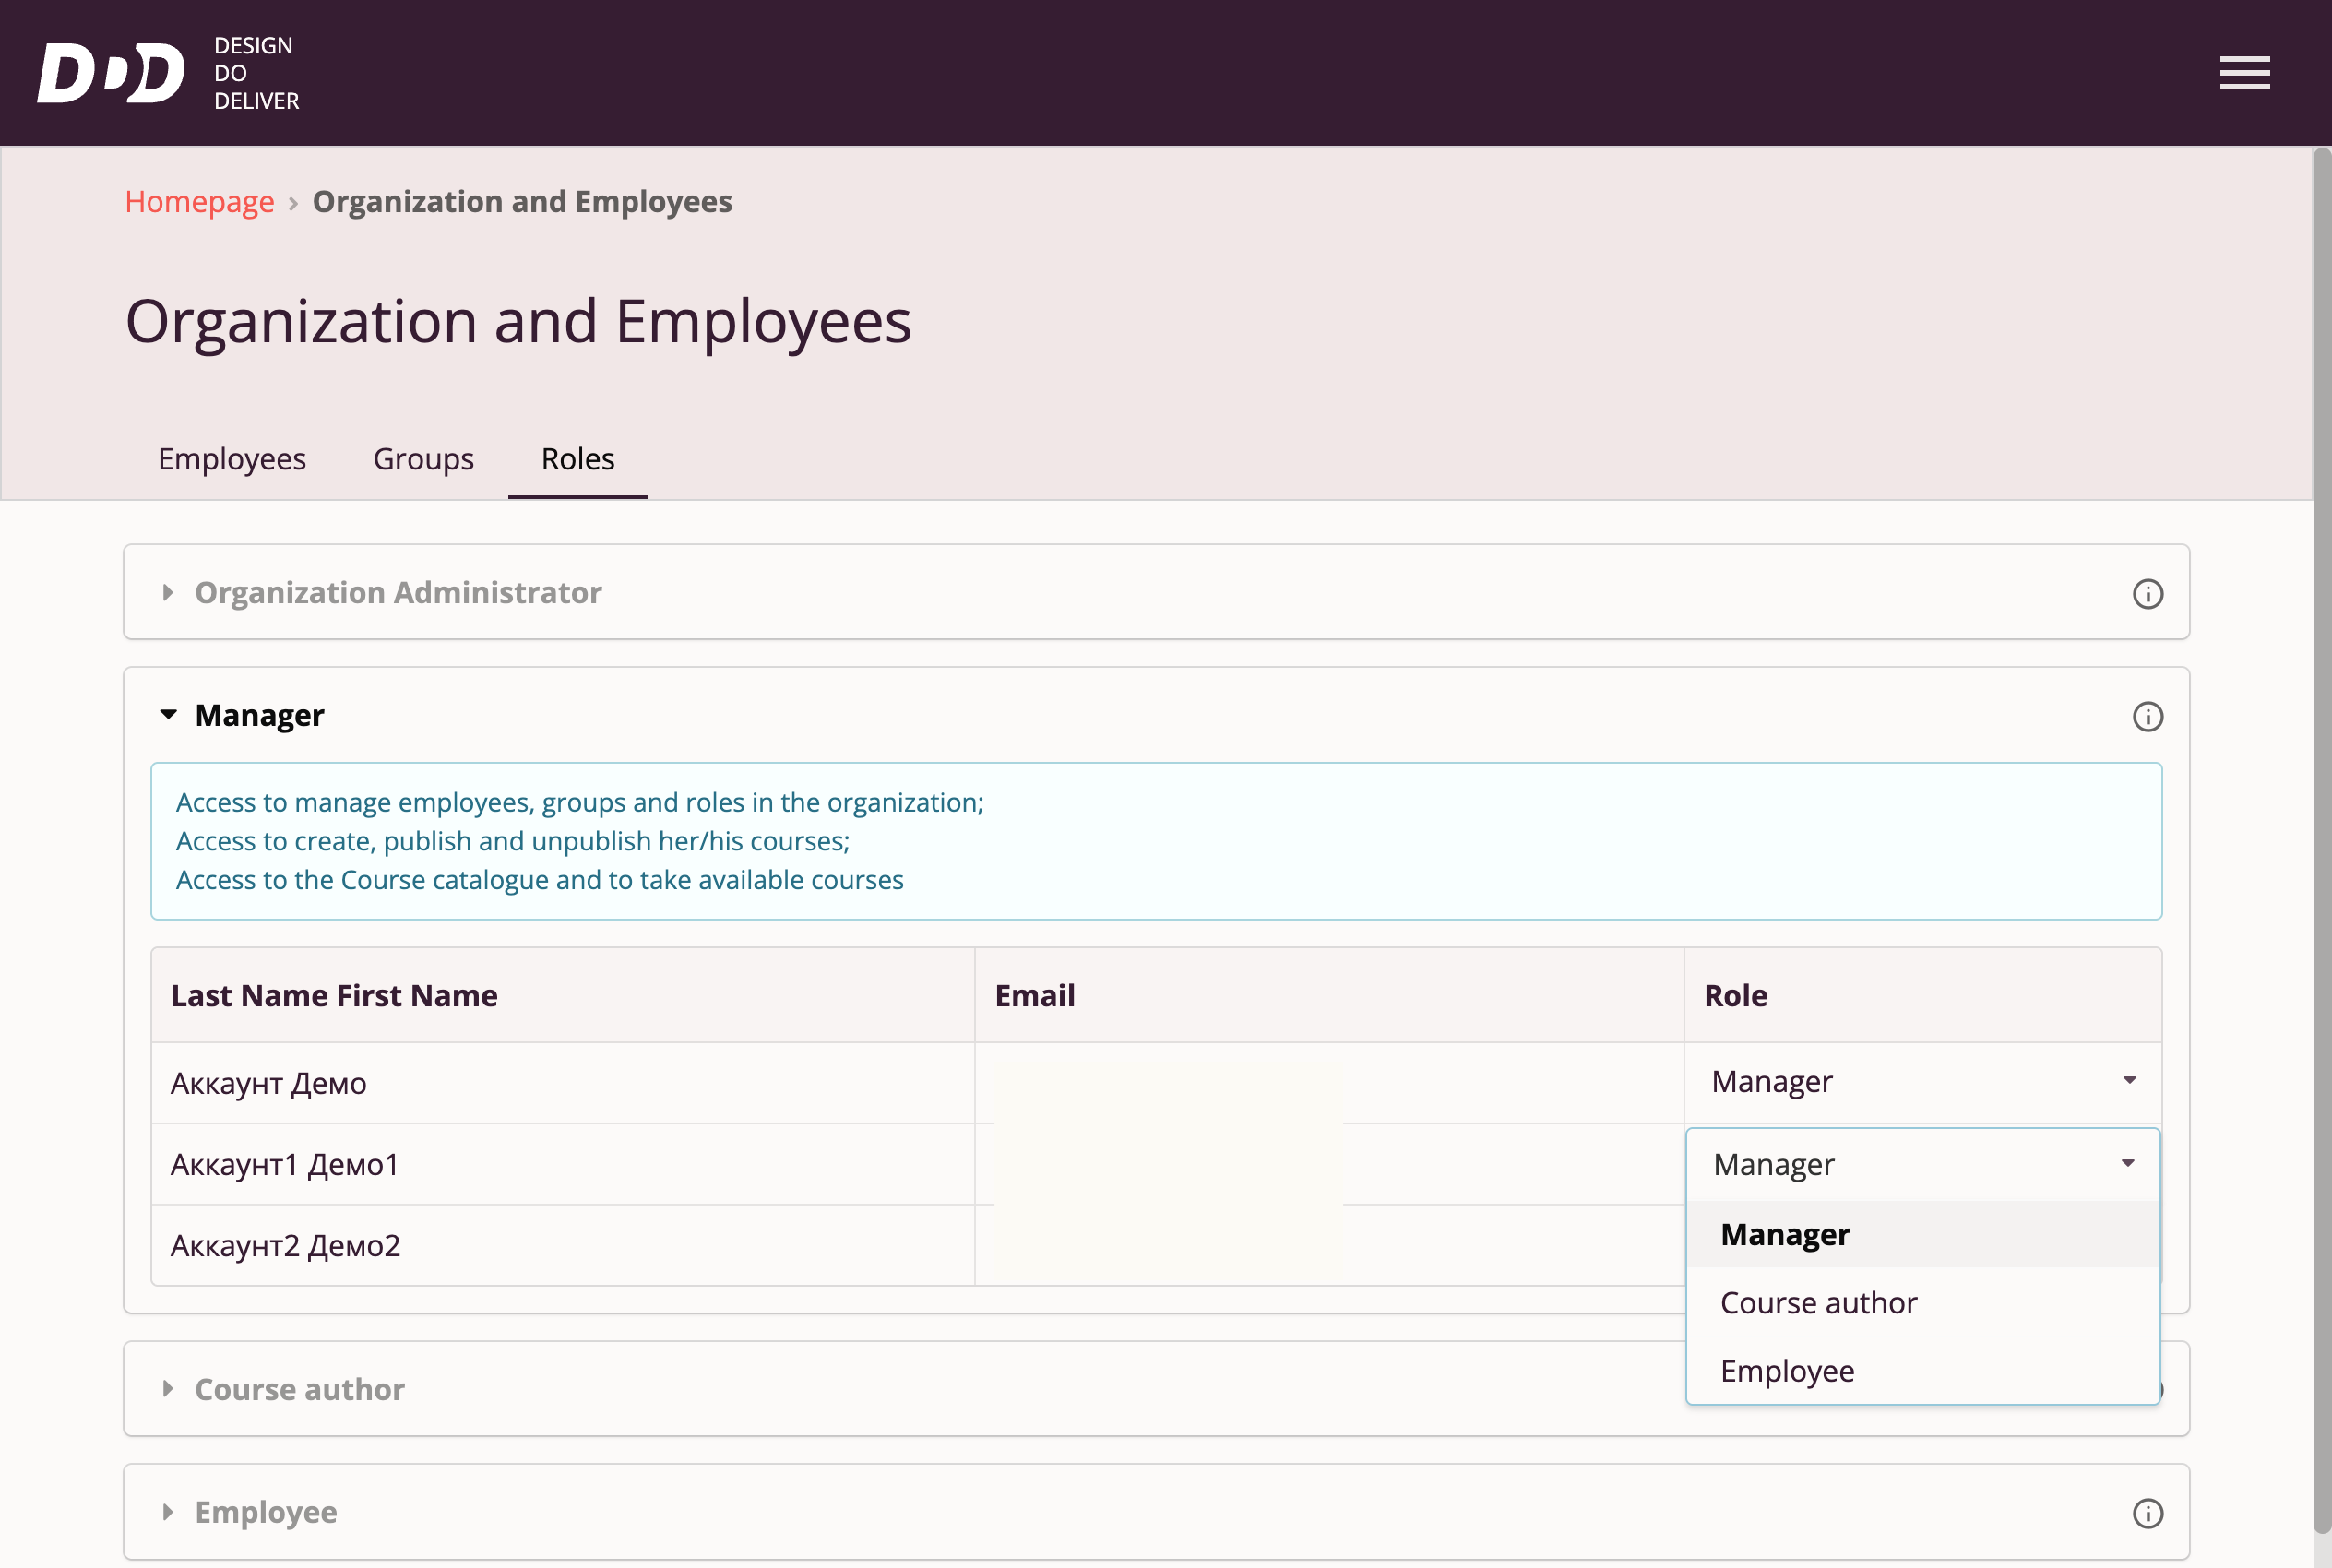
"Organization Administrators" in the "Organization and Employees" section on the "Roles" tab can view employee lists for each role in the organization.
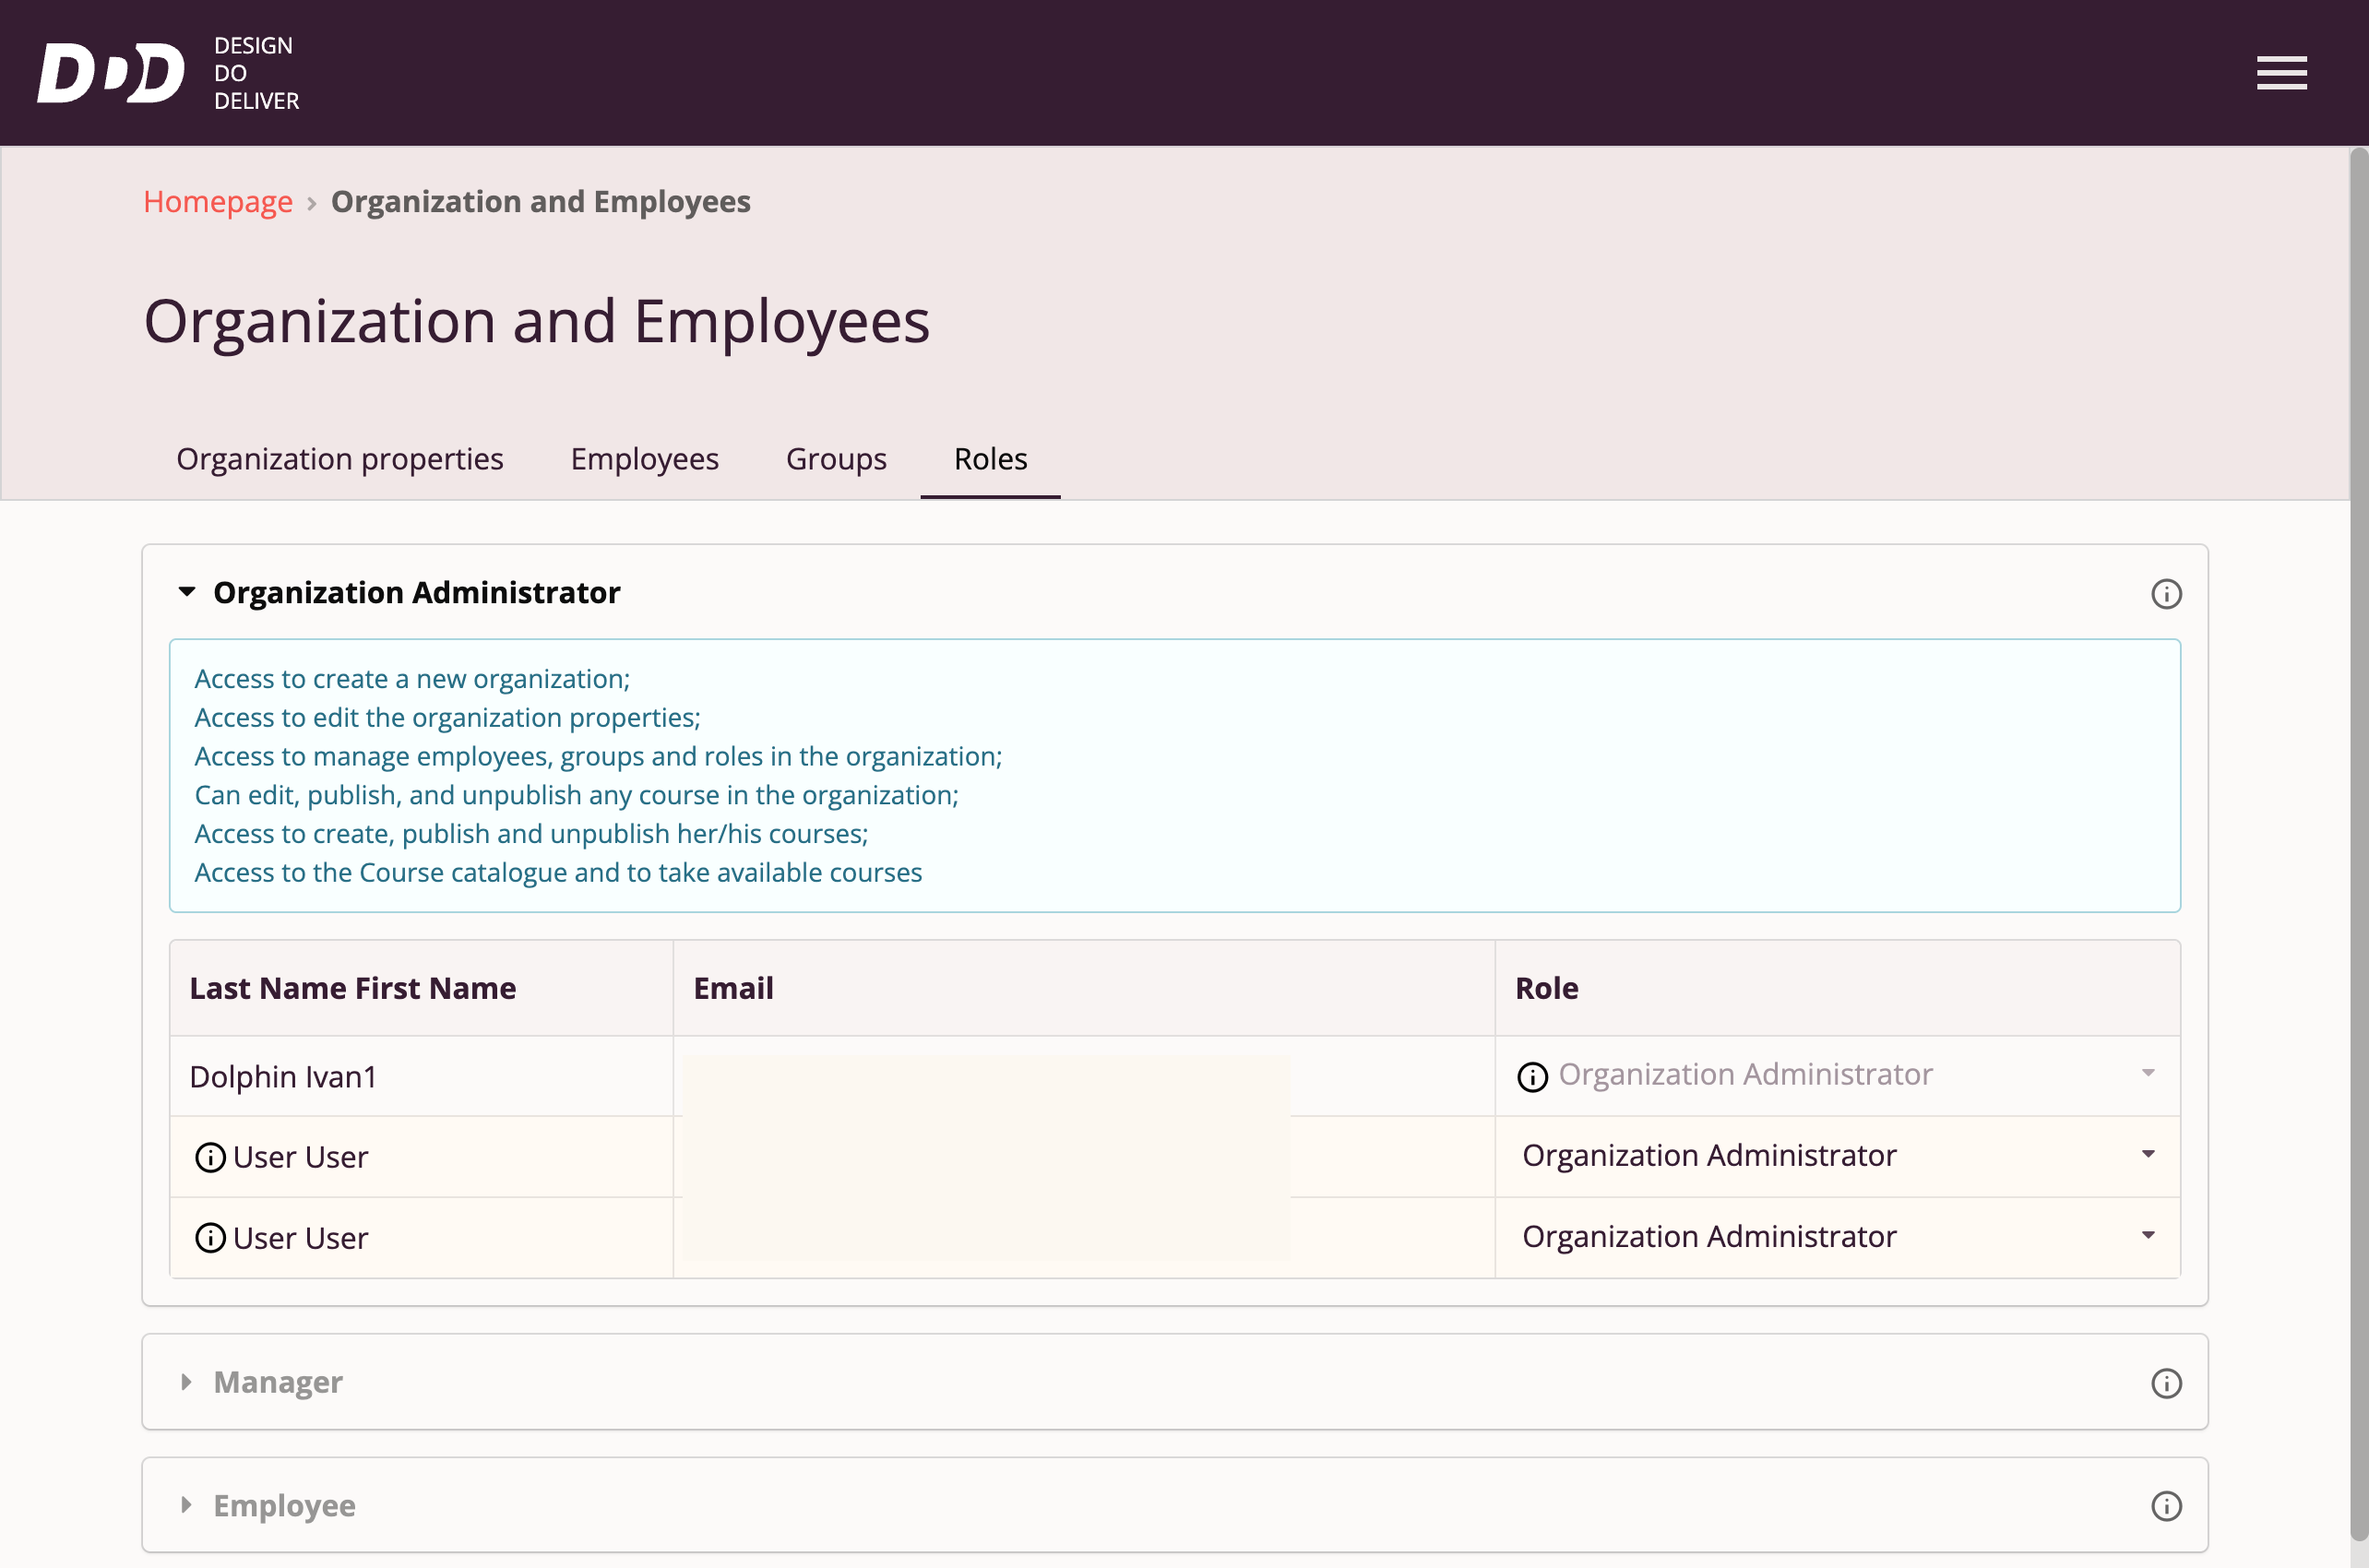
Clicking on a role name expands the permissions list for that role, as well as the list of employees currently assigned that role.
Changing an Employee's Role
Within a single organization, an employee can have only one role at a time, which can be changed if needed to expand/restrict access to platform functions.
Organization Administrators can change an employee's role in 3 ways:
- On the "Roles" tab
- On the "Employees" tab
- On the employee data page
Employee Roles
There must be at least one employee with the "Organization Administrator" role in active status (confirmed registration in the organization) within an organization.
It is not possible to change the role of the sole employee with the "Organization Administrator" role.
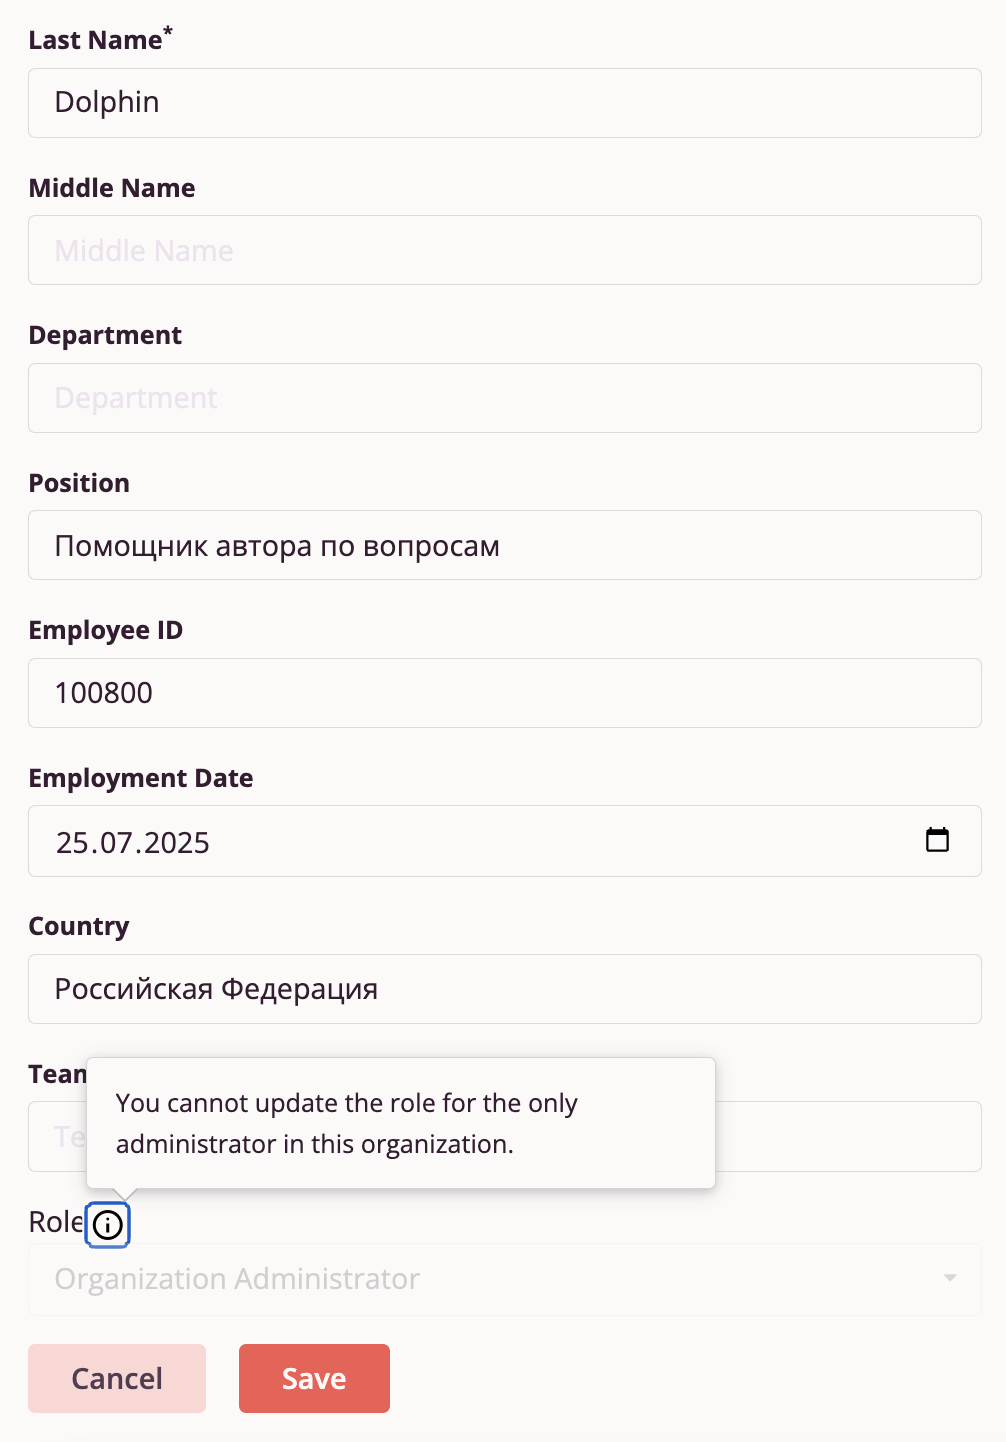
Similarly, it is not possible to delete the sole "Organization Administrator" (an employee who has confirmed registration in the organization). This restriction ensures that at least one active employee of the organization has access to edit organization settings.
Learning Results
Clicking "Learning Results" in the Main Menu takes the user to the Tri-D System Learning Results page.
This section allows system users to obtain analytical data about their own learning, course popularity available in the organization, and data about employees in the organization.

Currently, users have access to the following functionality:
- My Learning Results — Detailed statistics for the current user about their course activity, ratings, and completion time. For more information, see section "My Learning Results" below.
- Results by Courses — Detailed statistics about courses available in the organization and their completion. For more information, see section "Results by Courses" below.
- Results by Employees — Detailed statistics about activity and ratings of employees in the organization. For more information, see section "Results by Employees" below.
My Learning Results
This section of the "Learning Results" page is available to all roles.
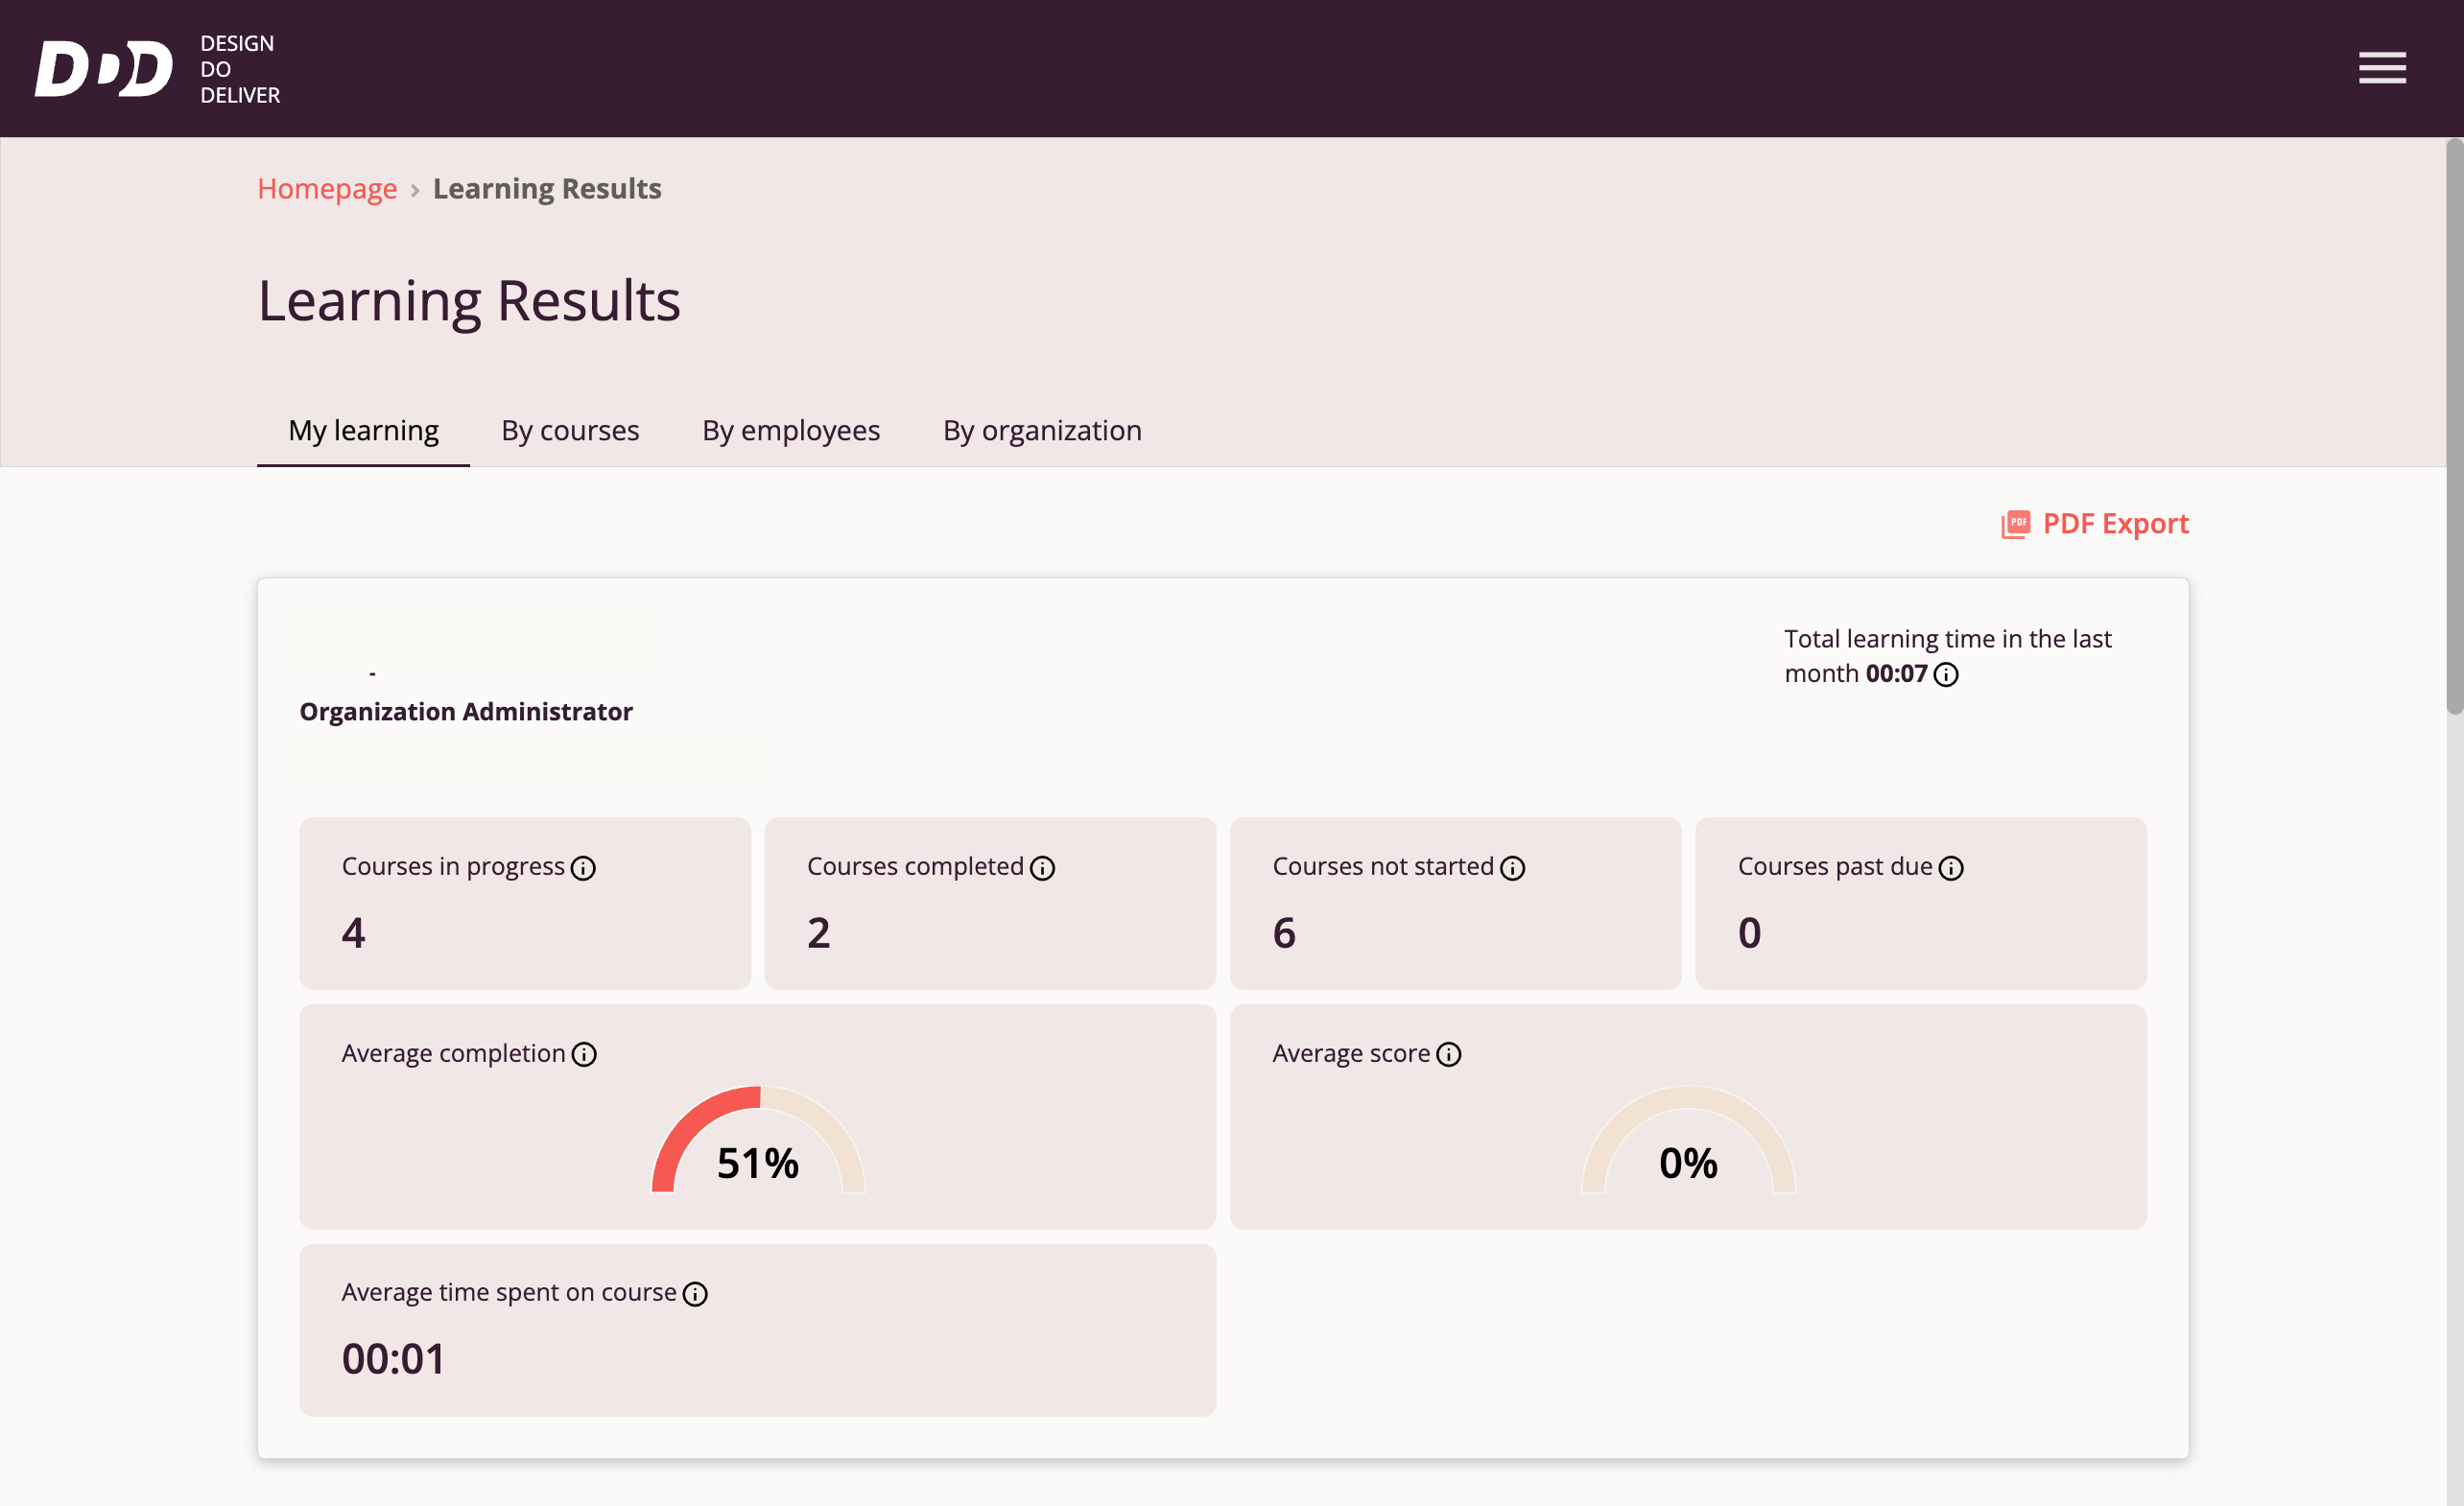
Upon entering the section, users can see brief statistics about their learning:
- Number of courses they currently need to complete
- Number of courses already completed by the user
- Number of courses not yet started by the user
- Number of courses the user has overdue for completion
- Average completion rate of all courses available to the user
- Average rating across all courses to date
- Average time to complete a course
- Total time spent on learning in the last month
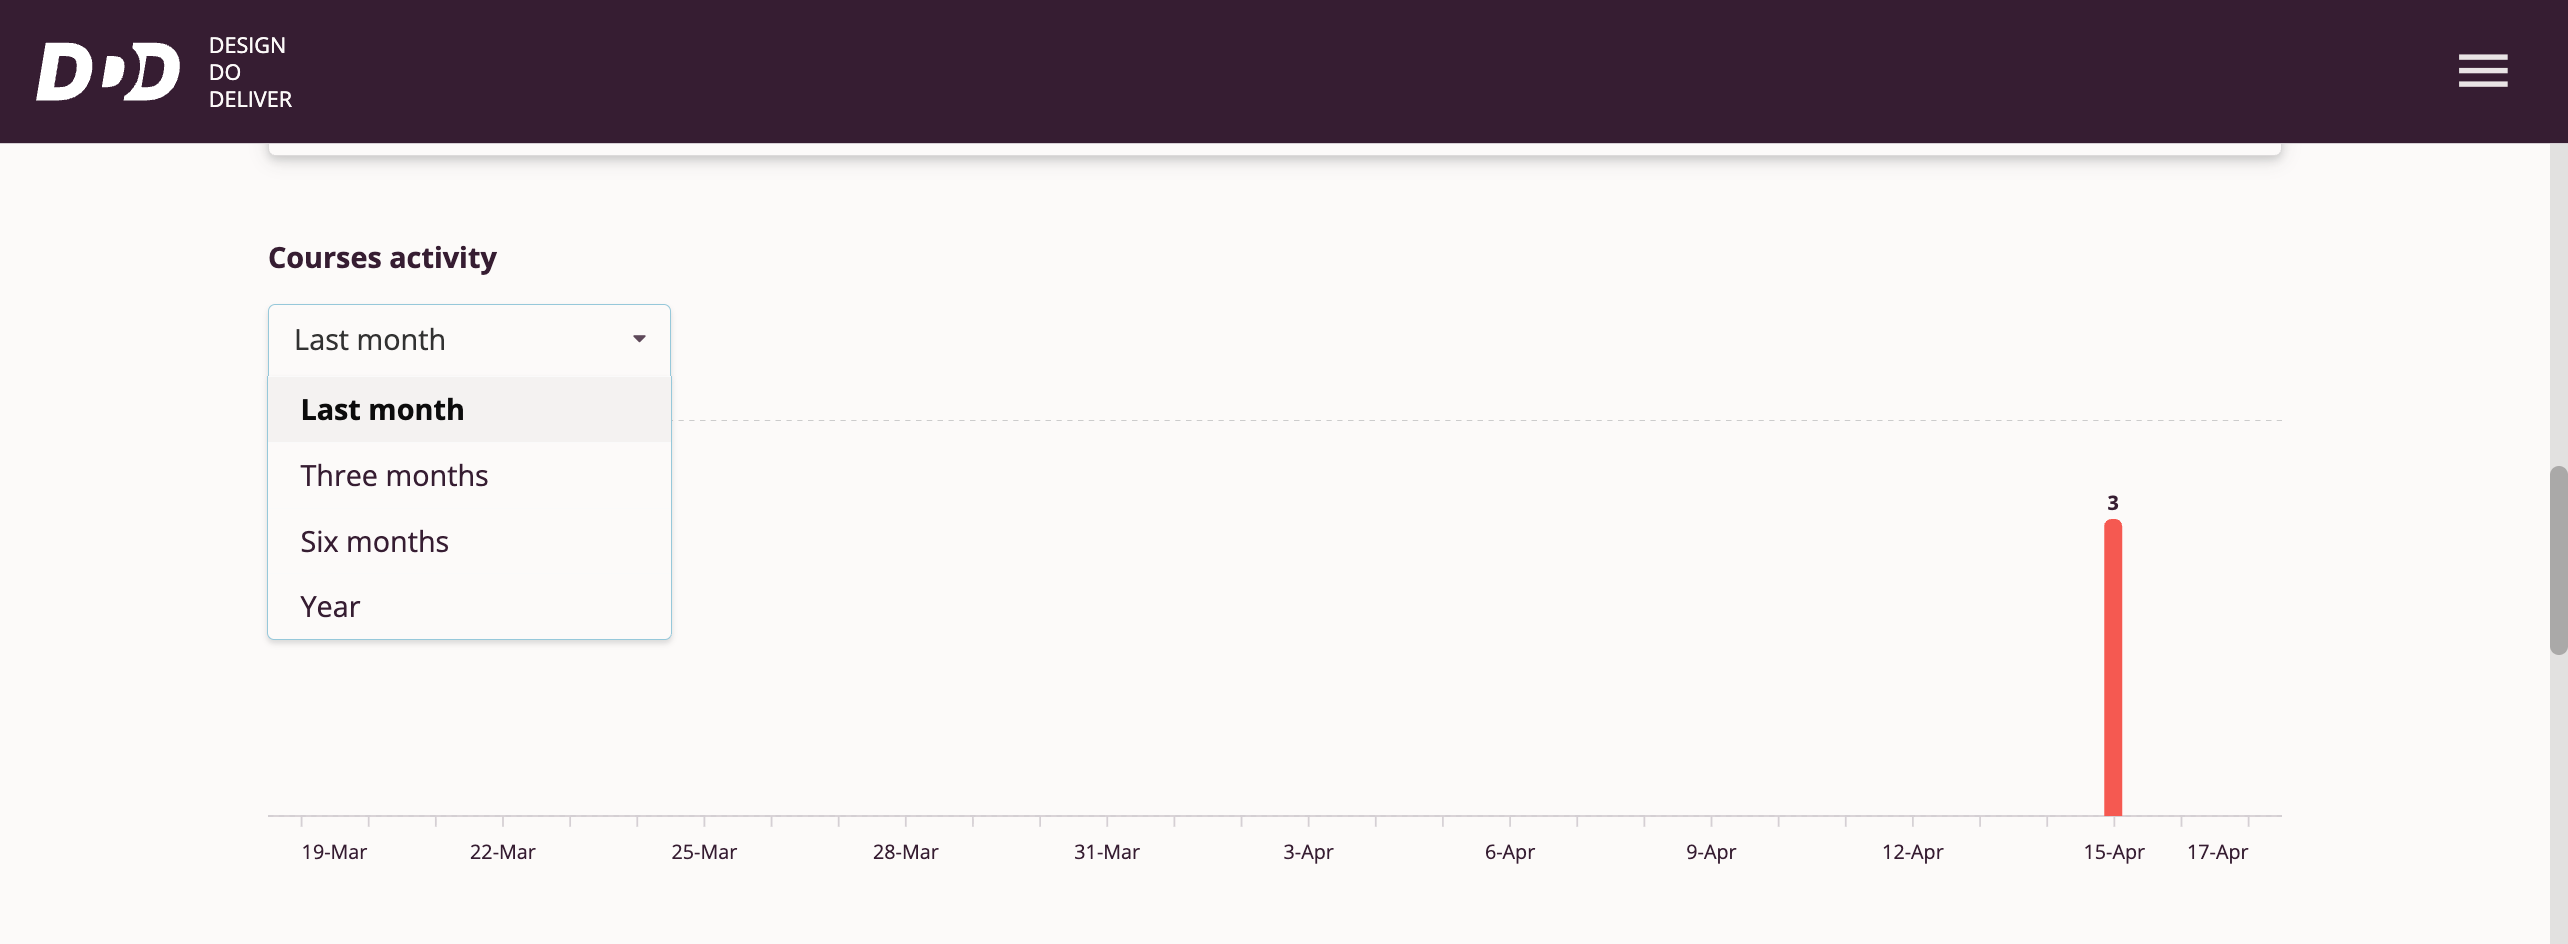
Also on the page, users have access to a chart of their course activity, visually displaying how actively the user engages in learning.
Users can select different time intervals to analyze their activity over:
- Last month
- Three months
- Six months
- One year
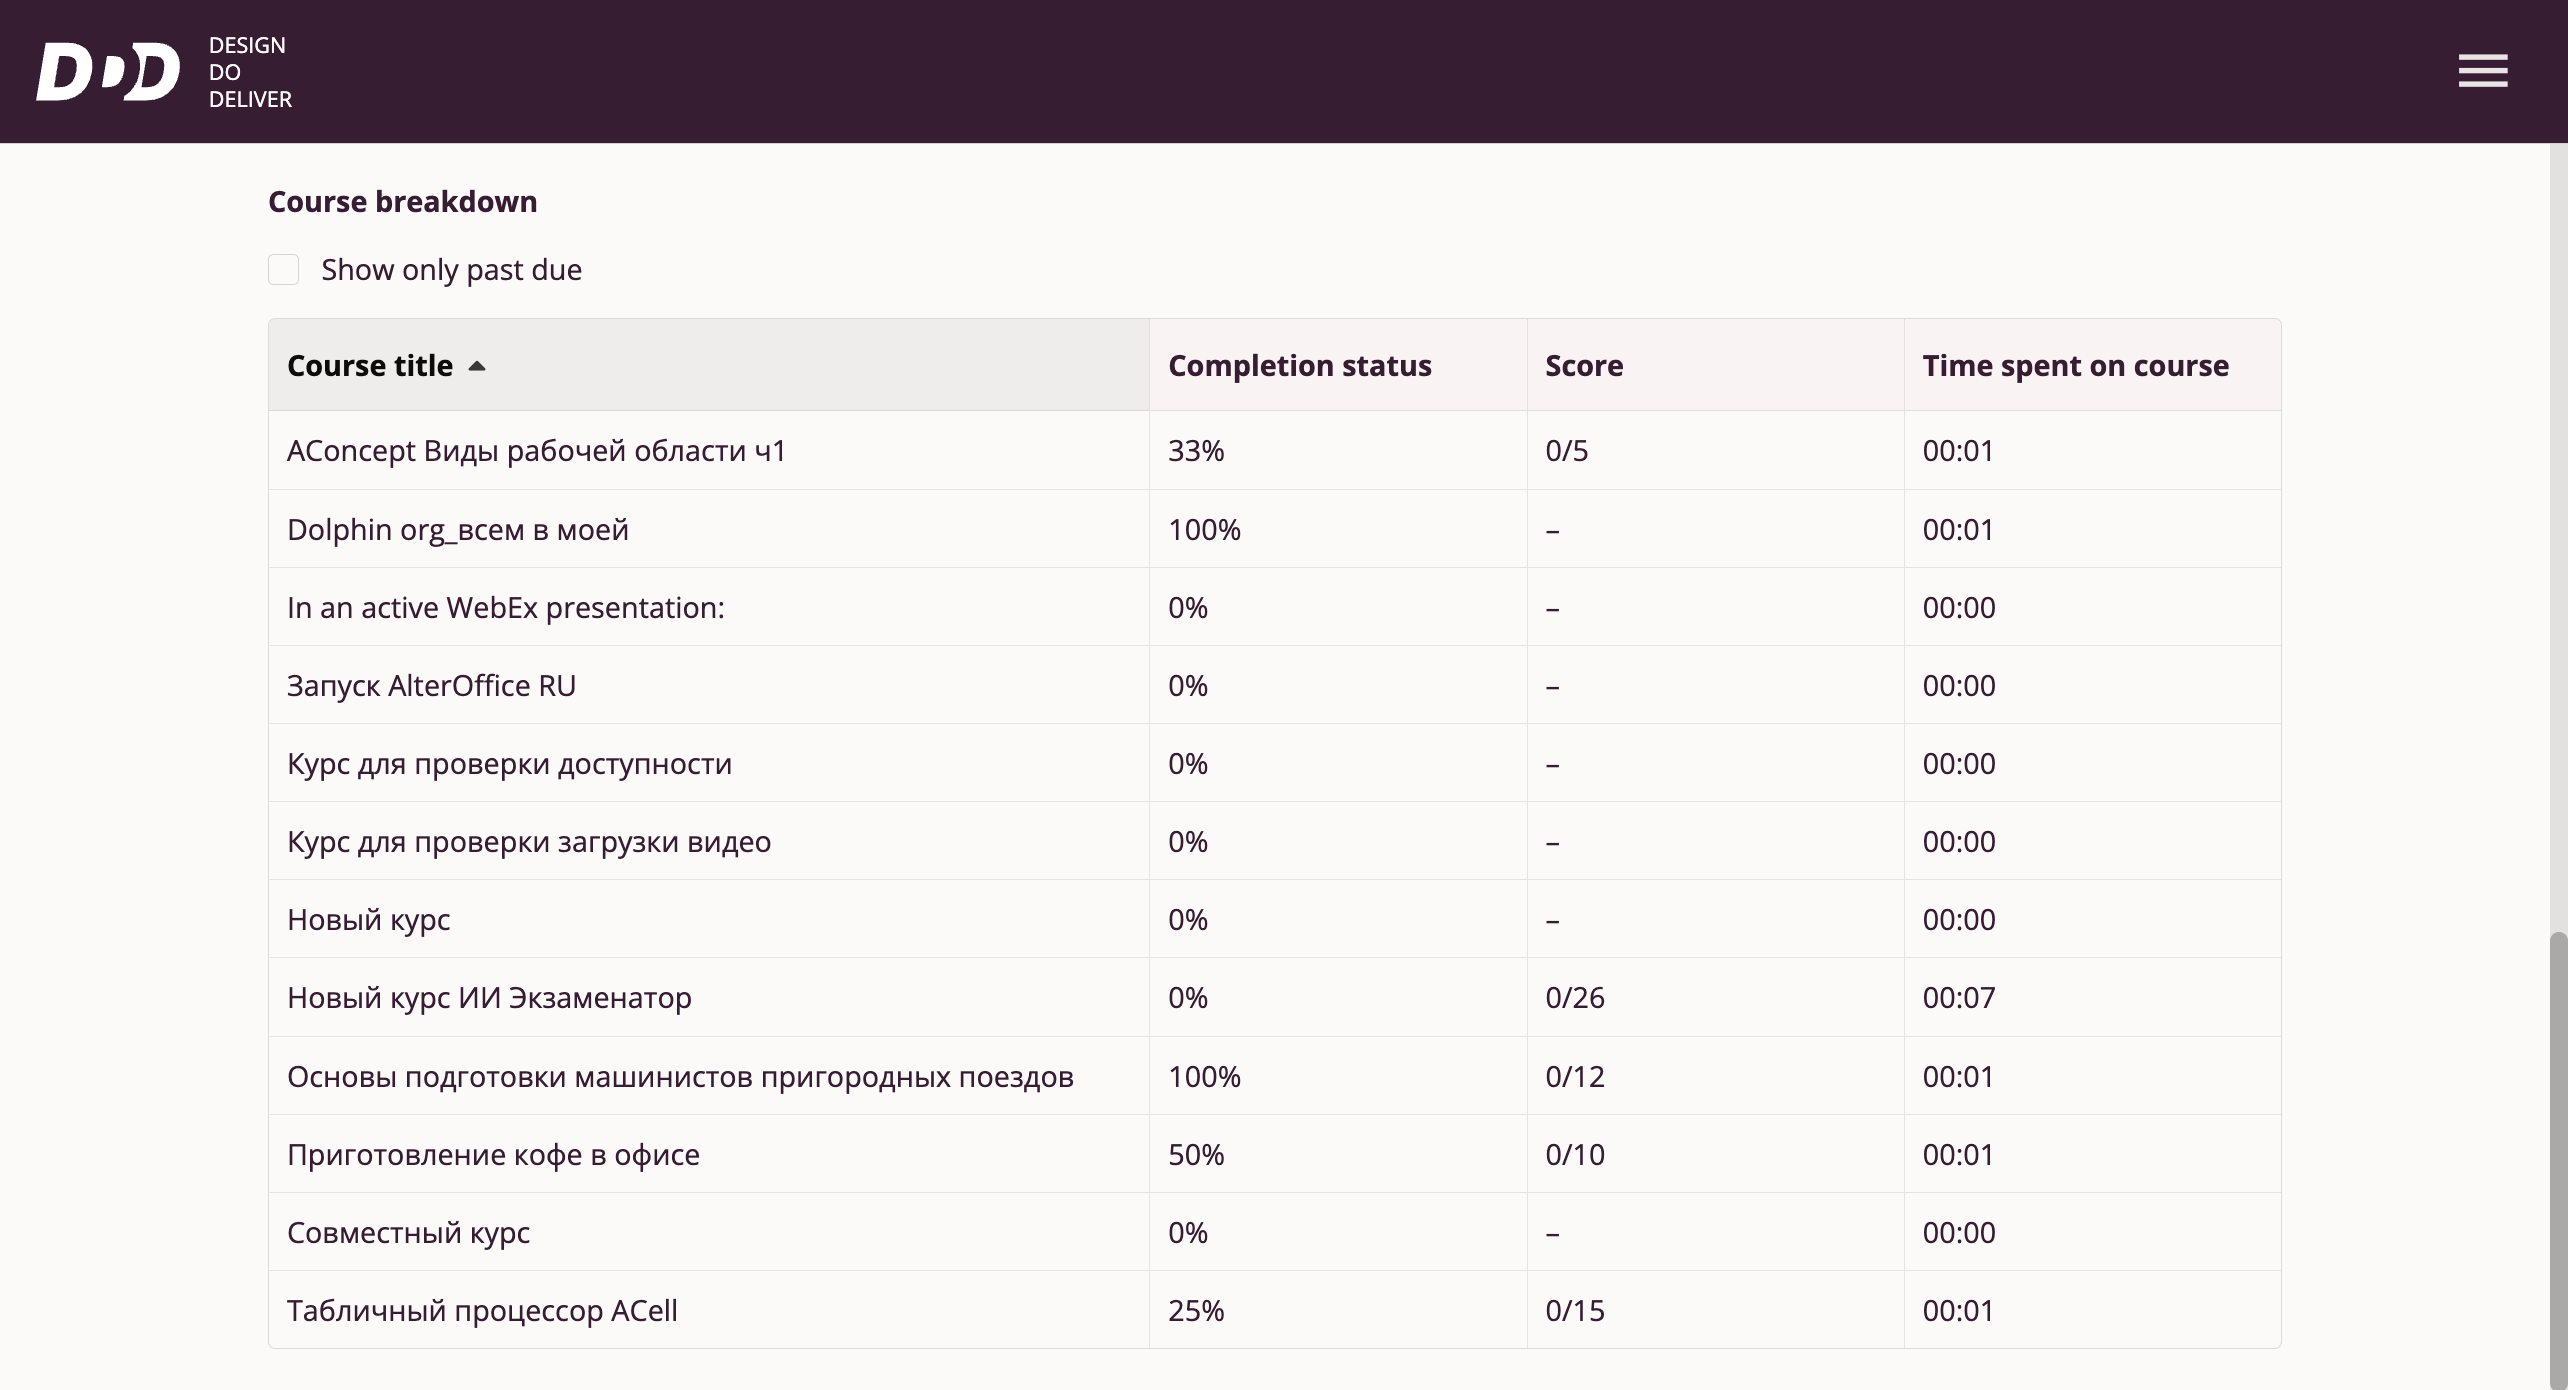
Further down the page, users have access to more detailed information about each course they have taken or been assigned.
The table lists each course name, its completion rate, rating, and completion time:
Results by Courses
This section of the "Learning Results" page is available to the following roles: Course Author, Manager, and Organization Administrator.
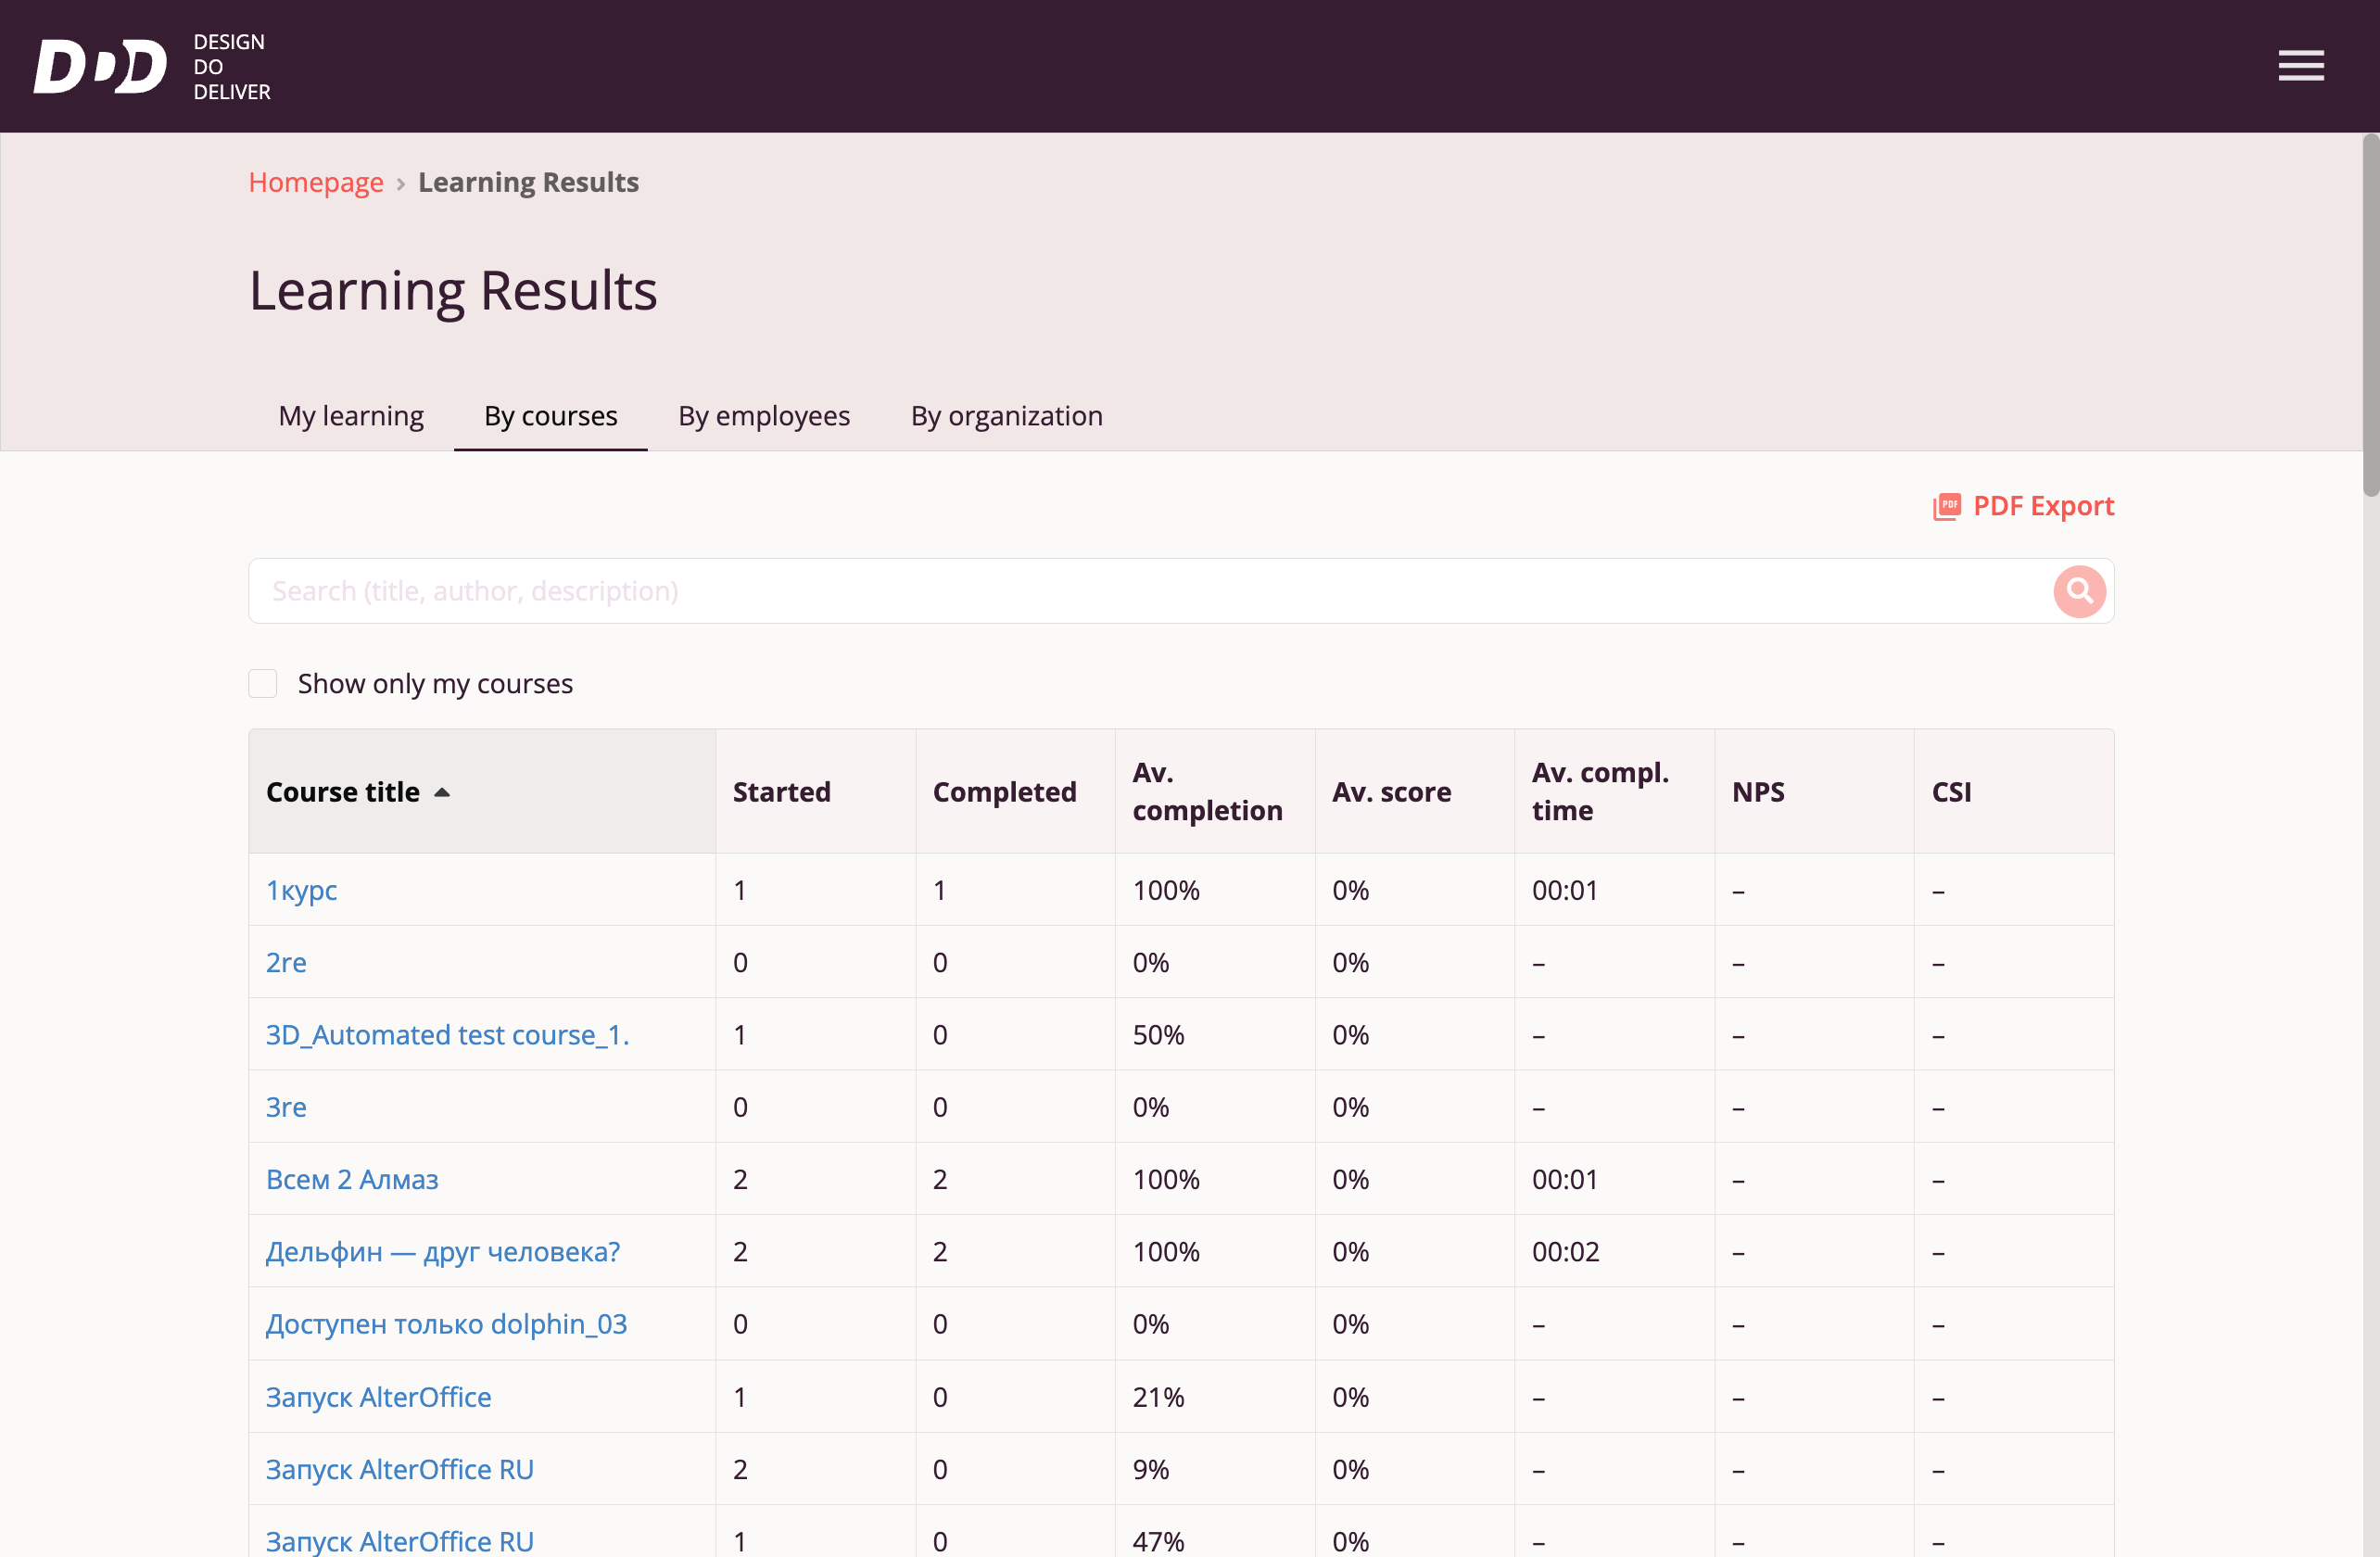
Here, users can view a summary statistics table for all courses available in the organization. The table displays the following parameters by column:
- Course name
- Number of employees who started this course
- Number of employees who completed this course
- Average completion rate of the course among all employees who started it
- Average course rating among all employees who started it
- Average time spent completing the course among all employees who started it
- Average NPS (Net Promoter Score) — employee loyalty index showing willingness to recommend this course
- Average CSI (Customer Satisfaction Index) — employee satisfaction index with this course
Detailed Course Statistics
For more detailed information about a course, users can access detailed statistics by clicking the course name in the table:
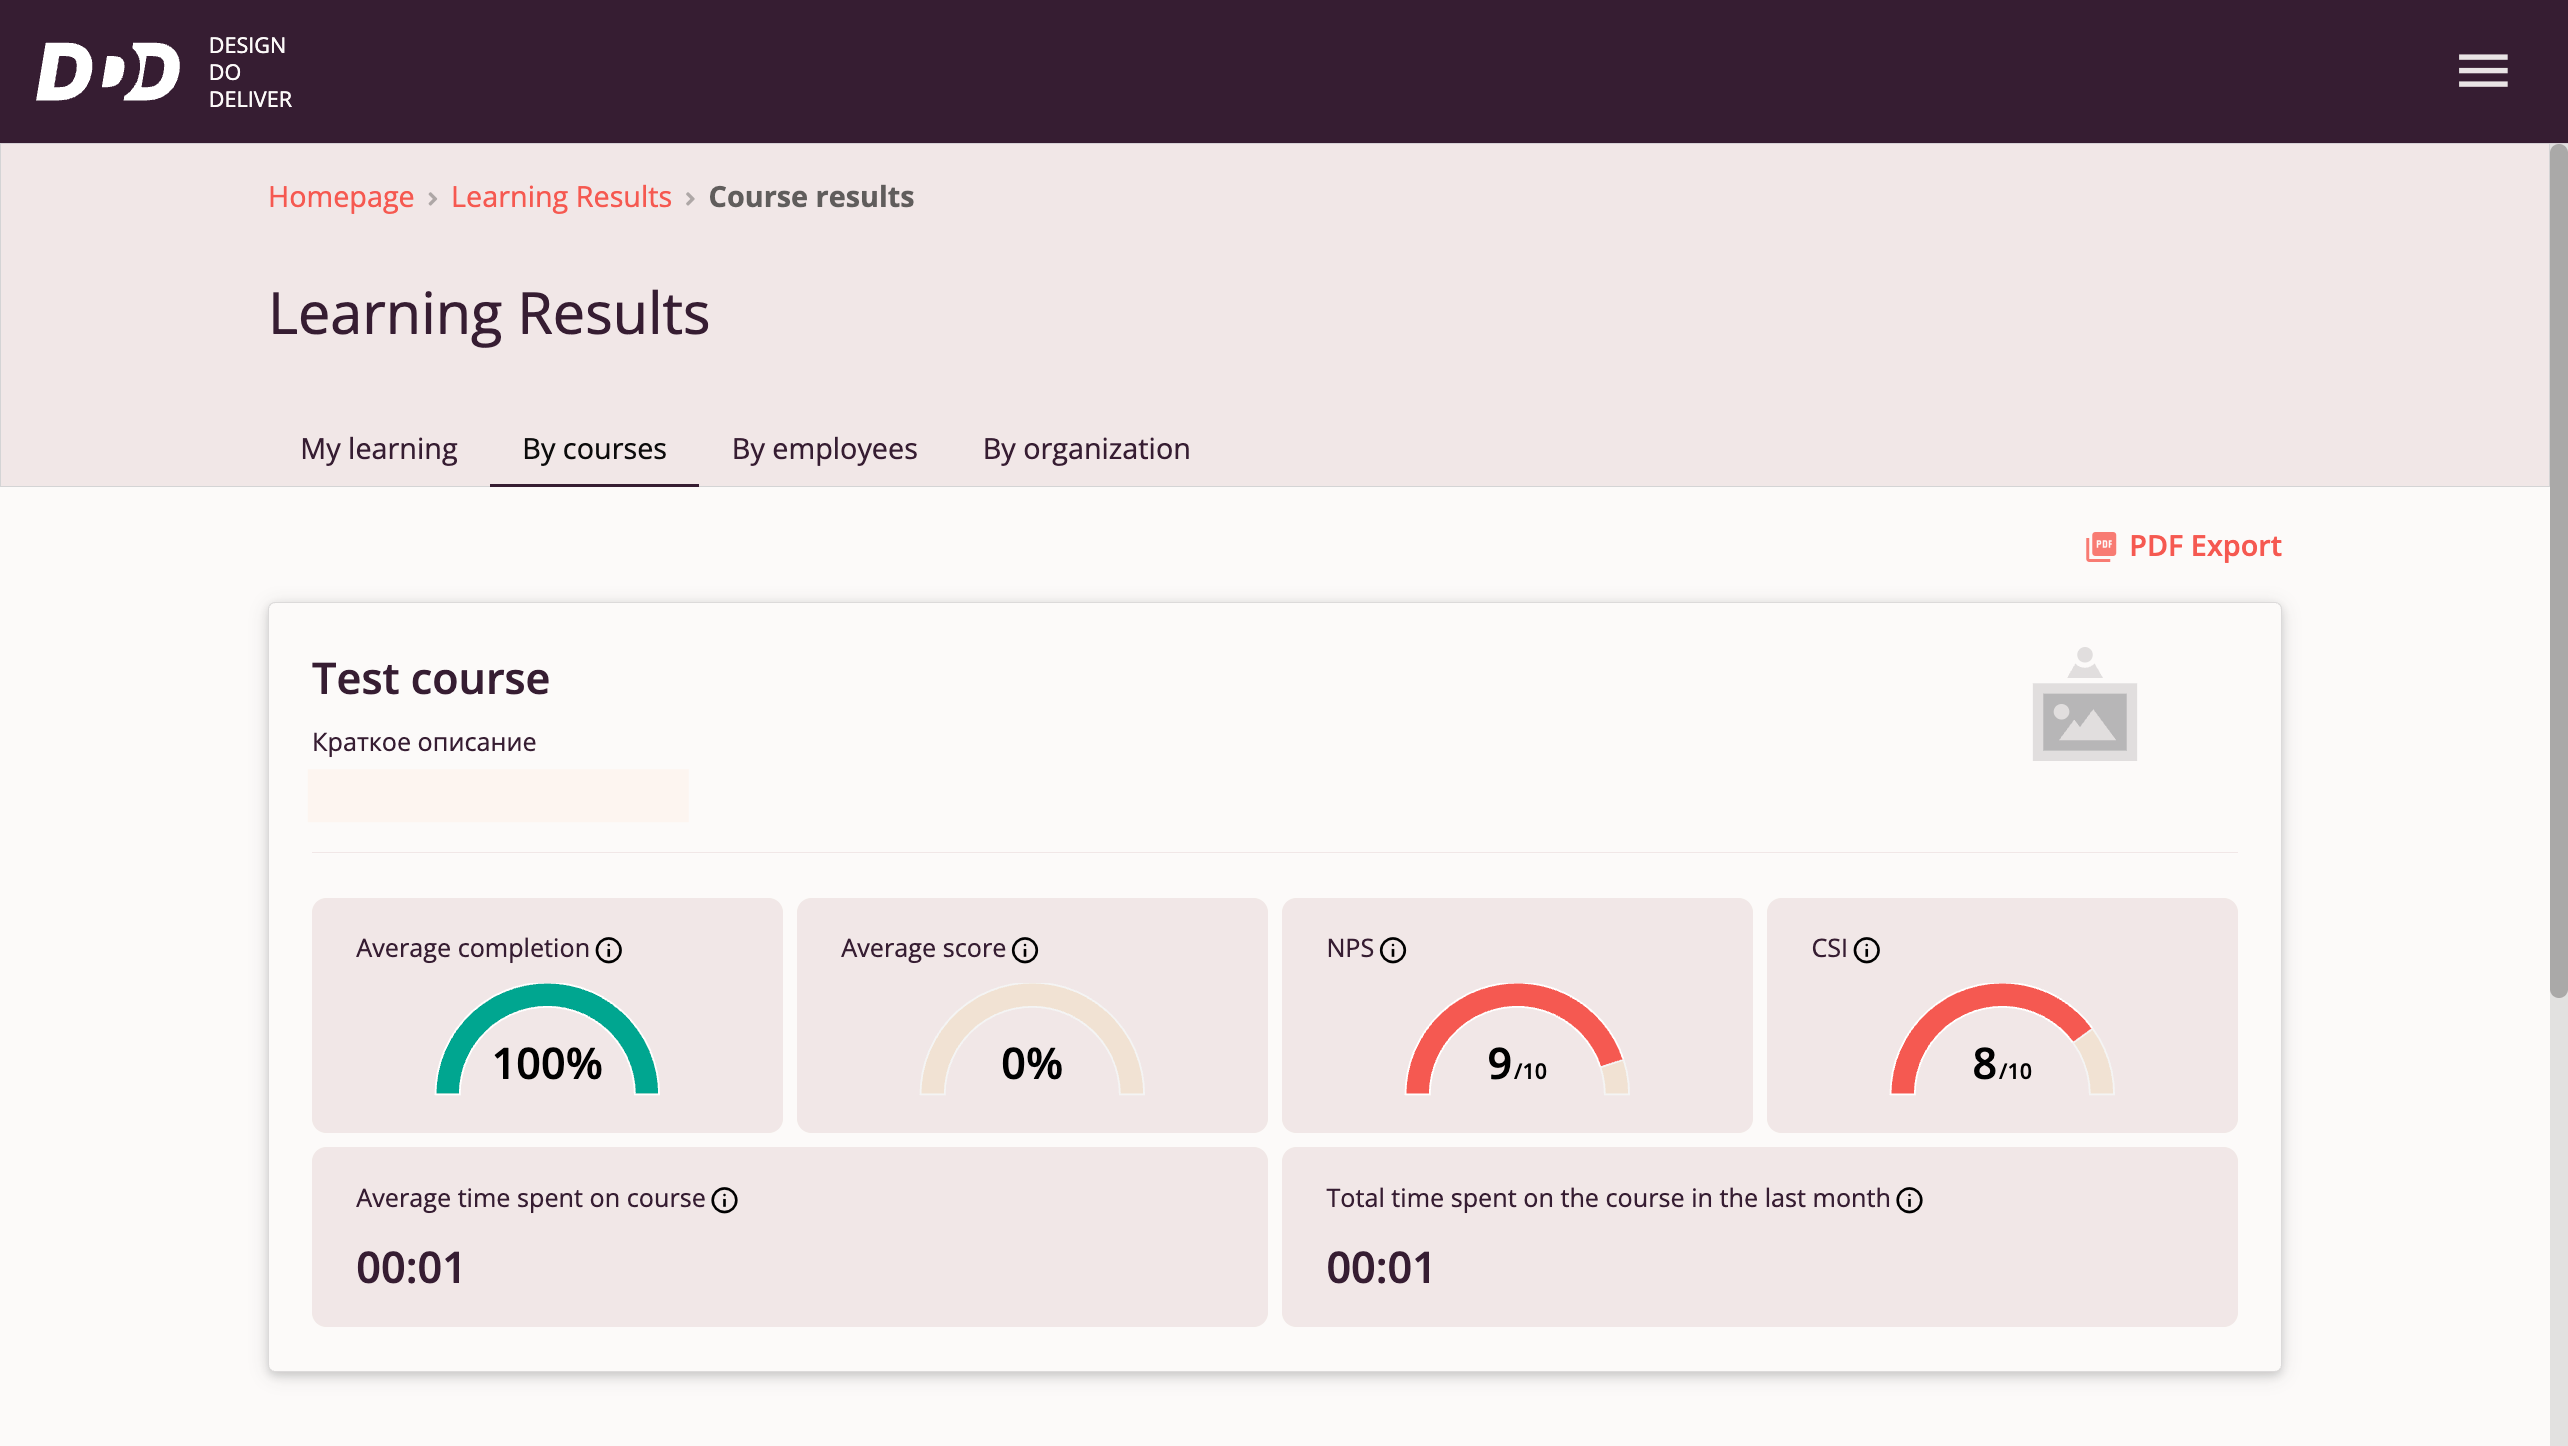
This page displays parameters for a specific course that provide insight into its popularity and employee performance on this course:
- Average completion rate of the course among all employees who started it
- Average course rating among all employees who started it
- Average time spent completing the course among all employees who started it
- Average NPS (Net Promoter Score) — employee loyalty index showing willingness to recommend this course
- Average CSI (Customer Satisfaction Index) — employee satisfaction index with this course
- Total time spent on the course by all employees who started it
Also on the page is a chart of activity for this course, displaying how actively employees in the organization are completing it:
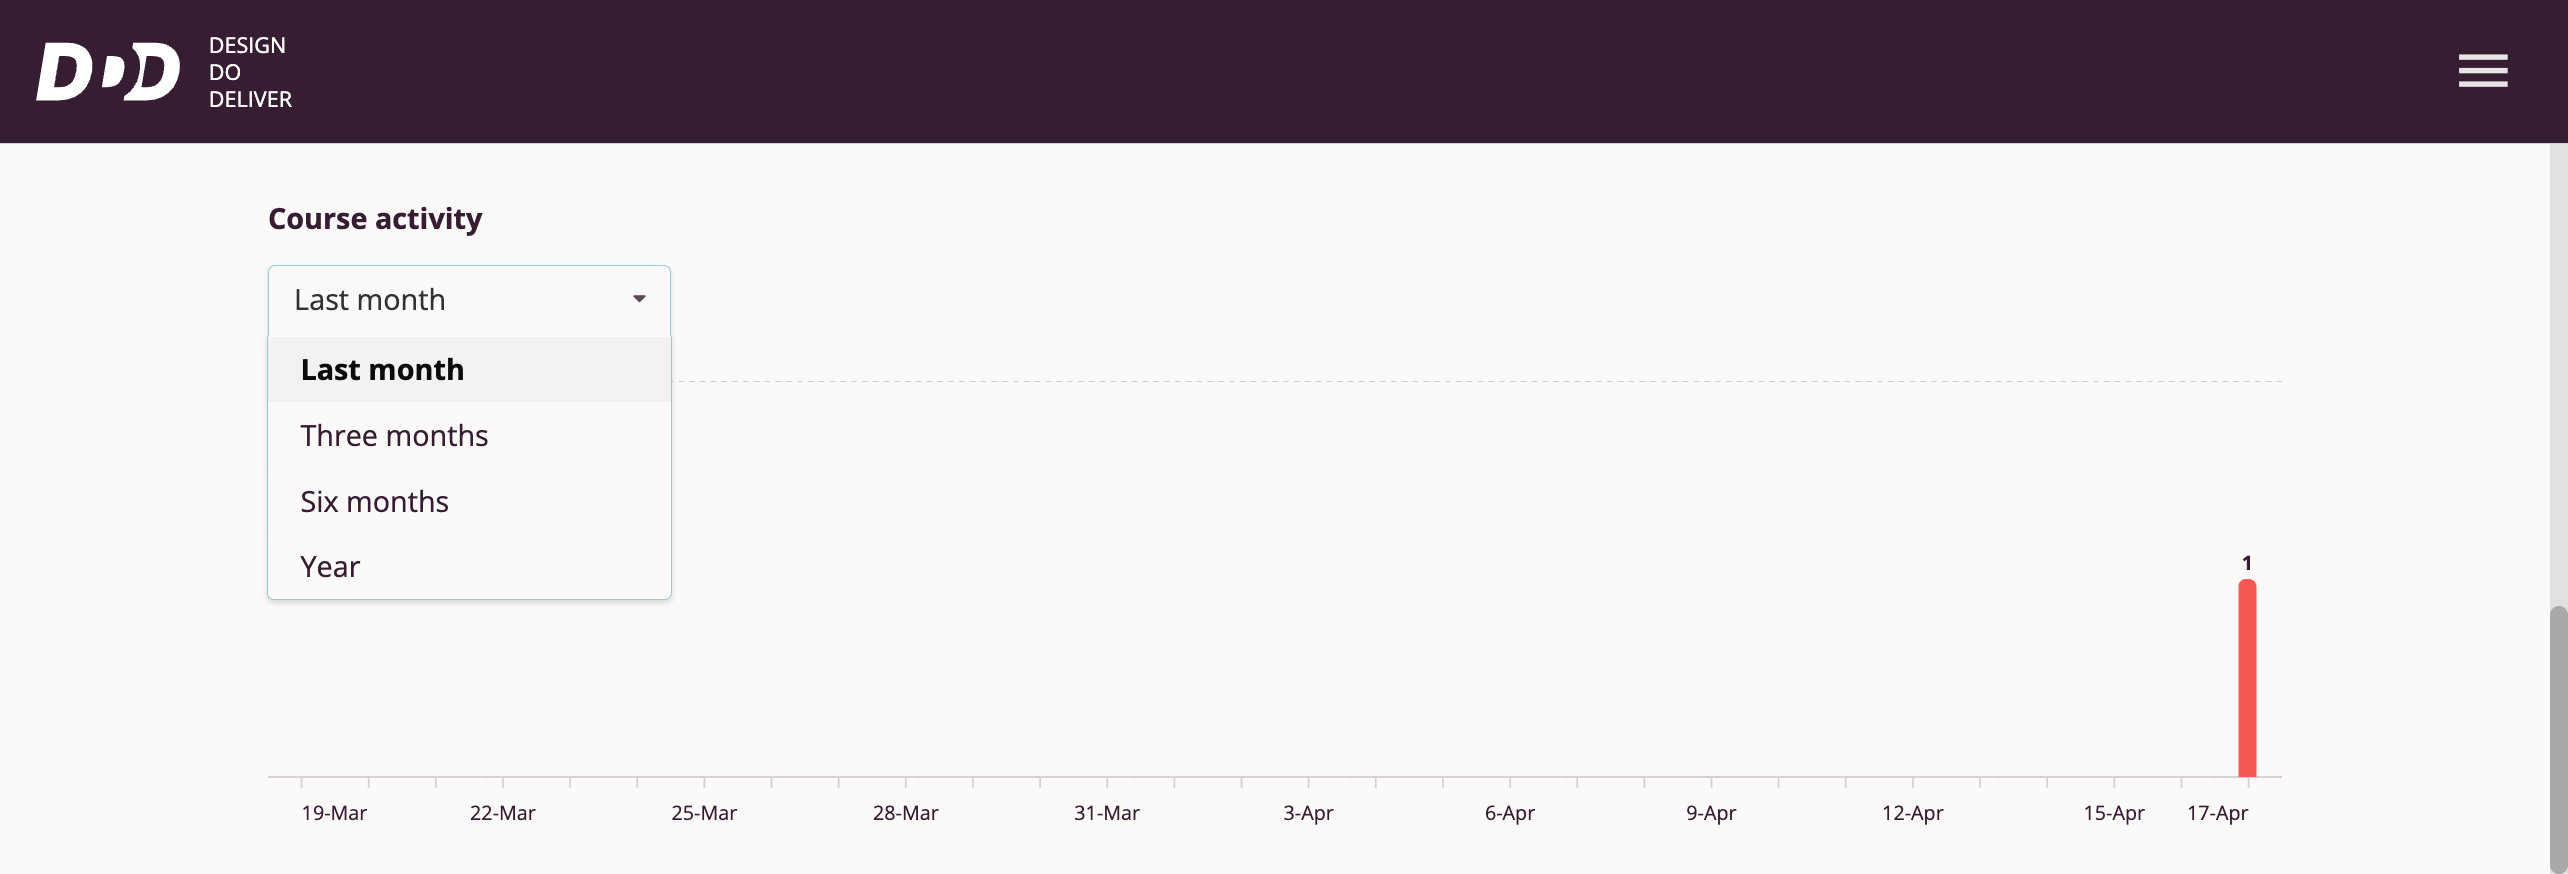
Users can select different time intervals to analyze course activity over:
- Last month
- Three months
- Six months
Users can also view statistics for employees who are in the process of learning or have completed this course:

Results by Employees
This section of the "Learning Results" page is available to the following roles: Manager and Organization Administrator.
Upon entering the section, users can see brief statistics about learning for all employees in the organization:
- Number of employees in the organization
- Number of employees who have not started learning
- Number of employees who have started learning
- Number of employees who have completed learning
- Number of employees who have overdue course completion deadlines

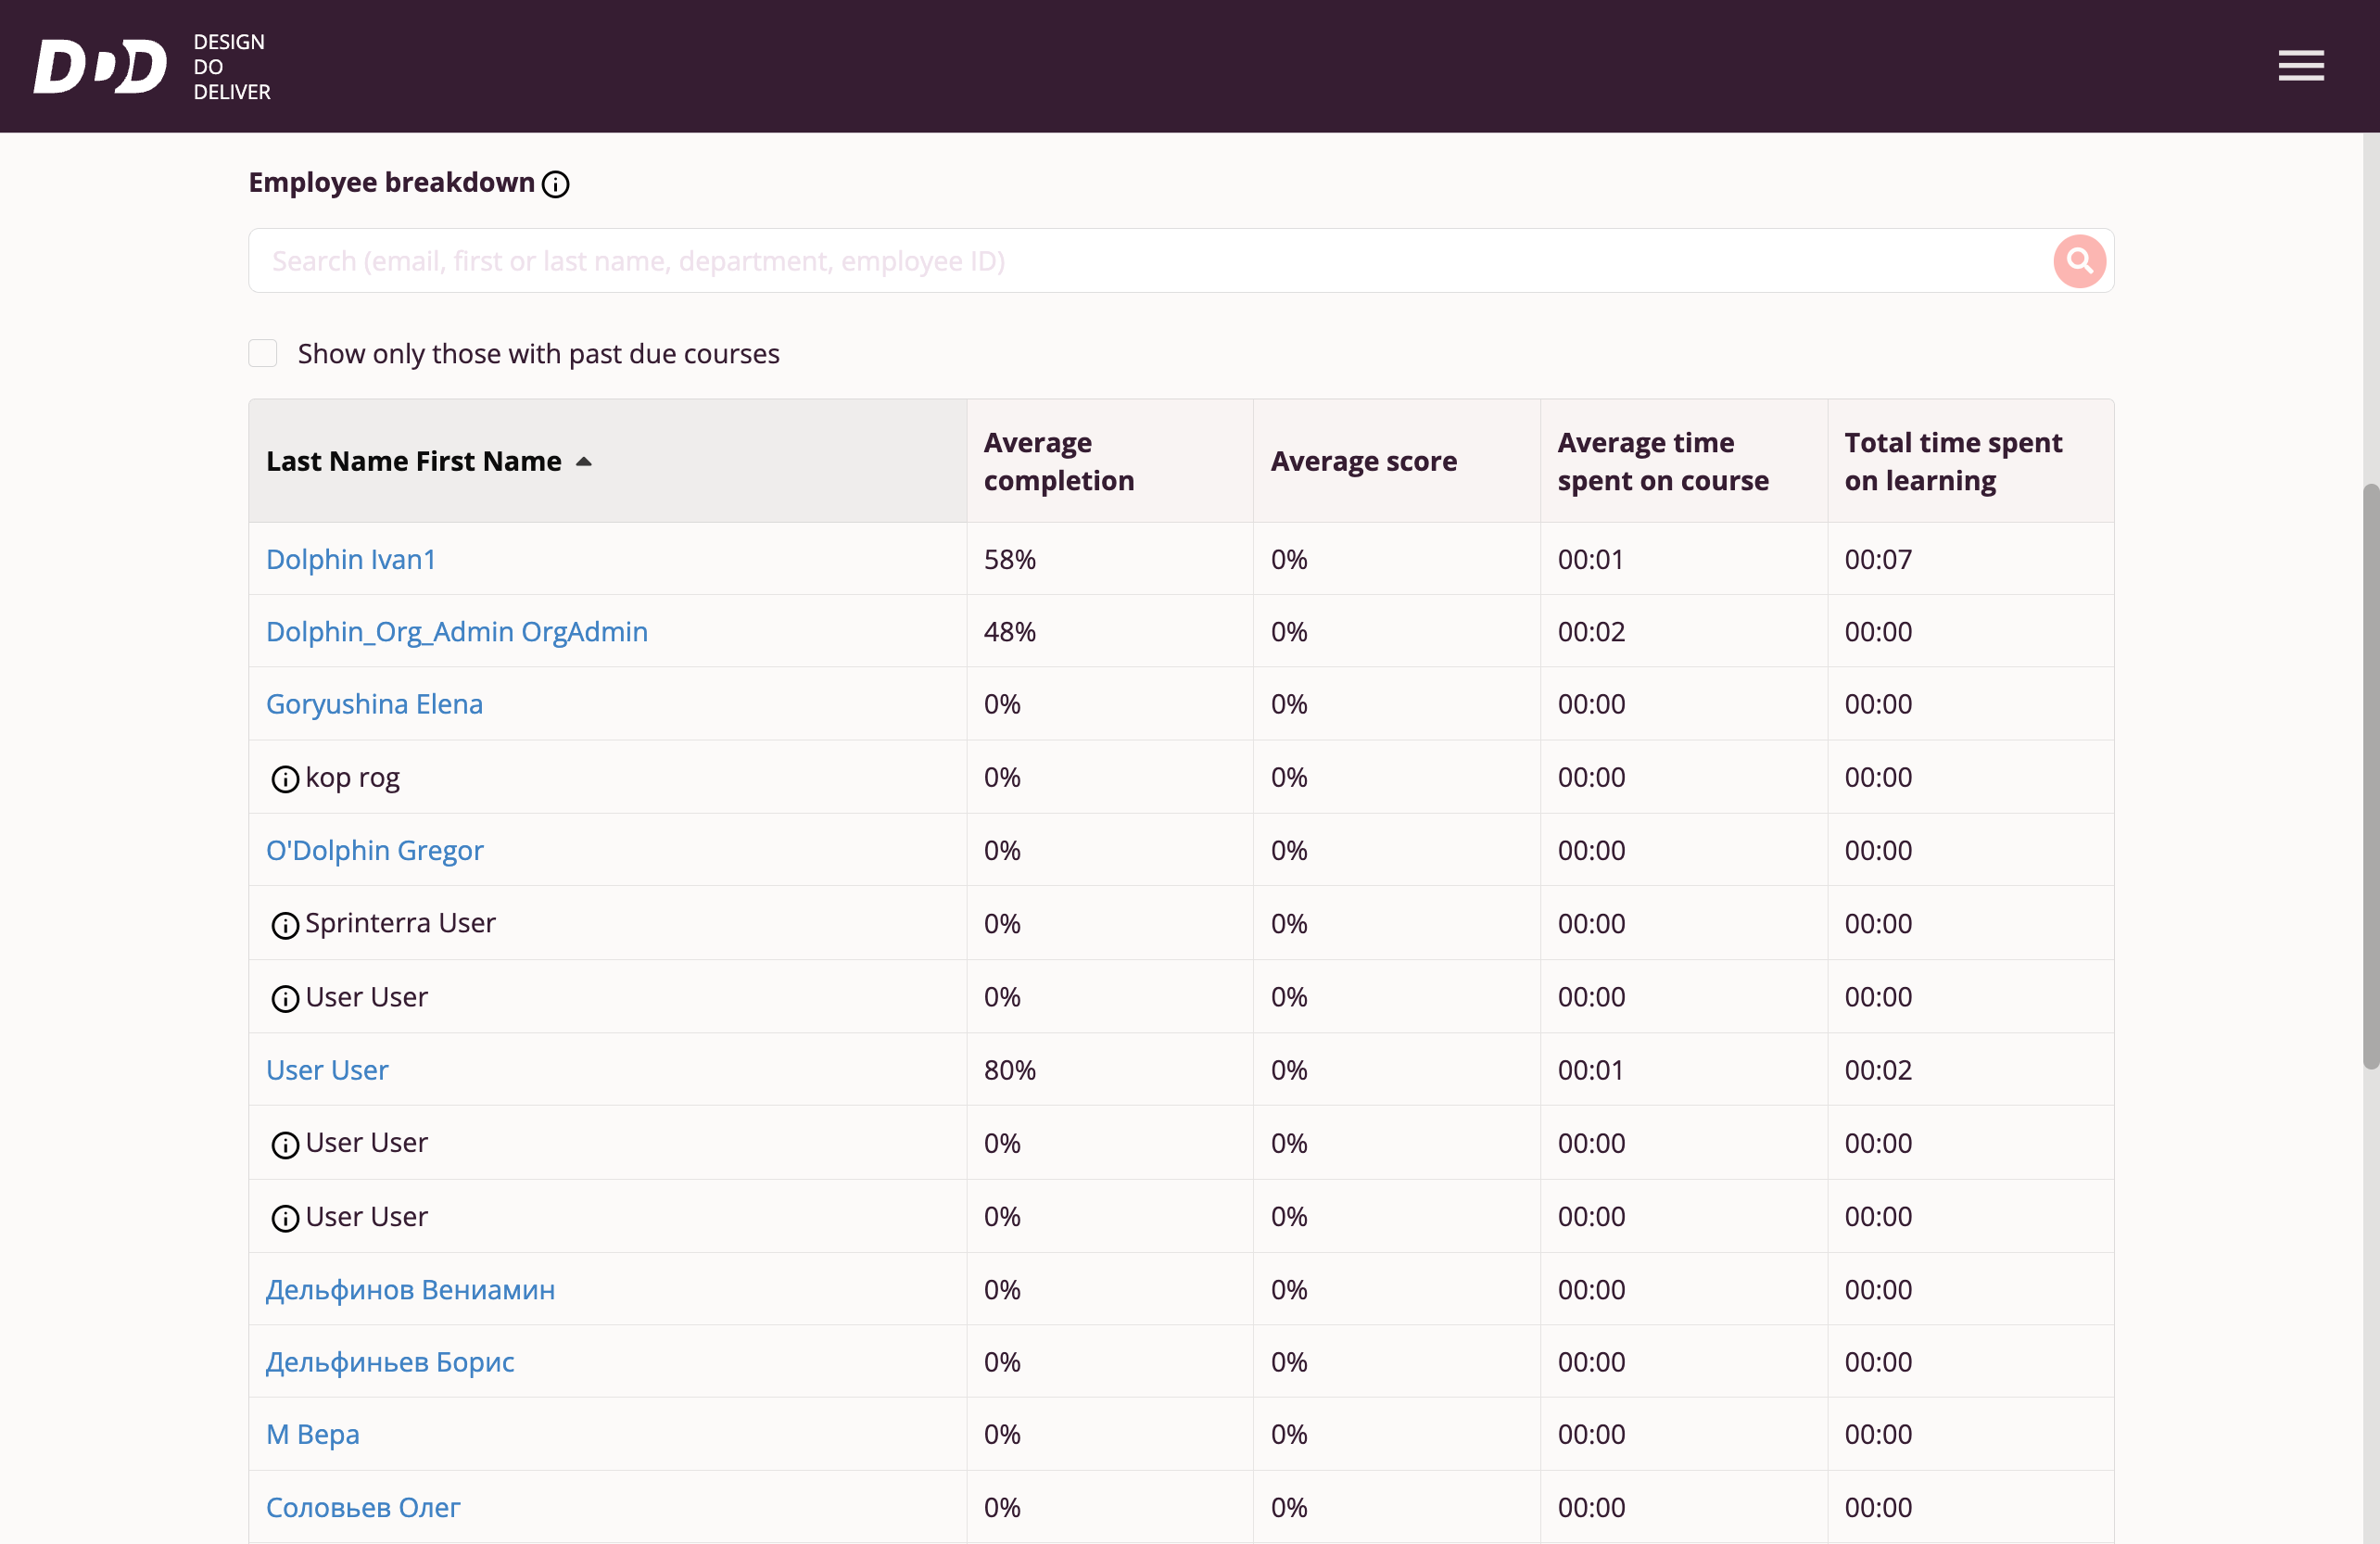
Also available to users is a summary table of performance for all employees in the organization. The table displays the following parameters by column:
- Employee last name and first name
- Average completion rate across all courses assigned to the employee
- Average rating across all courses assigned to the employee
- Average time to complete courses assigned to the employee
- Total time spent by the employee on all courses
Detailed Employee Statistics
For more detailed information about an employee's performance, users can access detailed statistics by clicking the name in the table:
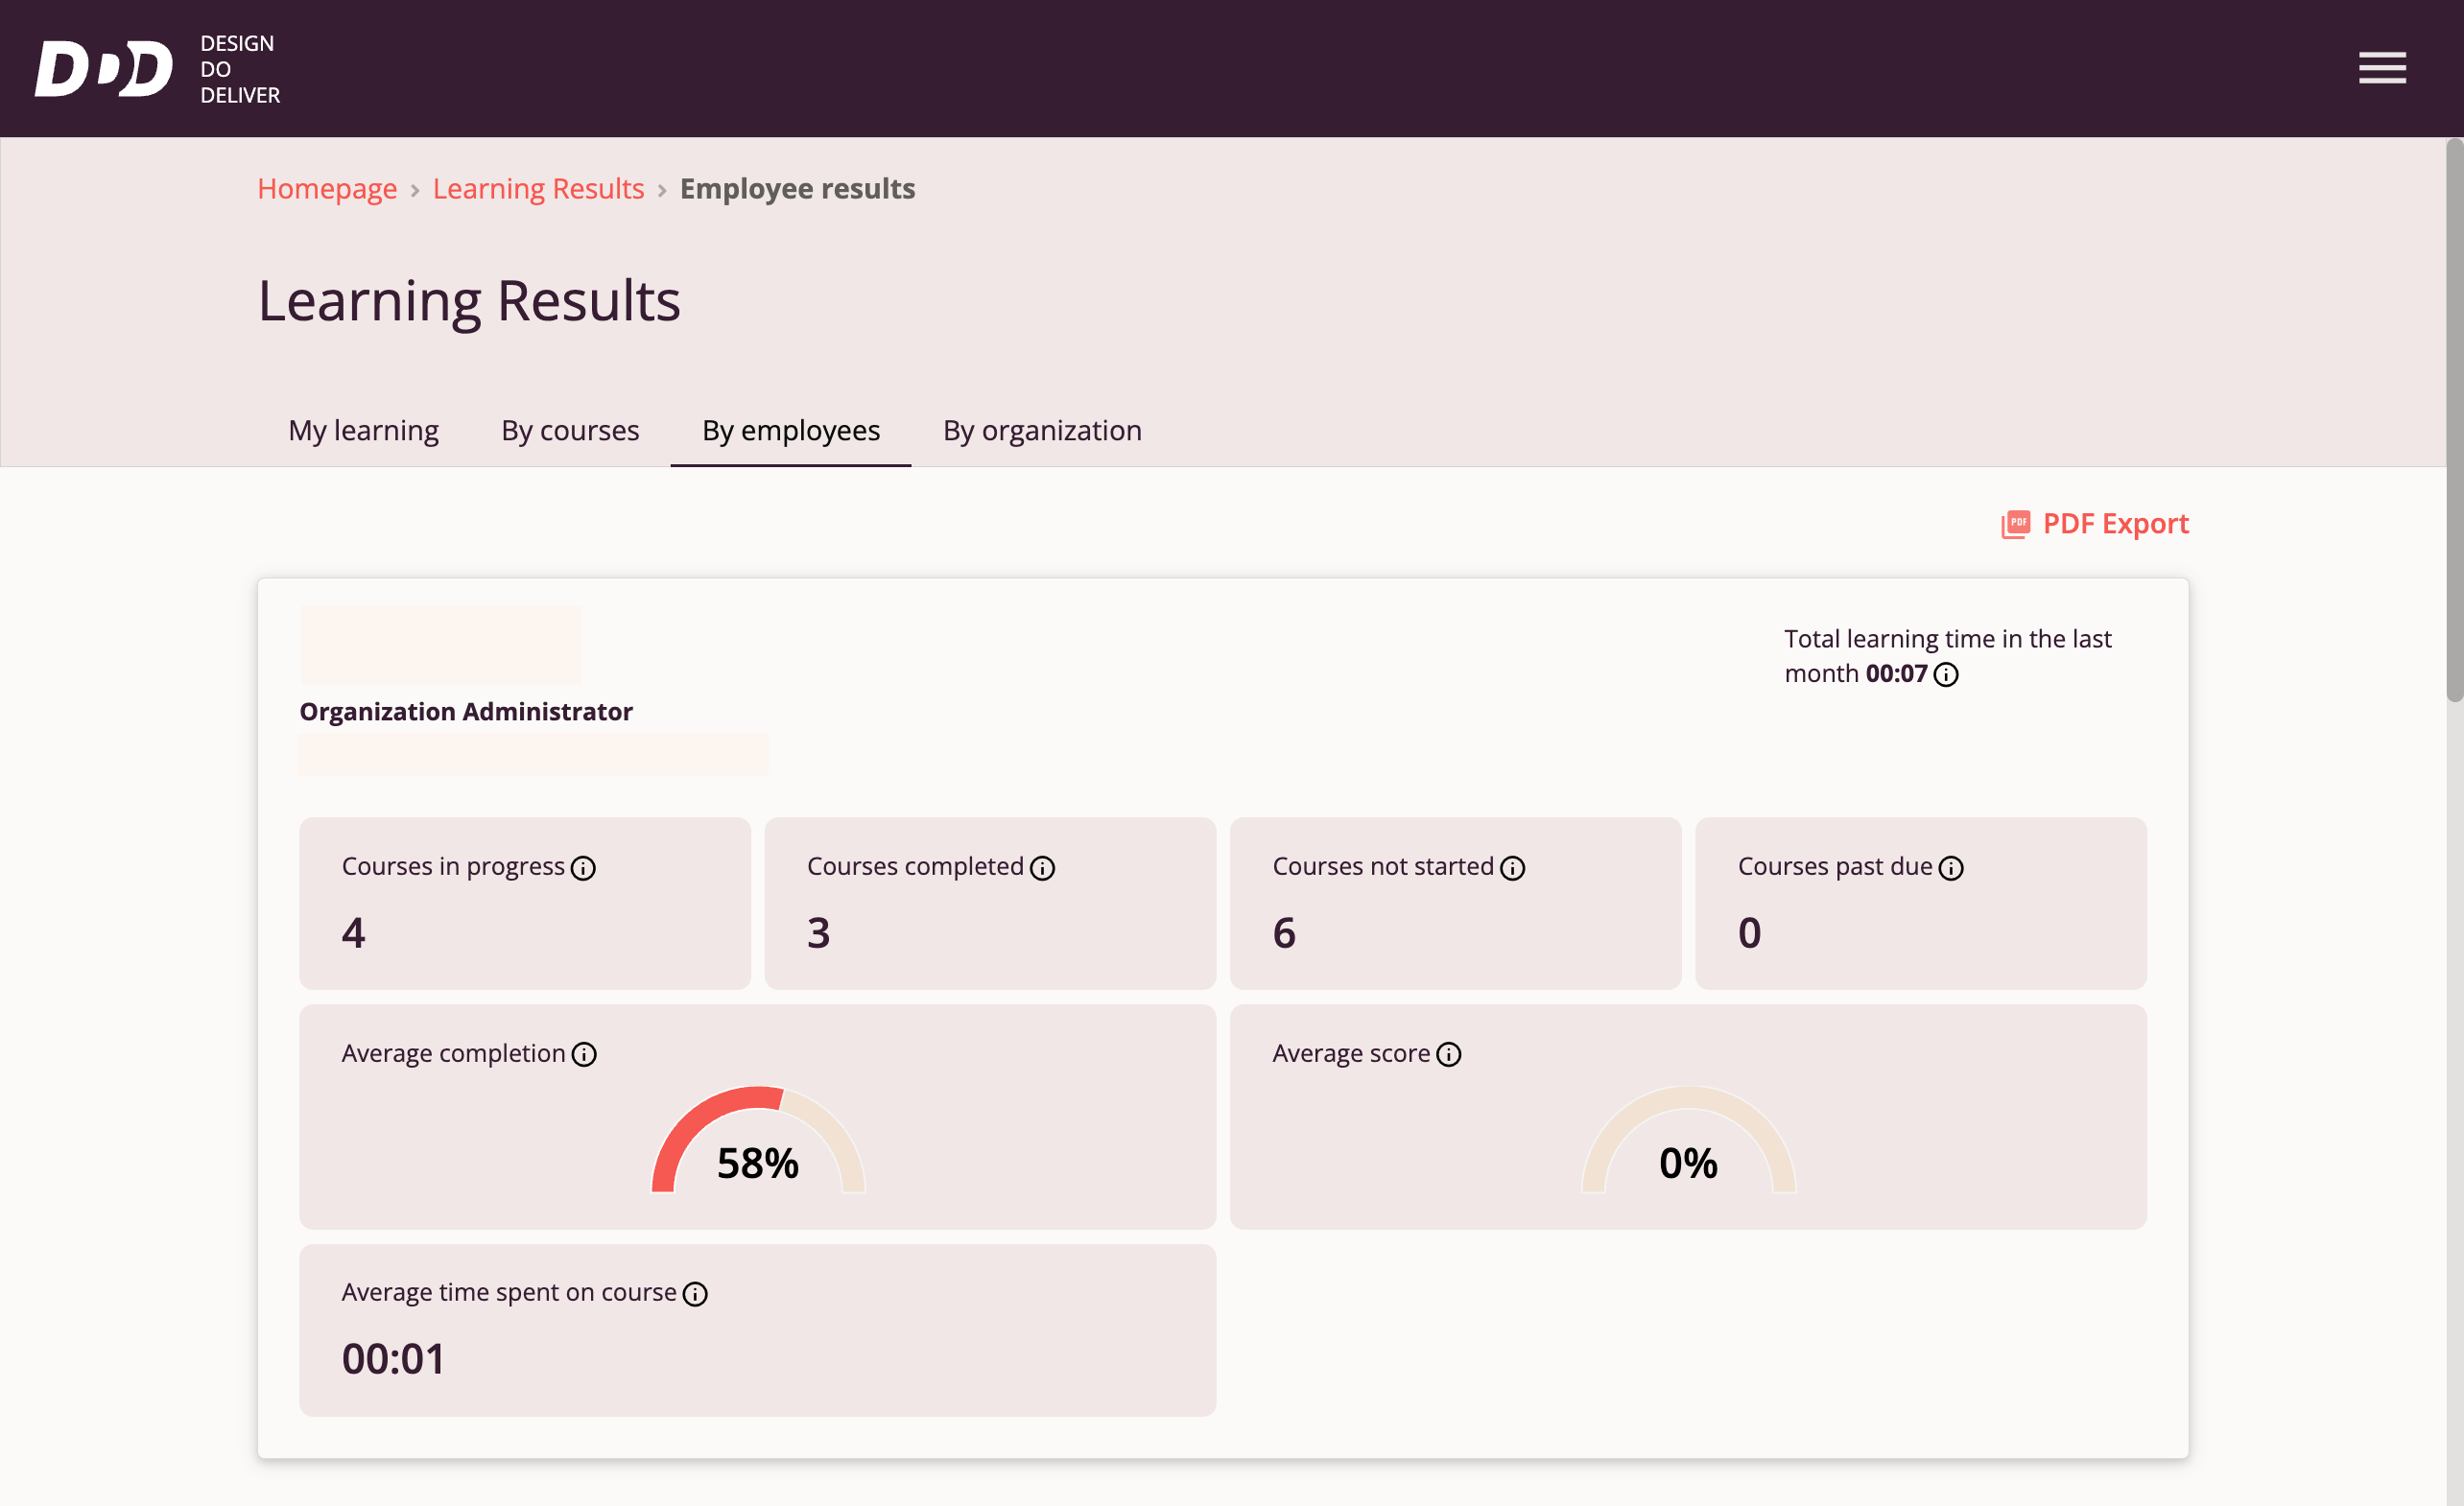
The displayed page is functionally similar to the "My Learning Results" page but applied to a specific employee.
My Account
Clicking "My Account" in the Main Menu takes the user to the Tri-D System My Account page.
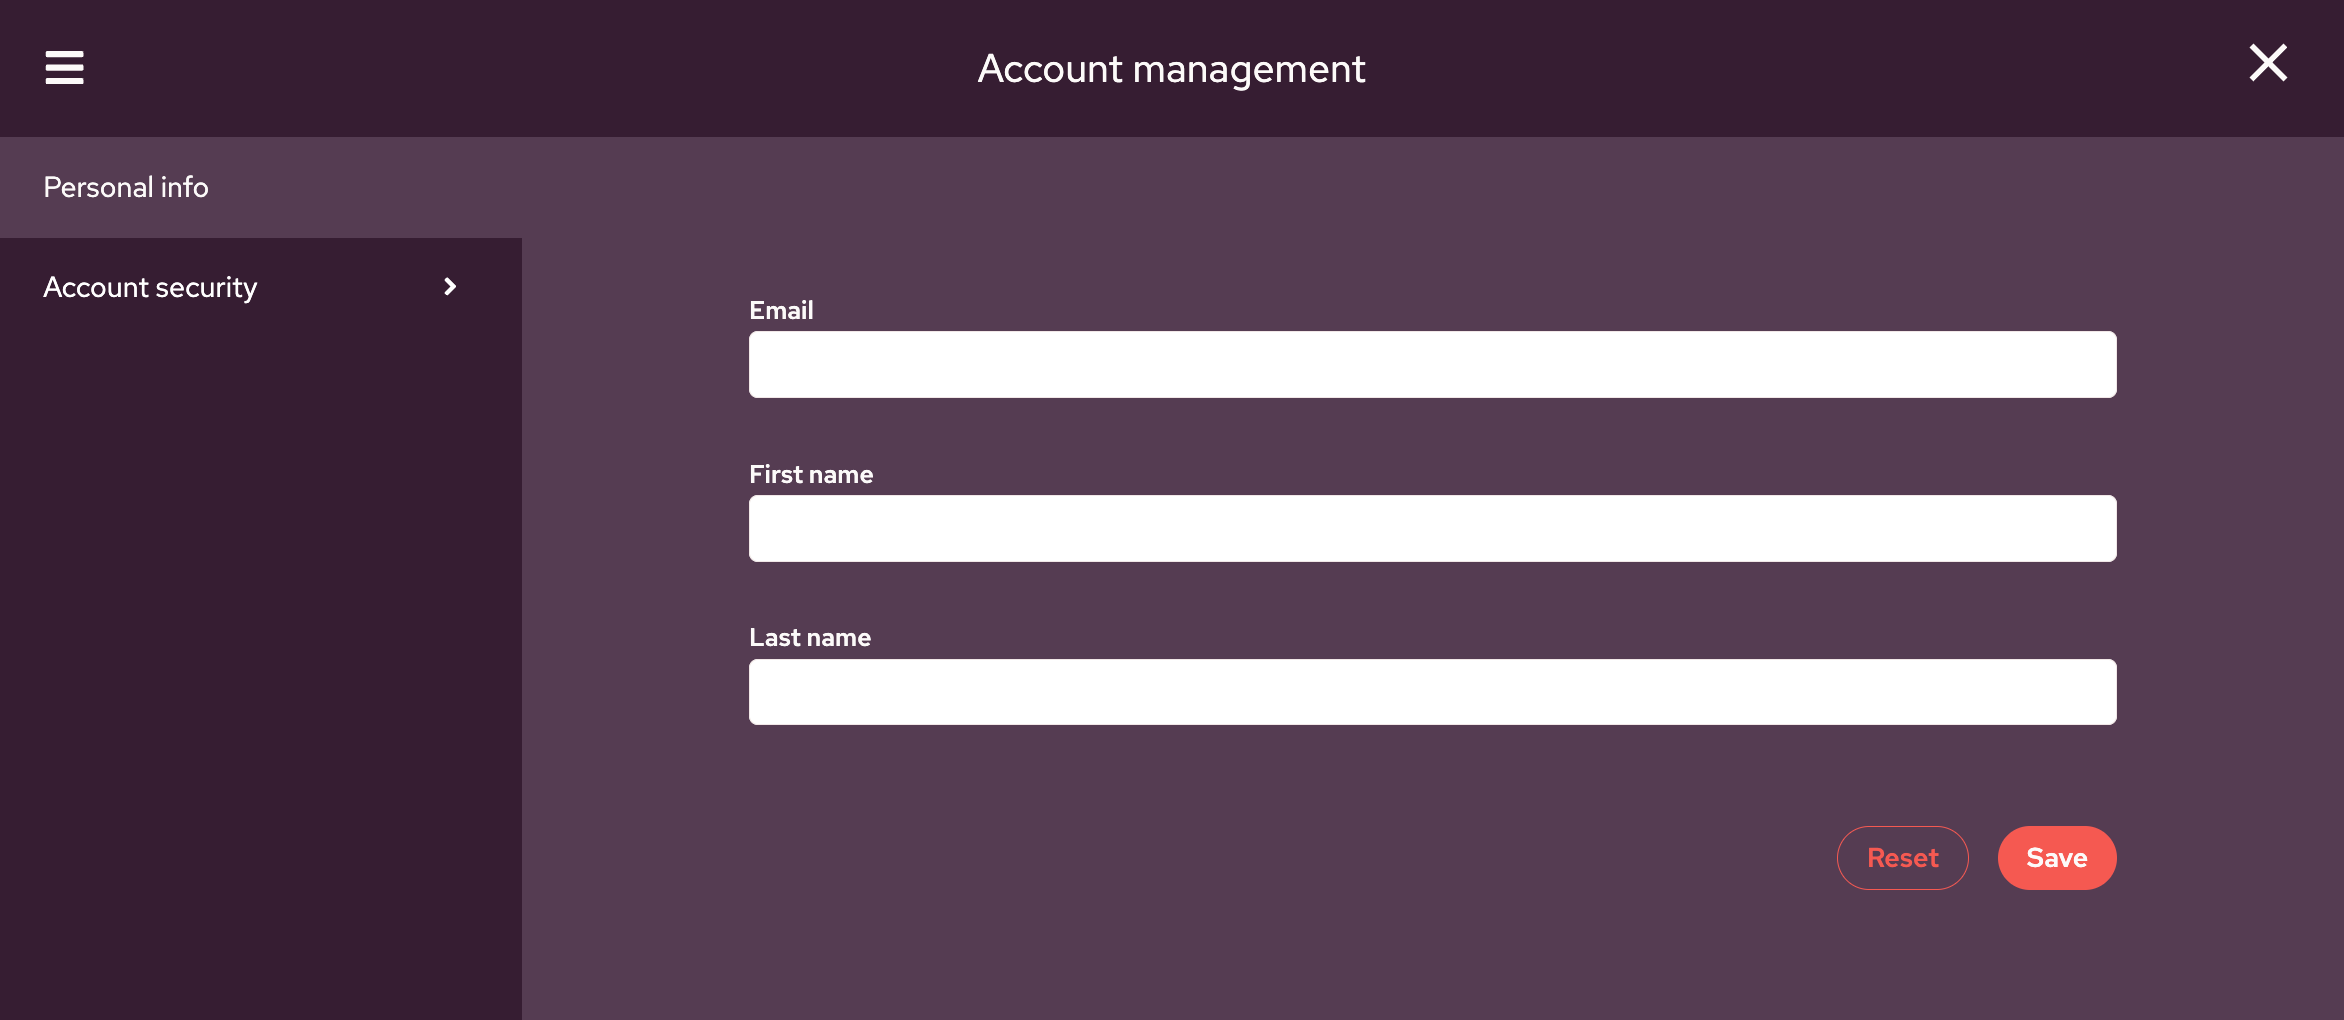
Upon accessing the My Account page, users have access to the following elements:
- A toggle allowing switching between personal information settings and security settings.
- Text fields containing user personal data — email address, user's first and last name. Currently, users can change their first and last name; email address is locked for editing.
Available Tri-D System Security Settings
Currently, users have access to the following security settings:
- Login — Allows viewing account registration date and changing password.
- Active Devices — Allows viewing active sessions for this account.
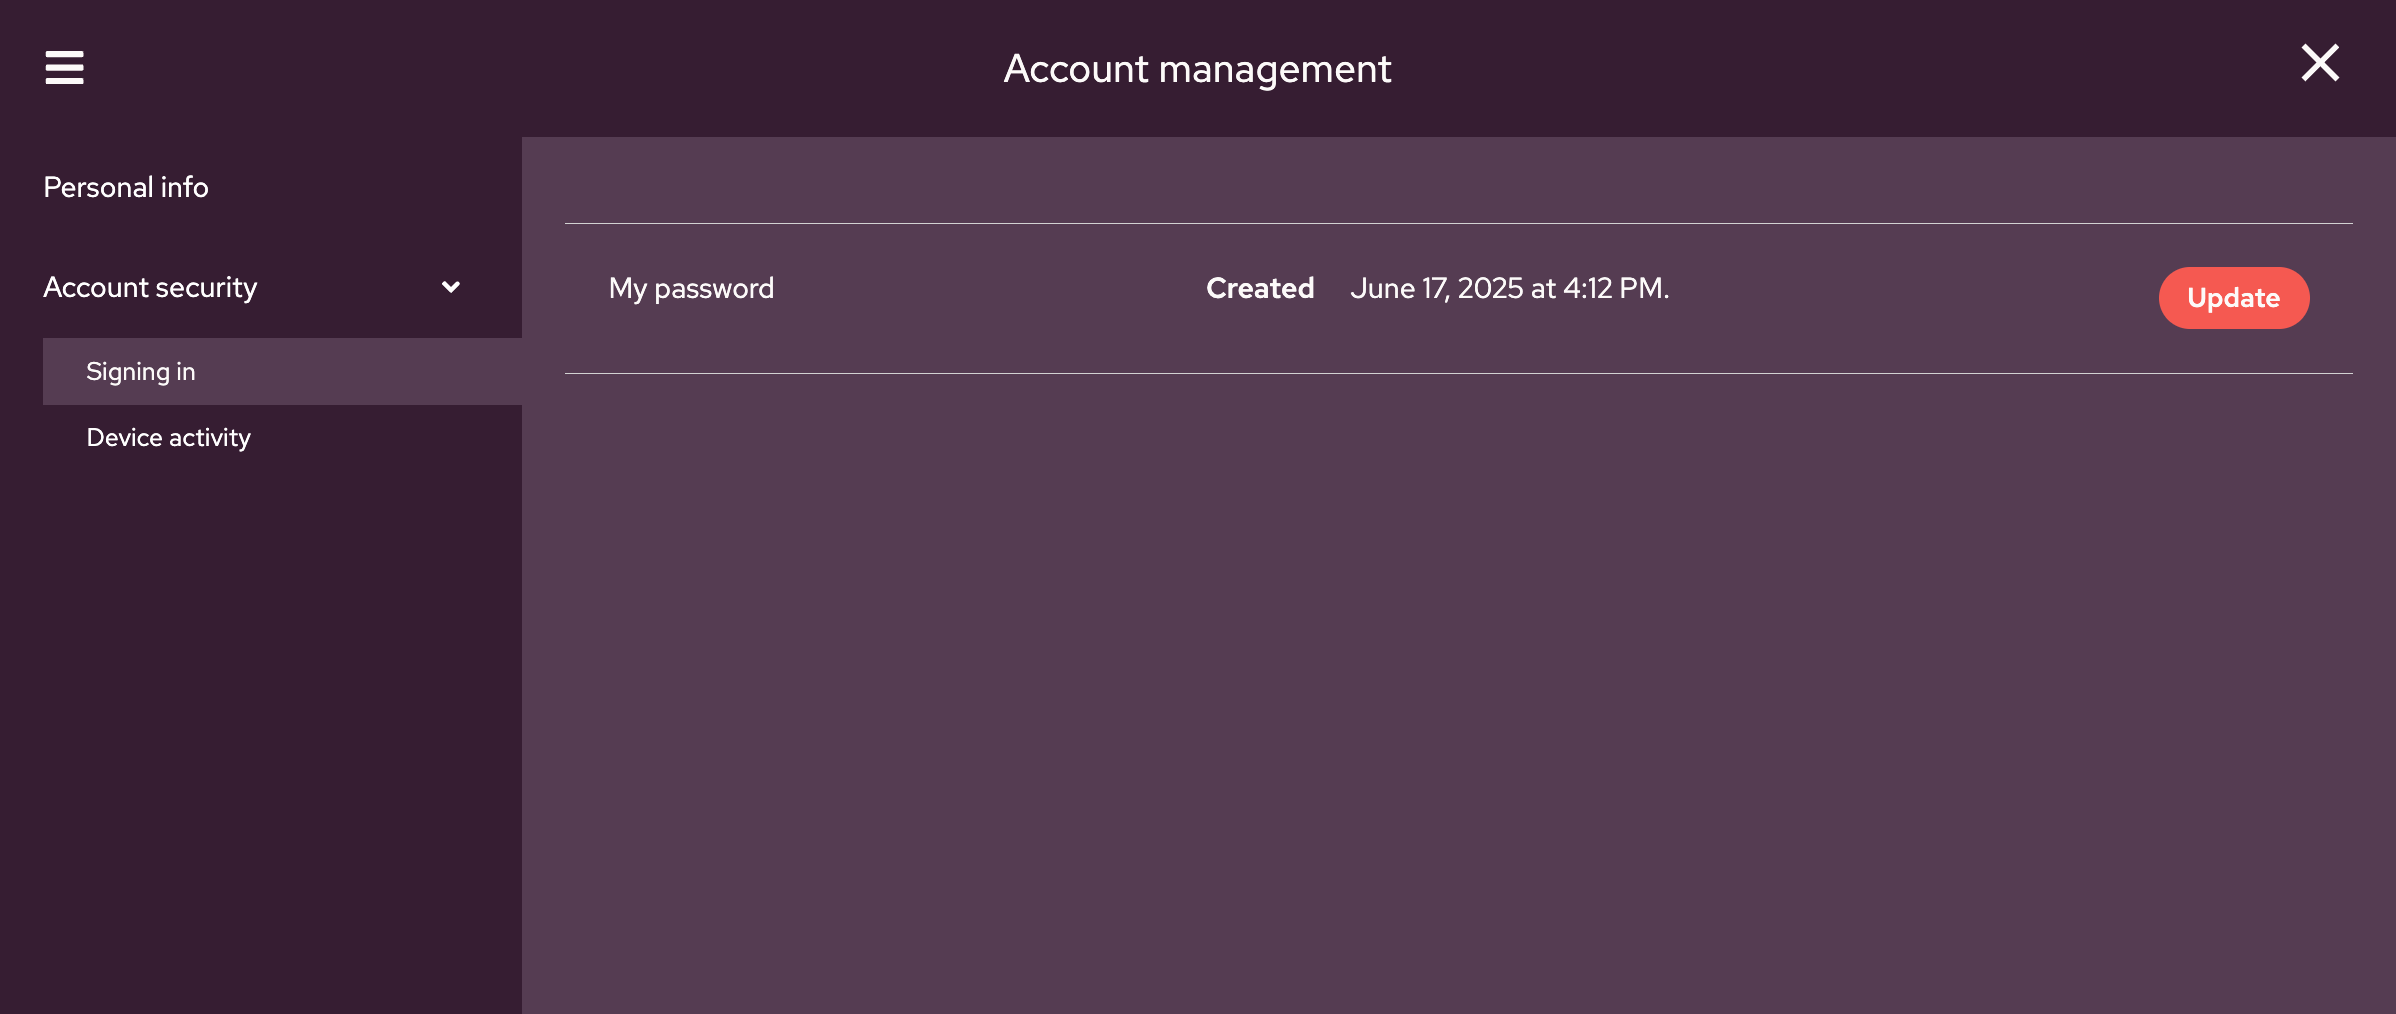
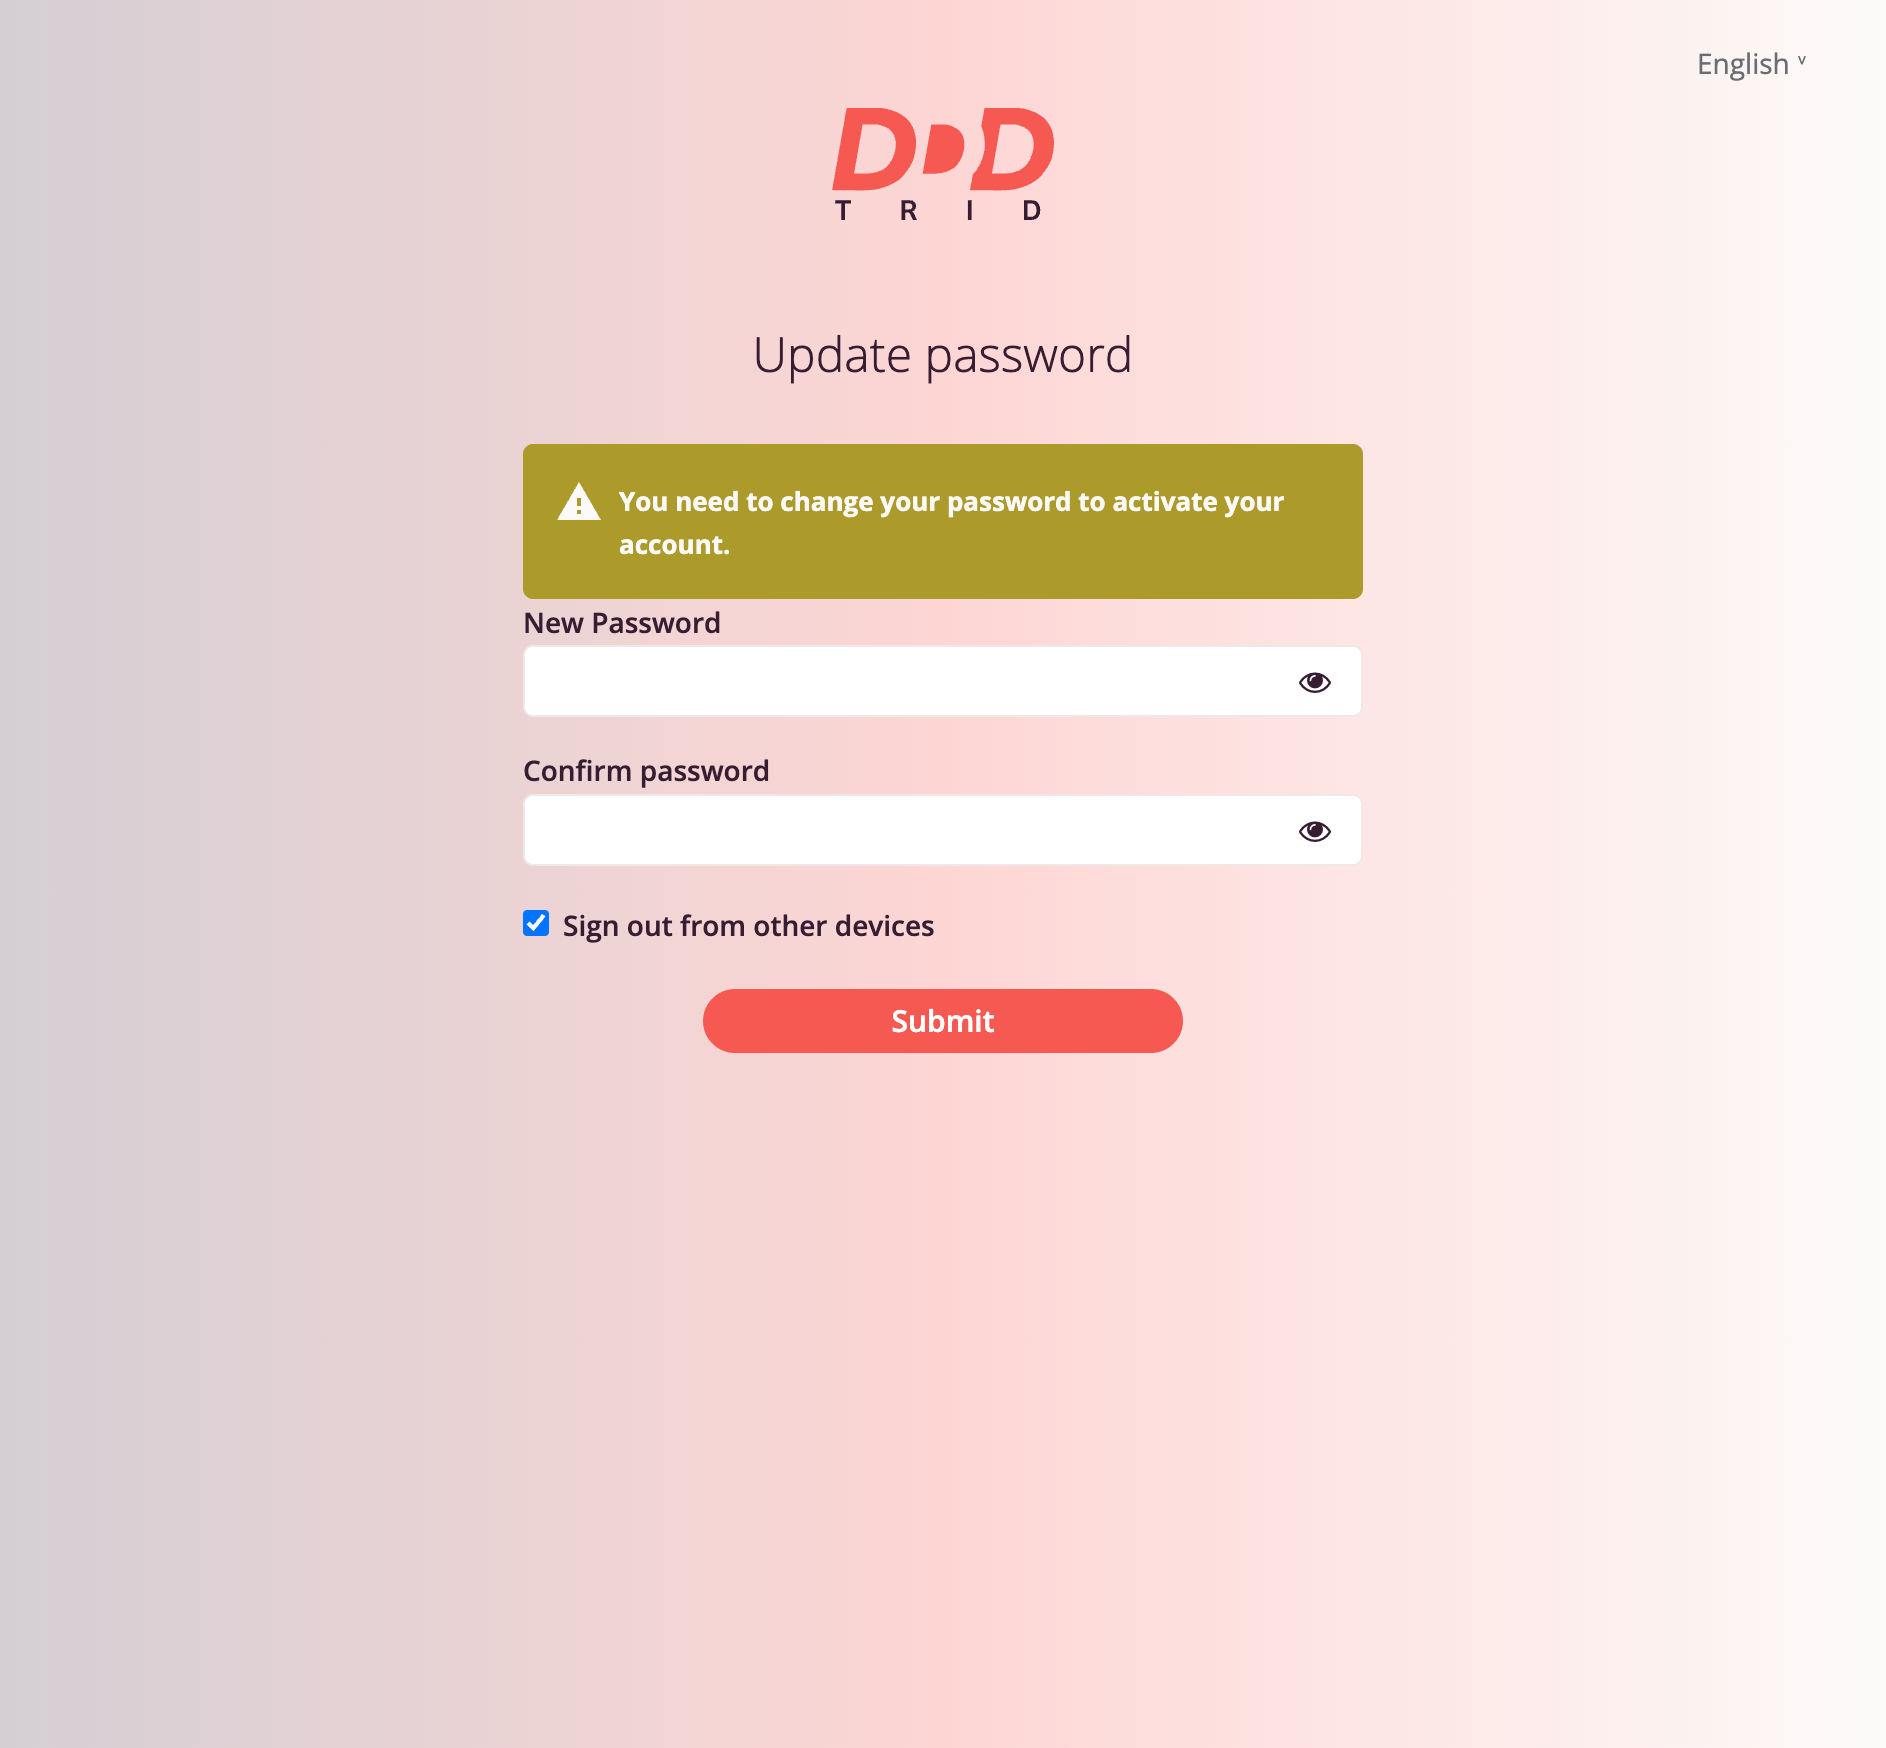
After selecting the "Login" option in security settings, users are taken to a page displaying account registration information and the ability to change the current password.
When selecting the "Update" option, users are presented with the password change interface:
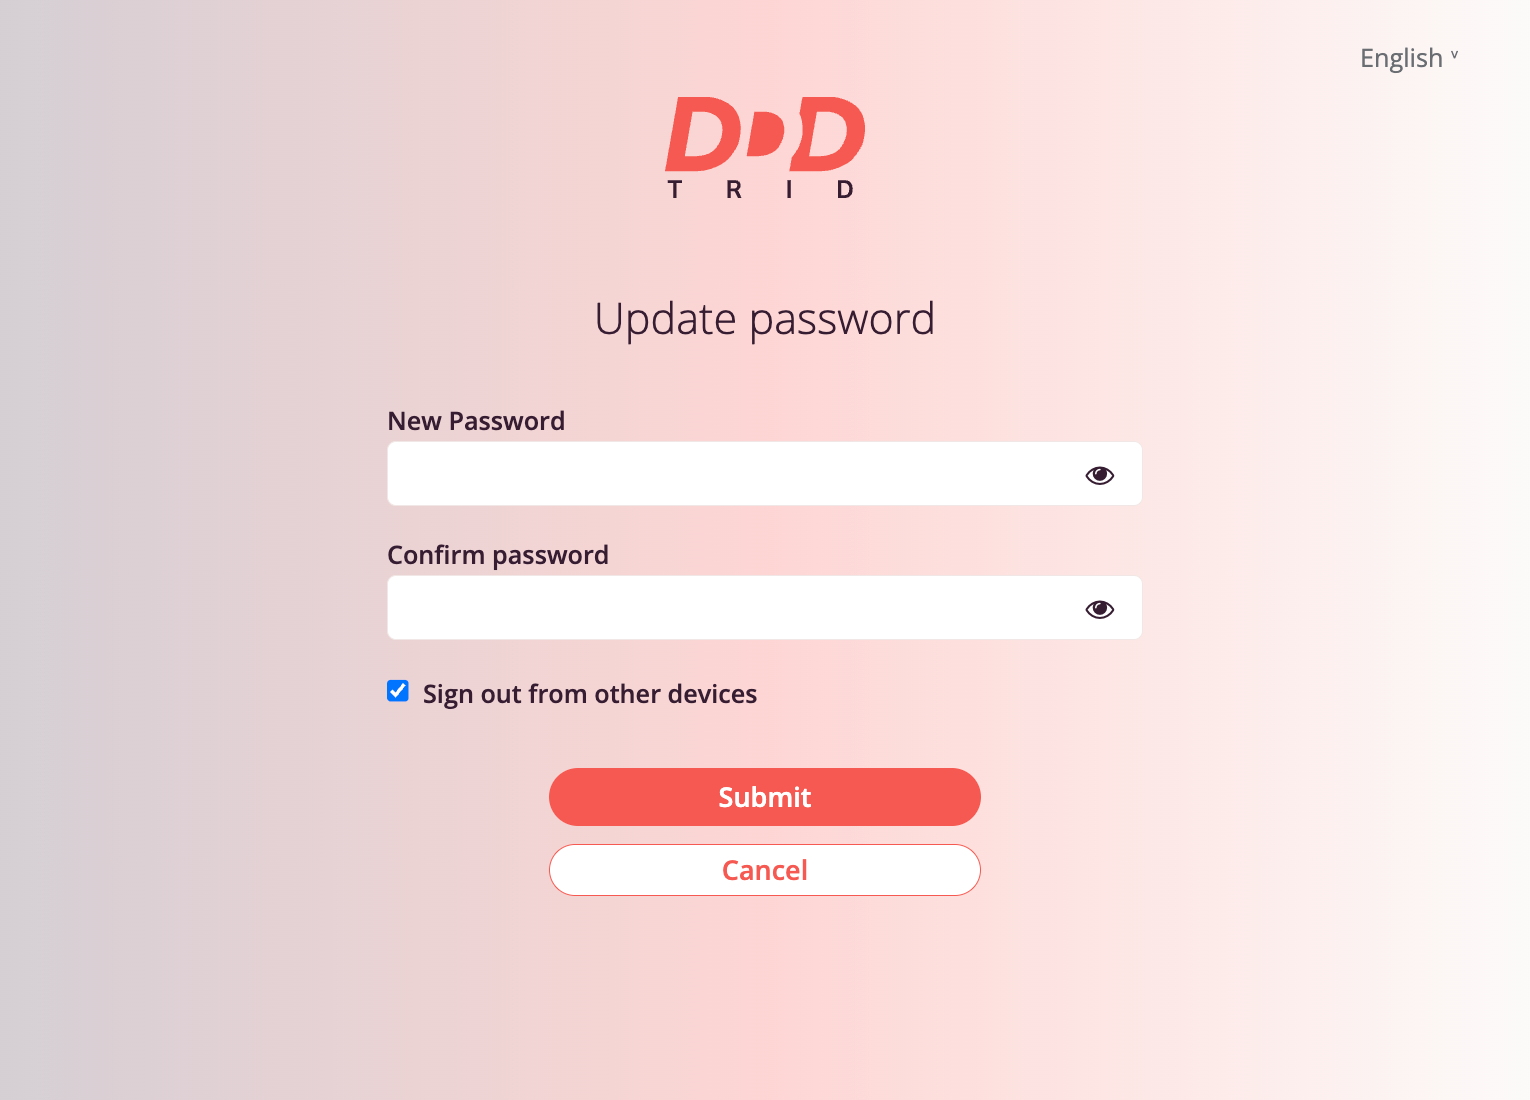
To change the password, users must enter a new password in the "New Password" field, confirm it by entering the same password in the "Confirm Password" field, and click the "Confirm" button.
Users have the option to log out of sessions on other devices by checking "Log out on other devices" and clicking the "Confirm" button.
The "Cancel" button allows returning to the previous page without changing the password.
Viewing Active Sessions
After selecting the "Active Devices" option in security settings, users are taken to a page displaying information about active sessions for the current account.
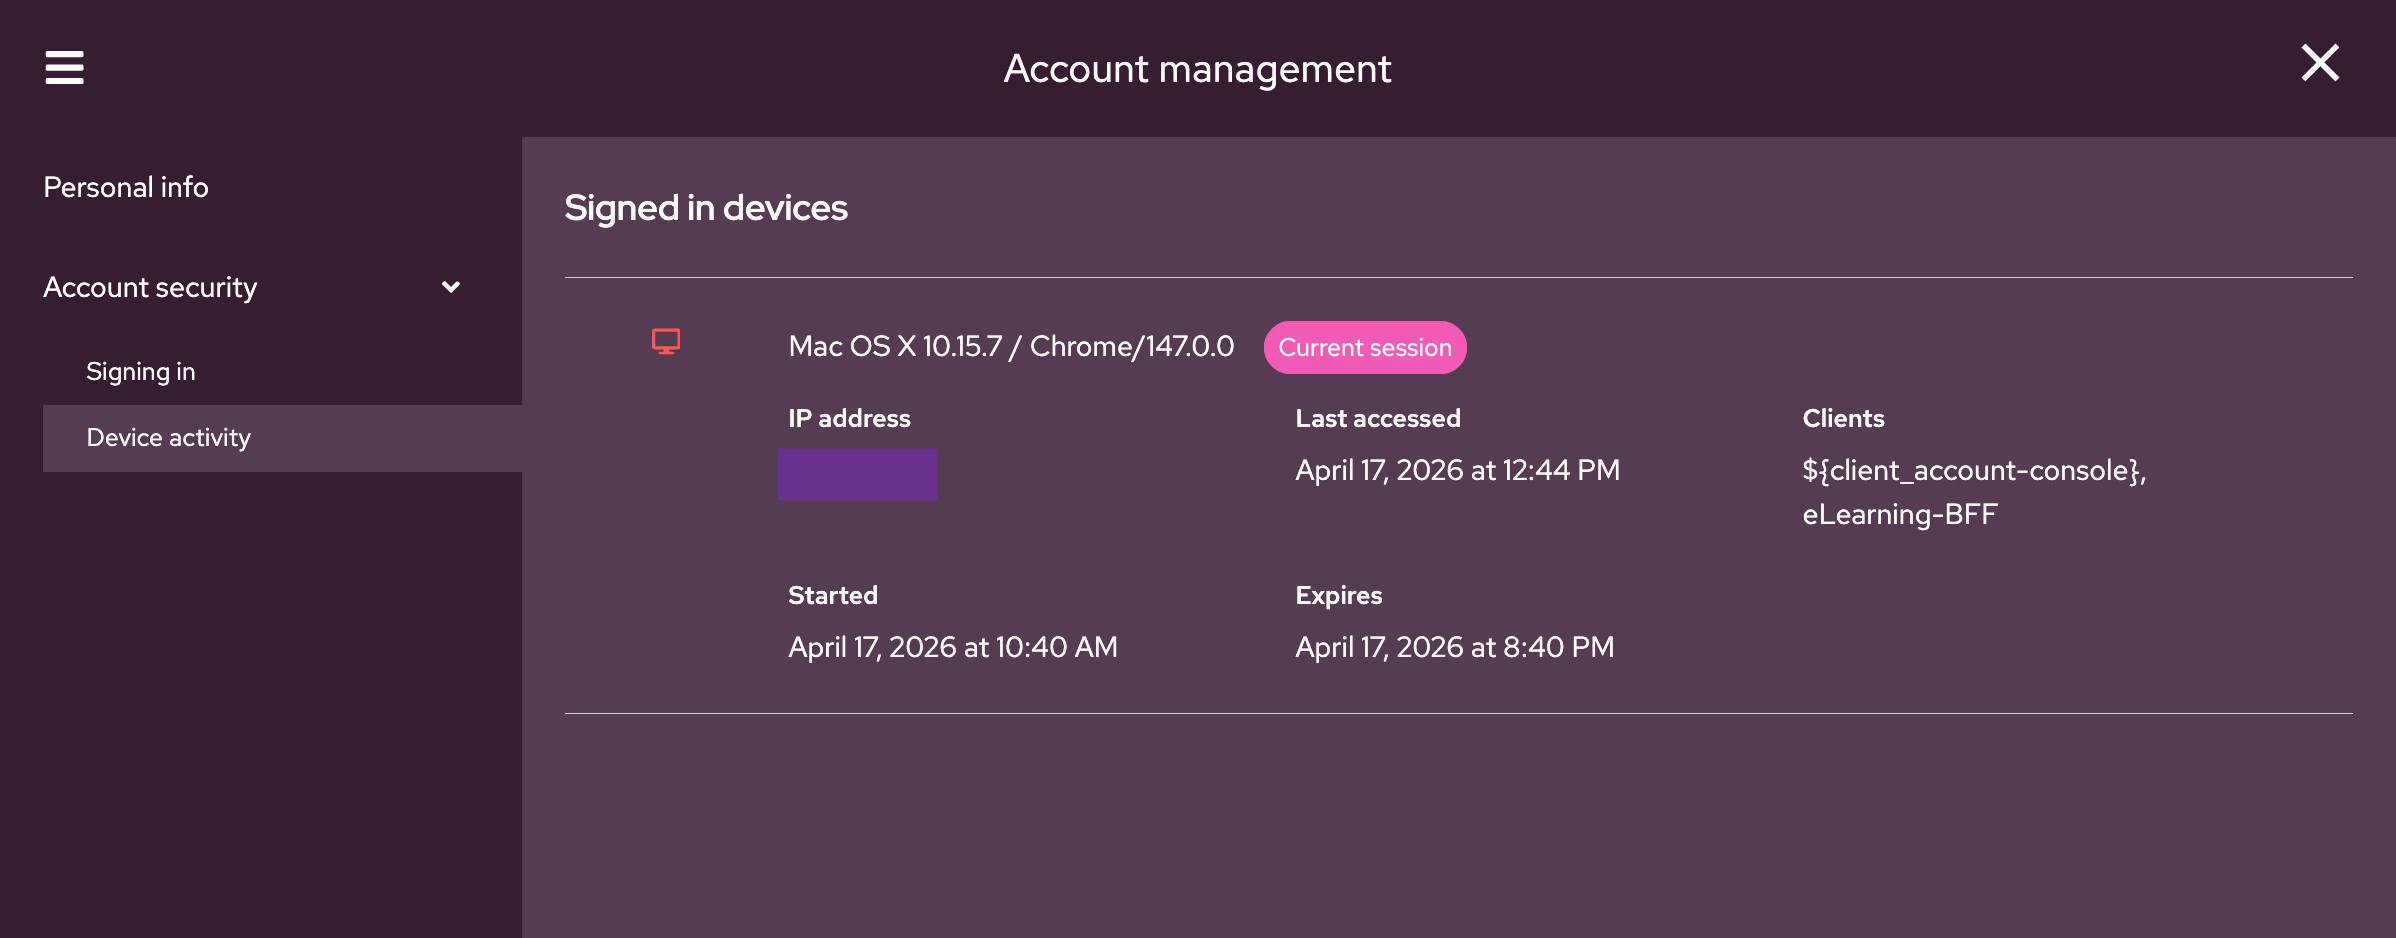
Users have access to information about the operating system, IP address, session start time, and session end time.
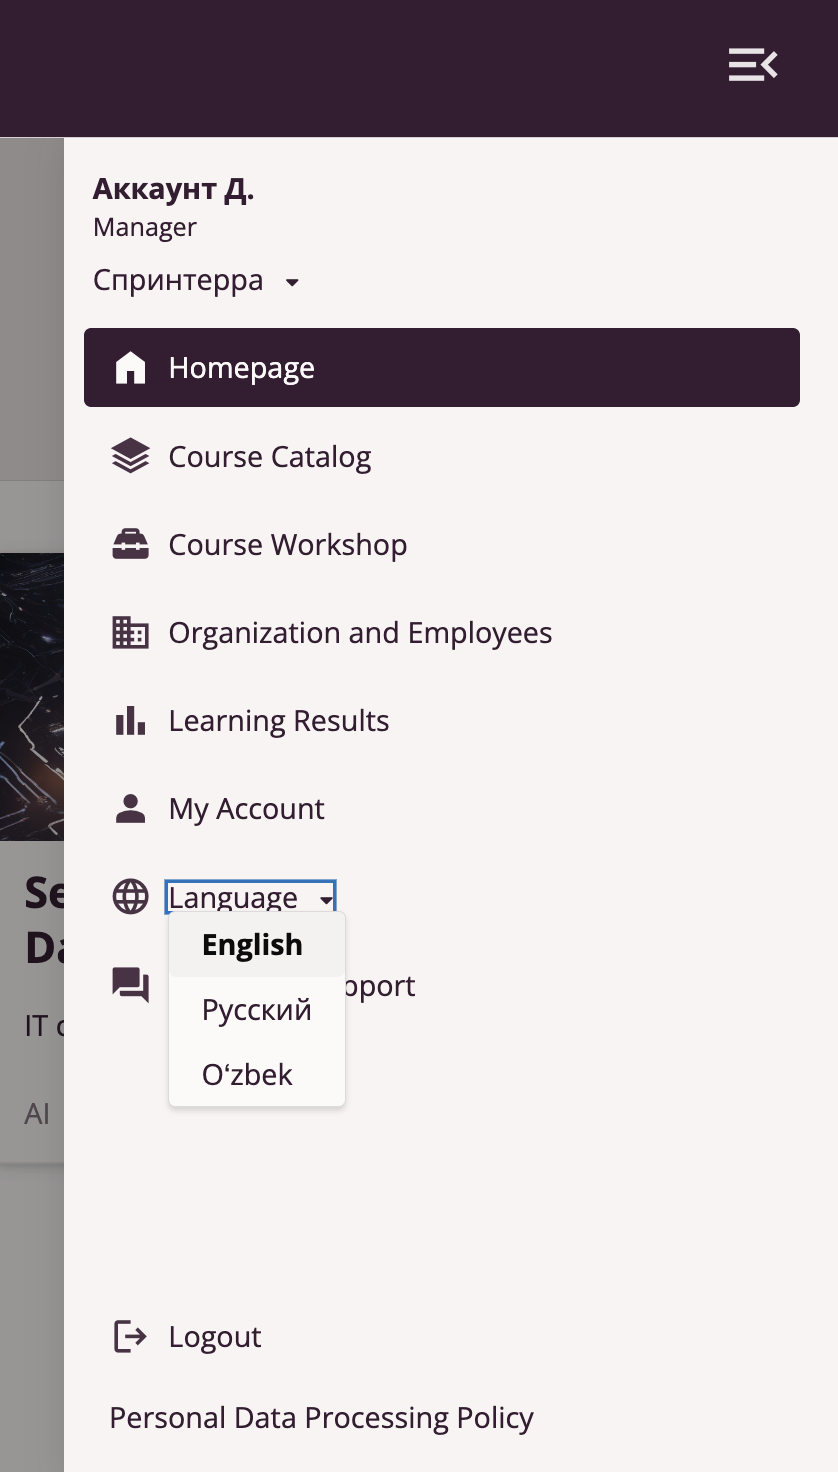
Language
This functionality is available to all roles and allows switching between interface languages in the Tri-D system. Currently available languages:
- Russian
- English
- Uzbek
User Support
This functionality is available to all roles and allows sending feedback and suggestions to the Tri-D system support service.
Clicking the Tri-D system main menu item displays a window with a text input field:
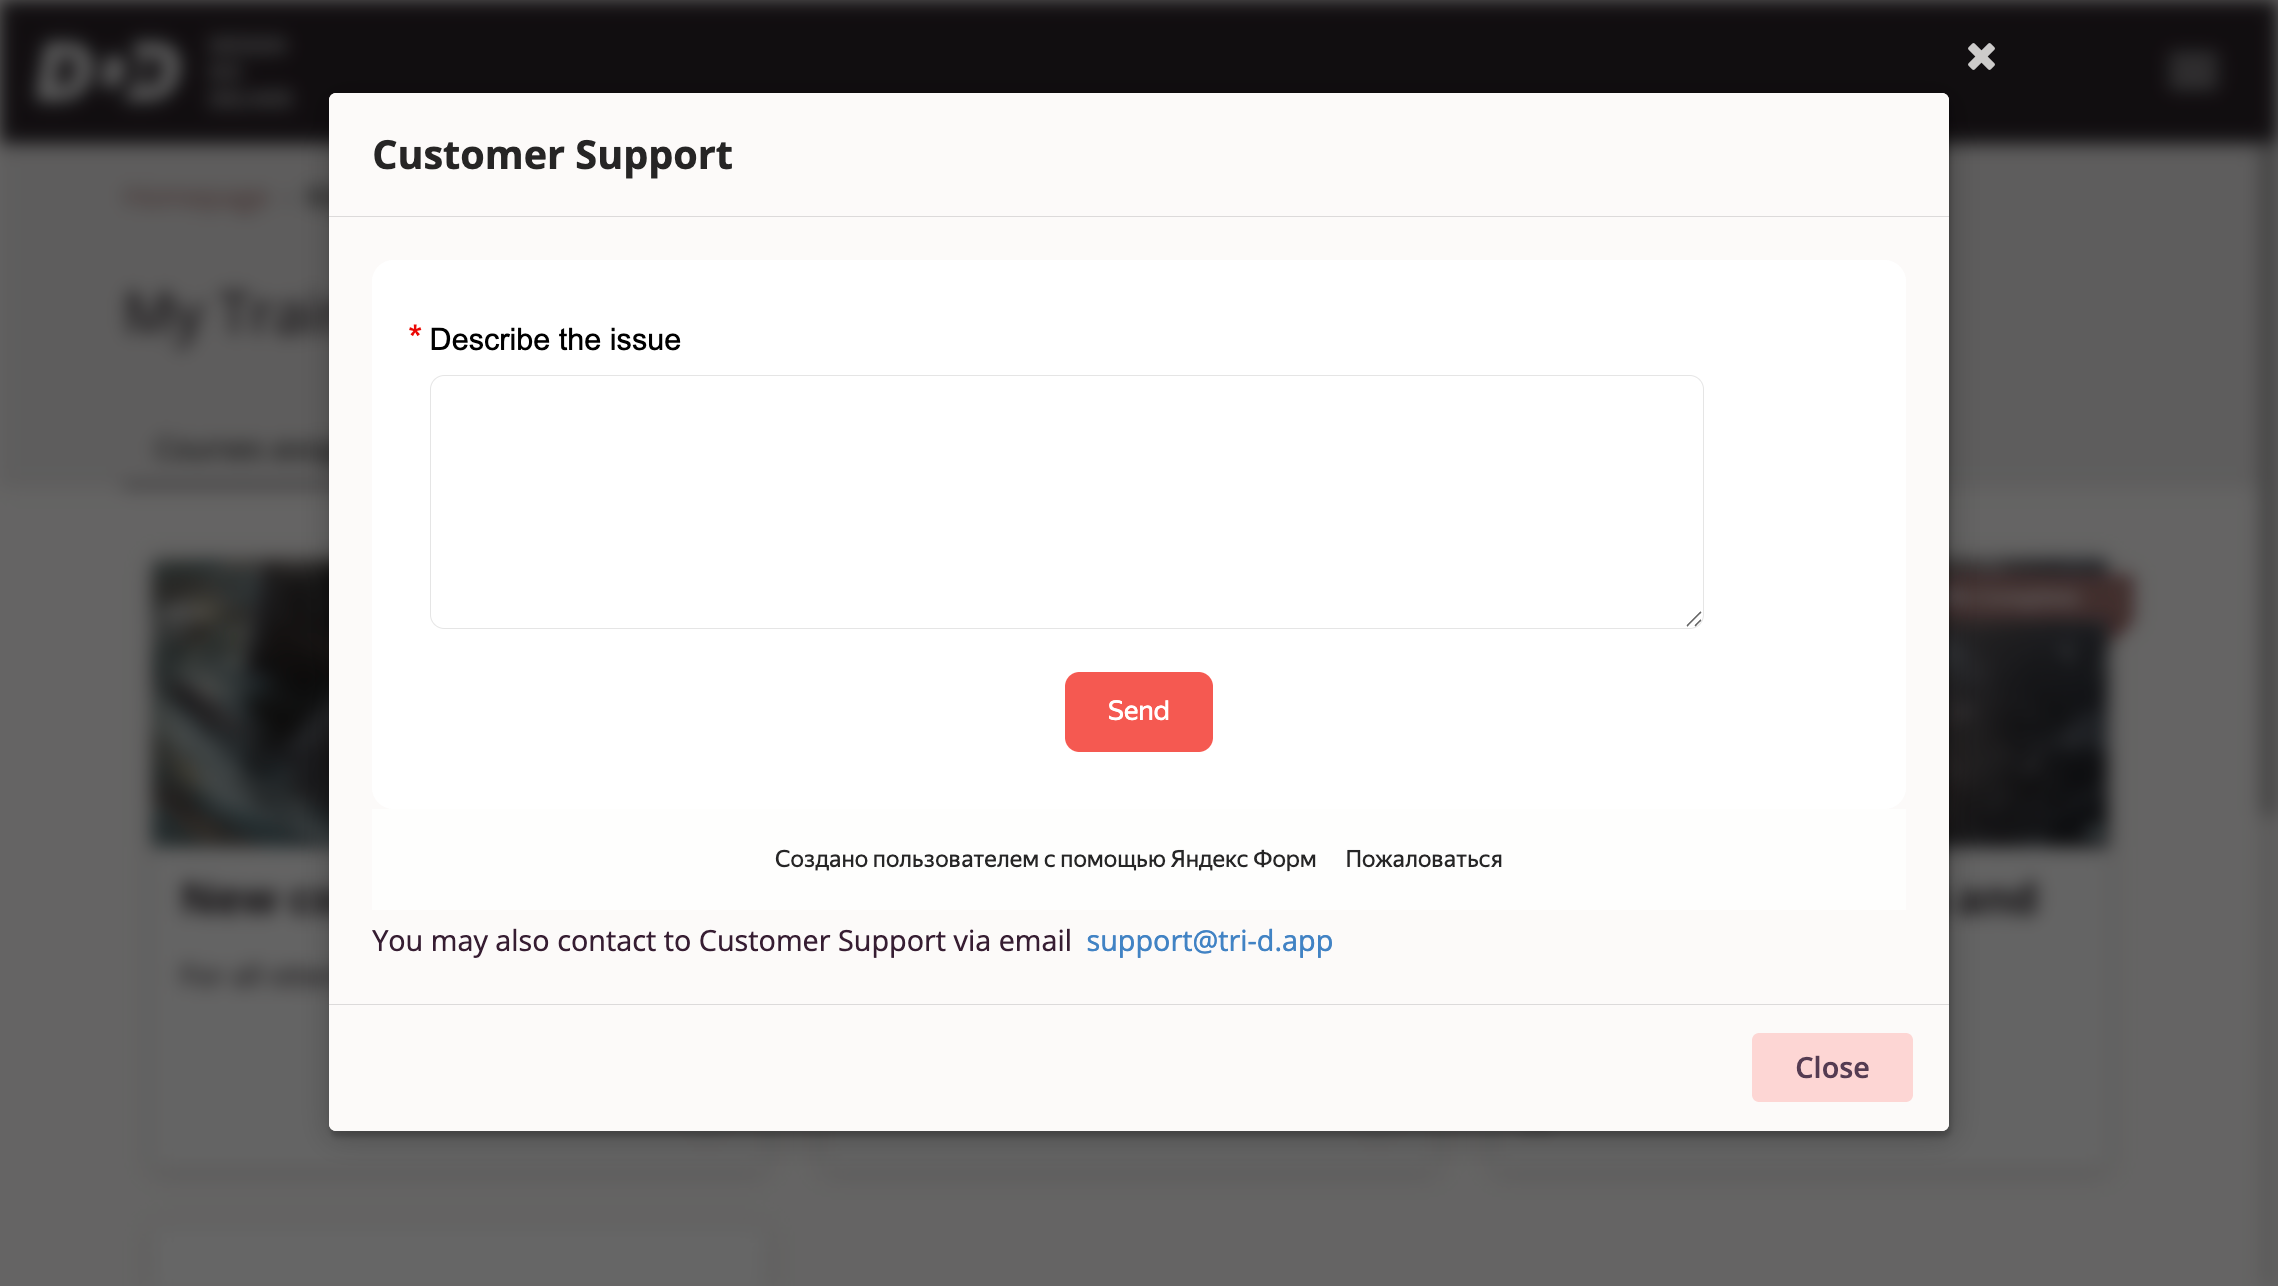
To send your message, type it in the input field and click "Send". Be sure to include your contact information for follow-up.
Logging Out of Your Account
Users can log out of their account by selecting the "Log Out" option in the Tri-D system main menu — in this case, the user will be redirected to the authorization page from which they can log back into the Tri-D system.
Completing Work with the Software
To end a session with the Tri-D system, simply close the browser page.
Emergency Situations
If problems arise with normal software operation, contact user support — write to the email address support@tri-d.app or via the support form on the website https://tri-d.app/.